Advertisement
Quick Links
Advertisement

Subscribe to Our Youtube Channel
Related Manuals for pitsco Tetrix Flex-Build Robot Chassis


Summary of Contents for pitsco Tetrix Flex-Build Robot Chassis
- Page 1 Flex-Build Robot Chassis Build Instructions 79289...
- Page 2 SolidWorks® Composer™ and KeyShot® renderings by Tim Lankford and Jason Redd. Desktop publishing by Todd McGeorge. ©2022 Pitsco Education, LLC, 915 E. Jefferson, Pittsburg, KS 66762 All rights reserved. This product and related documentation are protected by copyright and are distributed under licenses restricting their use, copying, and distribution.
-
Page 3: Table Of Contents
Table of Contents Preface Introduction...................................... 2 Safety Information ..................................3 Set Components TETRIX® Flex-Build Robot Chassis Components ......................4-7 TETRIX Flex-Build Robot Chassis Assembly Robot 1 – Standard TETRIX Wheels with short wheelbase ..................8-17 Robot 2 – Mecanum Wheel Chassis ..........................18-26... -
Page 4: Preface
Additional parts, tools, and elements can be utilized to create larger or more complex robots. These, as well as other resources such as videos, technical information, alternative inspirational builds, subassemblies, and activities, can be found at Pitsco.com. Robo-Rail Features: • The enclosed extrusion is stronger with less flex or bend than traditional channels. It makes for a much more rigid build. -
Page 5: Safety Information
Back to Table of Contents Safety Information Mechanical • Keep fingers, hair, and loose articles of clothing clear of gears and moving parts. • Never pick up the robot while it is moving or the servo motors are running. • Remove any burrs caused by cutting the metal beams. •... -
Page 6: Set Components
Back to Table of Contents Flex-Build Robot Chassis Set Components... - Page 7 Back to Table of Contents Flex-Build Robot Chassis Parts Index Robo-Rails 92311 TETRIX® Robo-Rail (7-hole) (16 mm x 32 mm x 128 mm) ..2 92313 TETRIX® Robo-Rail (11-hole) (16 mm x 32 mm x 192 mm) ..2 92316 TETRIX®...
- Page 8 Back to Table of Contents Flex-Build Robot Chassis Hardware Components Overview The following mechanical parts overview includes elements from the TETRIX Flex-Build Robot Chassis. TETRIX MAX Robo-Rail elements are identified by length in millimeters or by the number of large holes down their face.
- Page 9 Back to Table of Contents Motion Elements Socket Head Cap Screw 6-32 x 7/8" 92368 Socket Head Cap Screw 6-32 x 1/2" 39097 Motor Hub 39079 DC Motor Mount 39376 TorqueNADO Motor 44260 Mecanum Wheel Set (4 wheels with hub) 45320 4"...
-
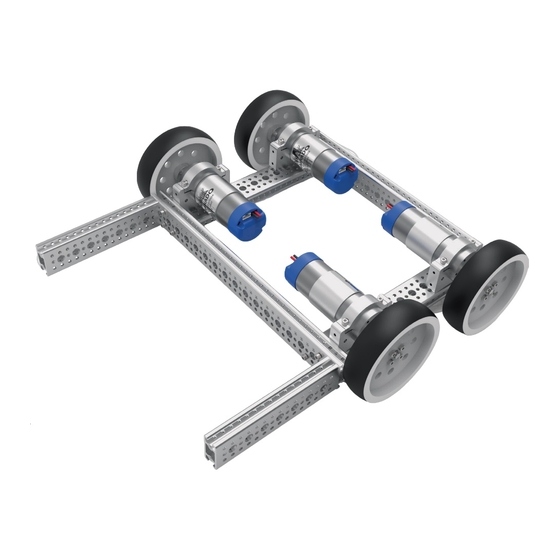
Page 10: Robot 1 - Standard Tetrix Wheels With Short Wheelbase
• The shorter wheelbase allows for more up-front space for attaching other mechanisms. • The standard wheels shown here can easily be swapped out for mecanum wheels to allow for more maneuverability. TETRIX Flex-Build Robot Chassis Assembly... - Page 11 Back to Table of Contents Finished chassis should look like this. TETRIX Flex-Build Robot Chassis Assembly...
- Page 12 Back to Table of Contents Step 1 Tip: You can identify the correct length of Robo-Rail by counting the large holes. Step 2 TETRIX Flex-Build Robot Chassis Assembly...
- Page 13 Then retighten all screws. Step 4 Tip: Loosen the top screws into the motor mounts to make it easier to put the screw in from the side. Then retighten all screws. TETRIX Flex-Build Robot Chassis Assembly...
- Page 14 Back to Table of Contents Step 5 Step 6 TETRIX Flex-Build Robot Chassis Assembly...
- Page 15 Back to Table of Contents Step 7 Tip: Rotating the motor in the motor mount will impact the final height of the chassis due to the off- set motor shaft. Step 8 TETRIX Flex-Build Robot Chassis Assembly...
- Page 16 Tip: Tighten the set screw on the motor hubs against the flat side of the D-shaped motor output shaft. Step 10 Tip: Tighten the set screw on the motor hubs against the flat side of the D-shaped motor output shaft. TETRIX Flex-Build Robot Chassis Assembly...
- Page 17 Back to Table of Contents Step 11 Step 12 TETRIX Flex-Build Robot Chassis Assembly...
- Page 18 Back to Table of Contents Finished chassis. TETRIX Flex-Build Robot Chassis Assembly...
- Page 19 Back to Table of Contents Variations on Robot 1 – Standard TETRIX Wheels long and short wheelbase TETRIX Flex-Build Robot Chassis Assembly...
-
Page 20: Robot 2 - Mecanum Wheel Chassis
• The mecanum wheels can be swapped out for standard wheels that provide better traction or for driving over uneven terrain. • The longer wheelbase gives more balance and helps avoid tipping. TETRIX Flex-Build Robot Chassis Assembly... - Page 21 Back to Table of Contents Finished chassis should look like this. TETRIX Flex-Build Robot Chassis Assembly...
- Page 22 Back to Table of Contents Step 1 Tip: You can identify the correct length of Robo-Rail by counting the large holes. Step 2 TETRIX Flex-Build Robot Chassis Assembly...
- Page 23 Then retighten all screws. Step 4 Tip: Loosen the top screws into the motor mounts to make it easier to put the screw in from the side. Then retighten all screws. TETRIX Flex-Build Robot Chassis Assembly...
- Page 24 Back to Table of Contents Step 5 Step 6 TETRIX Flex-Build Robot Chassis Assembly...
- Page 25 Back to Table of Contents Step 7 Tip: Rotating the motor in the motor mount will impact the final height of the chassis due to the off-set motor shaft. Step 8 TETRIX Flex-Build Robot Chassis Assembly...
- Page 26 Tip: Tighten the set screw on the motor hubs against the flat side of the D-shaped motor output shaft. Step 10 Tip: Tighten the set screw on the motor hubs against the flat side of the D-shaped motor output shaft. TETRIX Flex-Build Robot Chassis Assembly...
- Page 27 Back to Table of Contents Finished chassis. TETRIX Flex-Build Robot Chassis Assembly...
- Page 28 Back to Table of Contents Variations on Robot 2 – Mecanum Wheel Chassis TETRIX Flex-Build Robot Chassis Assembly...
- Page 29 Flex-Build Robot Chassis Call Toll-Free Visit Us Online at 800•835•0686 Pitsco.com...
Need help?
Do you have a question about the Tetrix Flex-Build Robot Chassis and is the answer not in the manual?
Questions and answers