Goosky S2 Manual
Hide thumbs
Also See for S2:
- Quick start manual (9 pages) ,
- Manual (13 pages) ,
- Instruction manual (32 pages)
Advertisement
Quick Links
Advertisement

Related Manuals for Goosky S2


Summary of Contents for Goosky S2
- Page 1 Flight Control Setting...
- Page 2 Turn on the GOOSKY T8 transmitter, press the BIND button for 3 times after the helicopter is powered on. The blue light flashes quickly. Keep the transmitter less than one meter away from the flight control. The flight control passes self-detection when the blue light is solid on. Then the binding is done.
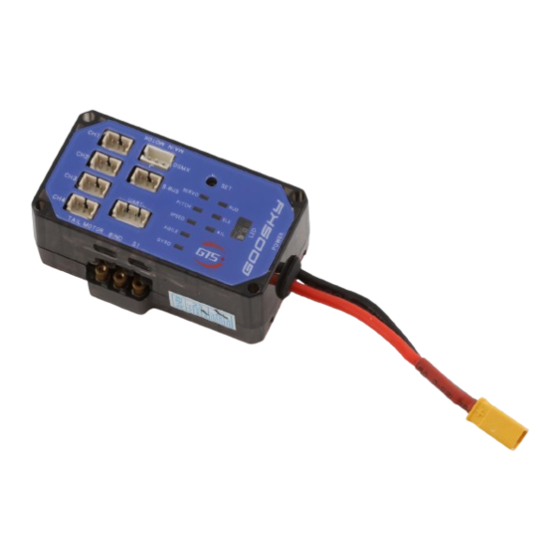
- Page 3 <Schematic diagram of flight control parameter adjustment> SET setting menu button SERVO servo midpoint setting RUD direction parameter adjustment mode PITCH pitch setting ELE up and down parameter adjustment mode SPEED speed indicator AIL Aileron tuning mode AGILE sensitivity indicator S1 On/Off Attitude Mode GYRO sensitivity indicator Note: Bind the remote controller to the aircraft, and wait for the flight controller to...
- Page 4 Long Press and hold SET for 3 seconds → RUD is solid on → SPEED flashes Direction hovering speed setting Long press the button for 3 seconds to enter the tuning mode. Short press the SET button until the indicator is solid on in white, the SPEED blue light flashes, and the factory default hover...
- Page 5 <Direction feel setting> RUD is solid on → click SET → GYRO flashes Direction Hovering sensitivity setting Press and hold the SET button for 3 seconds to enter the tuning mode, short press the SET button until the indicator light RUD is solid on, GYRO flashes, the factory default sensitivity GYRO flashes 5 times, use the remote control to raise and lower the gear forward and downshift to...
- Page 6 <Elevation feel setting> Press and hold SET for 3 seconds → ELE is Solid on → SPEED flashes Press and hold the button for 3 seconds to enter the tuning mode. Short press the SET button to select the option until the indicator light is always on, SPEED...
- Page 7 <Elevation feel setting> ELE is solid on → click SET → AGILE flashes Elevation sensitivity setting Press and hold the button for 3 seconds to enter the tuning mode. Short press the SET button until the indicator light solid on, AGILE flashes, the factory default value is AGILE flashes 5 times.
- Page 8 <Elevation feel setting> ELE is solid on → click SET → GYRO flashes Elevation sensitivity setting Press and hold the button for 3 seconds to enter the tuning mode. Short press the SET button until the indicator light is solid on, GYRO flashes, and the factory default sensitivity is GYRO flashes 5 times.
- Page 9 <Aileron feel setting> Long press SET for 3 seconds → AIL is solid on → SPEED flashes Aileron rollover rate setting Press and hold the button for 3 seconds to enter the adjustment mode. Short press the SET button to select the white light is solid on, SPEED blue light flashes, and the factory default flip speed SPEED...
- Page 10 <Aileron feel setting> AIL is solid on → click SET → AGILE flashes Aileron sensitivity setting Press and hold the button for 3 seconds to enter the adjustment mode. Short press the SET button to select the white light is solid on, AGILE blue light flashes, and the factory default AGILE flashes 5 times.
- Page 11 <Aileron feel setting> AIL is solid on → click SET → GYRO flashes Aileron Gain Setting Press and hold the button for 3 seconds to enter the adjustment mode, short press the SET button to select the white light is solid on, GYRO blue light flashes, and the factory default GYRO flashes 5 times.
- Page 12 <Servo center point setting> click SET → AGILE flashes Press and hold the button for 3 seconds to enter the tuning mode. Short press the SET button to select the option until the indicator SERVO blue light is solid on, use the aileron, lift, and direction on the remote control to set the servo center.
- Page 13 <Description of remote control functions> Remote control key description Note: Take the left-hand throttle as the column. 姿态模式: Altitude Mode 手动模式: Manual Mode 手动模式: Manual Mode 油门: Throttle 前后, 左右: Front & Back, Left & Right 方向: Direction 吊环: Ring Note: Take the left-hand throttle for example.
- Page 14 <Collective pitch setting> Click SET→PITCH is solid on Collective pitch setting Press and hold the button for 3 seconds to enter the tuning mode. Short press the option until the PITCH blue light is solid on, turn on HOLD button on the remote control, the accelerator is in the protection state.
- Page 15 <Restore factory settings> Click SET 10 times Restore factory settings Bind the remote controller to the aircraft (wait for the flight controller initialization to complete), and then press the button 10 times. At this time, the flight controller indicator LEDs flash red and blue together.
- Page 16 <S1 function introduction> Attitude mode on/off setting 1. Press and hold the button for seconds, the flight control indicator light is solid on in green to turn off Altitude mode; 2. Press and hold the button for seconds, the green light of the flight control indicator turns off.
- Page 17 <Schematic diagram of flight control parameter adjustment> The blue light flashes, White light is soli on Push the Elevation stick the factory default flashes continuously for forward (upshift) 5 cycles. Push the Elevation stick RUD direction SPEED speed backward (downshift) GYRO gain The number of consecutive ELE lift...
Need help?
Do you have a question about the S2 and is the answer not in the manual?
Questions and answers