Goosky S2 Manual
Hide thumbs
Also See for S2:
- Quick start manual (9 pages) ,
- Manual (17 pages) ,
- Instruction manual (32 pages)
Advertisement
Quick Links
Advertisement

Related Manuals for Goosky S2


Summary of Contents for Goosky S2
- Page 1 Flight Control Setting...
- Page 2 Binding with in-built Receiver: Goosky T8: Turn on the GOOSKY T8 transmitter,2.4Ghz press the BIND button 3 times after the helicopter is powered on. The blue light will flash quickly. Keep the transmitter less than one meter away from the flight controller.
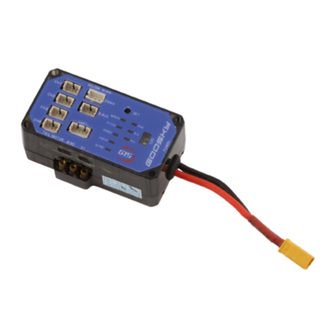
- Page 3 SET - Setting menu button S1 - On/Off Attitude Mode button LEDs: SERVO - Servo midpoint settings (swash levelling) PITCH - Pitch setting (Positive and negative pitch) SPEED - Speed indicator (Rotation rate) AGILE - Sensitivity indicator (Feed forward) GYRO - Sensitivity indicator (Gyro gain) RUD - Yaw parameter adjustment mode ELE –...
- Page 4 To enter the menu, long press and hold SET for 3 seconds → RUD light is solid-on → SPEED light flashes Yaw speed setting (rotation rate) With the light solid-on in white and the SPEED blue light flashing, you are reading the yaw speed setting.
- Page 5 Press and hold the SET button for 3 seconds to enter the tuning mode, short press the SET button until the indicator light is solid-on and the GYRO light flashes. The factory default yaw gain is 5 and you will see the BLUE light flashing 5 times followed by a pause.
- Page 6 Elevator agility setting (feed forward) Press and hold the SET button for 3 seconds to enter the tuning mode, short press the SET button until the indicator light is solid-on and the AGILITY light flashes. The factory default elevator agility is 5 and you will see the BLUE light flashing 5 times followed by a pause.
- Page 7 flashes. The factory default elevator gain is 5 and you will see the BLUE light flashing 5 times followed by a pause. You can use the Elevator stick of the transmitter to raise and lower the setting, forward stick giving a higher setting (higher gain) and back stick to give a lower setting.
- Page 8 Aileron agility setting (feed forward) Press and hold the SET button for 3 seconds to enter the tuning mode, short press the SET button until the indicator light is solid-on and the AGILITY light flashes. The factory default aileron agility is 5 and you will see the BLUE light flashing 5 times followed by a pause.
- Page 9 Press and hold the SET button for 3 seconds to enter the tuning mode, short press the SET button until the indicator light is solid-on and the GYRO light flashes. The factory default aileron gain is 5 and you will see the BLUE light flashing 5 times followed by a pause.
- Page 10 Collective pitch setting Press and hold the SET button for 3 seconds to enter the tuning mode, short press the SET button until the SERVO light is solid-on. Confirm throttle hold is enabled on the transmitter. Move the throttle/collective stick to the middle position (50%) and zero your pitch gauge.
- Page 11 Bind the transmitter to the aircraft (wait for the flight controller initialization to complete), and then press the button 10 times. At this time, the flight controller indicator LEDs flash red and blue together. After the flight controller initialization is completed, the factory settings are restored. S1 function introduction The attitude mode (self levelling) can be switched via the transmitter or manually set via the buttons on the flight controller.
- Page 12 Manual attitude mode on/off setting 1. Press and hold the button for seconds, the flight control indicator light is solid-on in green - the attitude mode is switched off 2. Press and hold the button for seconds, the green light of the flight control indicator turns off - the Altitude mode is switched on.
- Page 13 GYRO gain Blue light is always on Yaw corresponds to CH1 SERVO servo midpoint setting Elevator corresponds to CH2 Aileron corresponds to CH3...
Need help?
Do you have a question about the S2 and is the answer not in the manual?
Questions and answers
S2had been flying great then for no obvious reason it did not initialize, did bind process with no change.. replaced fc board and esc board and still will not initialize
The context does not provide specific reasons for the Goosky S2 not initializing after replacing the flight controller and ESC board. However, possible reasons could include incorrect wiring, incompatible firmware, or a need for calibration such as the undocumented auto-level calibration procedure mentioned.
This answer is automatically generated