
Related Manuals for Ascentac OCI600


Summary of Contents for Ascentac OCI600
- Page 1 OCI600 Optical Cable Identifier User Guide _ Version 1.0 Ascentac Inc. www.ascentac.com 07-398-1000 07-398-3965 sales@ascentac.com...
- Page 2 Ascentac. Disclaimer Ascentac shall not be liable for errors contained herein or for incidental or consequential damages in connection with the furnishing, performance, or use of this user guide.
- Page 3 The label with S/N has been altered or damaged. Notice: Ascentac makes no warranty of any kind with regard to the content in this document, including, but not limited to, the implied warranties of merchantability and fitness for a particular purpose.
- Page 4 Service & Support If you have any questions or need any assistance, please contact our service center. Kaohsiung Office TEL: +886-7-398-1000 FAX: +886-7-398-3965 Address: 11F.-1, No.80, Minzu 1st Rd., Sanmin Dist., Kaohsiung City 80761, Taiwan (R.O.C.) Please prepare below information before you contact us and describe the problems.
-
Page 5: Table Of Contents
Content 1. Safety Information ........................1 2. Introduction ..........................2 Features ..........................3 Application ........................3 3. Layout ............................4 Appearance ........................4 Instruction .......................... 5 LED Indicator ........................5 4. Display ............................6 5. Operation ........................... 8 Power-on ..........................8 Home Screen ........................ - Page 6 5.4.3 Exit ......................... 22 Power Meter ........................22 5.5.1 Measurement ...................... 24 5.5.2 Wavelength ......................25 5.5.3 Reference Value ....................26 5.5.4 Measuring Unit ....................27 5.5.5 MAX. & MIN......................28 5.5.6 Threshold ......................29 5.5.7 Save ........................31 Loss Meter ........................
- Page 7 5.8.1.8 Storage Device ........................44 5.8.2 About ........................45 5.8.3 Exit ......................... 45 File Management ......................46 5.9.1 Report ........................47 5.9.2 Delete ........................48 5.9.3 Exit ......................... 48...
-
Page 8: Safety Information
Do not use damaged power cords, accessories or other peripheral equipment. Make sure the product is operated on the permitted ambient conditions. Never directly look into the optical outputs interface. Dangerous laser radiation: 1 | OCI600... -
Page 9: Introduction
Technicians can easily recognize whether it is the target cable through the colors Ascentac OCI 600 Series is easy to operate by its one-touch automatic testing and available to various environments because of its strong on-spot application capacity. -
Page 10: Features
2.2 Application Optical cable construction, installation & maintenance 1. Pinpoint unlabelled patch cords in the equipment room 2. Identify far-end cables under different environment like manholes, tunnels, conduits or elevated construction 3. Fiber cut, splicing, resource inventory 3 | OCI600... -
Page 11: Layout
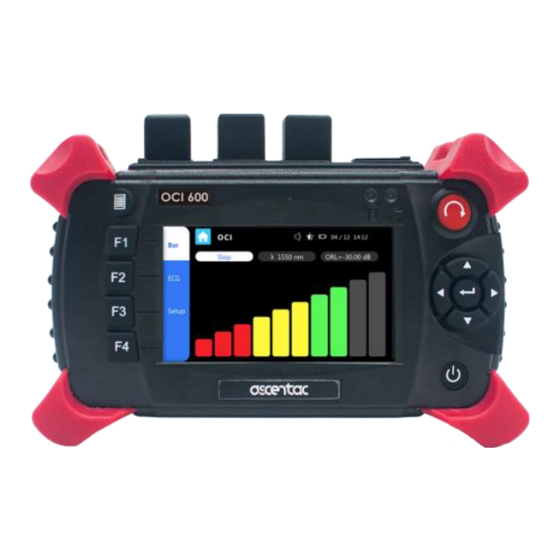
3. Layout 3.1 Appearance Front Back 4 | OCI600... -
Page 12: Instruction
: Left / Right Visual Fault Locator Menu or ESC Battery F1 to F4 Function keys Support stand 3.3 LED Indicator Icon LED Indicator LED Status Description Laser Off Laser Laser On Low battery Battery Orange Charging Green Normal 5 | OCI600... -
Page 13: Display
4. Display 6 | OCI600... - Page 14 Outputting stable light Light Source Device settings Setting ecord of saved optical File Management power value Icon Function Description Fully charged Low battery Battery status Insufficient power Charging Brightness The brightness of LCD display can be adjusted. Alert tone 7 | OCI600...
-
Page 15: Operation
] key to move to the desired function, and then short press [ ] key to enter into the home screen of the function or directly tap the function icon on the screen to enter into it. 8 | OCI600... -
Page 16: Optical Cable Identifier
] or [ ] key to move to OCI, and then short press [ ] key to enter into the home screen of optical cable identifier or directly tap [ ] on the screen to enter into it. 9 | OCI600... -
Page 17: Automatic Detection
Note To increase the accuracy of detection, please don’t hit the optical cable during detecting Please restart the automatic detection to ensure the best performance whenever you change the optical cable. 10 | OCI600... -
Page 18: Test
Yellow: The strength of signal is medium. The target cable or the cable next to it has been hit. Change the hit point or strengthen the hit. Green: The strength of signal is high. The target cable has been hit. 11 | OCI600... - Page 19 2. The color indicator will show RED when things as below happened. Optical cable return loss or total return loss is massive. The reflected amount of remote joint face is low. The value of sensitivity set manually is too low. 12 | OCI600...
-
Page 20: Ecg
ECG (Electrocardiography). Short press [ F1 ] key or directly tap [ Bar ] on the screen to be back to present whether the target cable has been hit in bar. 13 | OCI600... -
Page 21: Stop Test
5.3.4 Stop Test Short press [ ] key or directly tap [ Stop ] on the screen to stop the test and turn off the laser. 14 | OCI600... -
Page 22: Setting Volume
And then short press [ ] key or directly tap [ OK ] to confirm the setting. Short press [ ] key or directly tap [ Cancel ] to discard it. Available range: 0 to 50. Default: 25. 15 | OCI600... -
Page 23: Setting Sensitivity
Short press [ F3 ] key or directly tap [ Setup ] on the screen. Directly tap the blue button next to Sensitivity to select the level of sensitivity. (1: minimum sensitivity; 5: maximum sensitivity) 16 | OCI600... - Page 24 Maximizing the sensitivity will increase the background noise, please set up the noise cancellation to solve the problem. 2. Setting the vibration energy within two bar graph could achieve a better result when you adjust the sensitivity. 17 | OCI600...
-
Page 25: Setting Noise Cancellation
And then short press ] key or directly tap [ OK ] to confirm the setting. Short press [ ] key or directly tap [ Cancel ] to discard it. 18 | OCI600... - Page 26 After automatic detection, the value of noise detection will be automatically set to the best value based on the current environment. Turn the value down, the noise will be clearer. Turn the value up, the knocking voice will be lower. 19 | OCI600...
-
Page 27: Visual Fault Locator
] key to move to Visual Fault Locator, and then short press [ ] key to enter into the home screen of visual fault locator or directly tap [ ] on the screen to enter into it. 20 | OCI600... -
Page 28: Mode
Mode: CW 1 Hz 2 Hz 5.4.2 Laser-on & Laser-off Short press [ ] key or directly tap [ ] or [ and [ ] on the screen to turn on and off laser. 21 | OCI600... -
Page 29: Exit
] or [ ] key to move to Power Meter, and then short press [ ] key to enter into the home screen of optical power meter or directly tap [ ] on the screen to enter into 22 | OCI600... - Page 30 23 | OCI600...
-
Page 31: Measurement
(100 seconds) and Y-axis refers to the dBm. Note 1. When the measured value is above the available range, the value will be ++++. 2. When the measured value is below the available range, the value will be ----. 24 | OCI600... -
Page 32: Wavelength
5.5.2 Wavelength Short press [ F1 ] key or directly tap [ ] on the screen to select the wavelength. Wavelength: 1310 nm 1490 nm 1550 nm 1625nm 25 | OCI600... -
Page 33: Reference Value
2. Connected to another optical fiber to be tested with light source, the value displayed in the middle of the screen is the difference between the currently measured optical power value and the reference value. 26 | OCI600... -
Page 34: Measuring Unit
5.5.4 Measuring Unit Short press [ F3 ] key to switch the unit or directly tap [ Unit ] or ] on the screen to switch the unit. Unit: dBm mW (uW) 27 | OCI600... -
Page 35: Max. & Min
If you would like to cancel recording values, short press [ ] key or directly tap [ Stop ] to clean the record. Note When the record is cleaned, the value will be [ --.-- dBm ]. 28 | OCI600... -
Page 36: Threshold
[ F1 ] key or directly tap [ Thr. ] or [ ] on the screen to set the threshold. Input the value of the threshold and then directly tap [ ] on the screen. 29 | OCI600... - Page 37 White: The threshold setting is turned off. Green: The threshold setting is turned on and the measured value is less than the threshold. Red: The threshold setting is turned on and the measured value is higher than the threshold. 30 | OCI600...
-
Page 38: Save
[ Save ] on the screen to save the value. Directly tap [ ] on the screen if you would like type the file name yourself. Directly tap [ ] on the screen if you want the file name to be default. 31 | OCI600... - Page 39 Directly tap [ ] on the screen to finish saving the measured values. Note The saved files can be read in File Management. 32 | OCI600...
-
Page 40: Loss Meter
] or [ ] key to move to Loss Meter, and then short press [ ] key to enter into the home screen of optical loss meter or directly tap [ ] on the screen to enter into it. 33 | OCI600... -
Page 41: Measurement
OPM’s optical interface, and then short press [ ] or [ F4 ] key or directly tap [ ] on the screen to turn on the laser. 2. The value displayed on the screen is the loss value of optical fiber. 34 | OCI600... -
Page 42: Zero
Attach an 1m patchcord first and press [ F1 ] key or directly tap ] on the screen to complete zeroing. 5.6.3 Exit Short press [ ] key or directly tap [ ] on the screen to return to the home screen of all functions. 35 | OCI600... -
Page 43: Light Source
] or [ ] key to move to Light Source, and then short press [ ] key to enter into the home screen of optical light source or directly tap [ ] on the screen to enter into it. 36 | OCI600... -
Page 44: Mode
Mode: continue 270 Hz 1K Hz 2K Hz 5.7.2 Laser-on & Laser-off Short press [ ] key or directly tap [ ] or [ ] and ] on the screen to turn on and off laser. 37 | OCI600... -
Page 45: Exit
], [ ] or [ ] key to move to Setting, and then short press [ ] key to enter into the home screen of setting or directly tap [ ] on the screen to enter into it. 38 | OCI600... -
Page 46: Setup
5.8.1 Setup 39 | OCI600... -
Page 47: Date
] to turn to year, month or date. Tap [ off ] to turn off the on-screen keyboard and discard the setting. Tap [ ] to turn off the on-screen keyboard and confirm the setting. 40 | OCI600... -
Page 48: Time
Tap [ ] to turn off the on-screen keyboard and confirm the setting. 5.8.1.3 Sleep Mode Tap the green button next to Sleep Mode and select the time interval. (off, 30min, 60min, 90min or 120min) 41 | OCI600... -
Page 49: Backlight Auto-Off
Tap the green button next to Backlight Auto-off and select the time interval. (off, 5min, 10min, 20min or 30min) 5.8.1.5 Display Brightness Tap the green button next to Display Brightness and select the level of display brightness. (5: the brightest) 42 | OCI600... -
Page 50: Network Information
Directly tap [ IP ], [ Gateway ] or [ Mask ] on the screen, fill with the details in the text field, and then tap [ Enter ] to confirm it. After the pop-up window disappears, please press [ ] key to restart the device to finish this setting. 43 | OCI600... -
Page 51: Language
After the pop-up window disappears, please press [ ] key to restart the device to change the language. 5.8.1.8 Storage Device Tap the green button next to Storage Device and directly tap [ USB Device ] or [ Local Device ] to confirm it. 44 | OCI600... -
Page 52: About
Short press [ F2 ] key or directly tap [ About ] on the screen to enter into the home screen of the system information. 5.8.3 Exit Short press [ ] key or directly tap [ ] on the screen to return to the home screen of all functions. 45 | OCI600... -
Page 53: File Management
] or [ ] key to move to File Management, and then short press [ ] key to enter into the home screen of file management or directly tap [ ] on the screen to enter into it. 46 | OCI600... -
Page 54: Report
Directly tap the name of the report you would like to read and then tap [ ] on the screen to read the related values Short press [ F1 ] key or directly tap [ Report ] on the screen to be back to the list of report. 47 | OCI600... -
Page 55: Delete
5.9.3 Exit Short press [ ] key or directly tap [ ] on the screen to return to the home screen of all functions. 48 | OCI600...
Need help?
Do you have a question about the OCI600 and is the answer not in the manual?
Questions and answers