
Related Manuals for Ascentac OPM120


Summary of Contents for Ascentac OPM120
- Page 1 OPM120 Optical Power Meter User Guide _ Version 1.0 Ascentac Inc. www.ascentac.com +886-7-398-1000 +886-7-398-3965 sales@ascentac.com...
- Page 2 Ascentac. Disclaimer Ascentac shall not be liable for errors contained herein or for incidental or consequential damages in connection with the furnishing, performance, or use of this user guide.
- Page 3 The label with S/N has been altered or damaged. Notice: Ascentac makes no warranty of any kind with regard to the content in this document, including, but not limited to, the implied warranties of merchantability and fitness for a particular purpose.
- Page 4 Service & Support If you have any questions or need any assistance, please contact our service center. Kaohsiung Office TEL: +886-7-398-1000 FAX: +886-7-398-3965 Address: 11F.-1, No.80, Minzu 1st Rd., Sanmin Dist., Kaohsiung City 80761, Taiwan (R.O.C.) Please prepare below information before you contact us and describe the problems.
-
Page 5: Table Of Contents
Content 1. Safety Information ........................1 2. Introduction ..........................2 Features ..........................3 Application ........................3 3. Layout ............................4 Appearance ........................4 Instruction .......................... 5 LED Indicator ........................6 4. Display ............................7 Optical Power Meter (OPM) ................... 7 Visual Fault Locator (VFL) (Option) ................ - Page 6 5.13 Saving Measurement Result ..................15 5.14 Loading Measurement Result ..................17 5.15 Device Setting ......................... 19 5.15.1 Date ........................19 5.15.2 Time ........................20 5.15.3 Power Saving (Default: 10 mins) ............... 21 5.15.4 Screen Saving (Default: 5 mins) ................ 22 5.15.5 Brightness (Default: Mid) ..................
-
Page 7: Safety Information
Do not use damaged power cords, accessories or other peripheral equipment. Make sure the product is operated on the permitted ambient conditions. Never directly look into the optical outputs interface. Dangerous laser radiation: 1 | OPM120... -
Page 8: Introduction
(OLS200). Technicians are not required to manually set up the calibration parameter. It speeds up the test and eliminates possible failures of setting. Ascentac OPM120 Series also has the capacity to analyze the cable status. ‘’Low Power” alarm reads on screen when the measured value is lower than the threshold users set up. -
Page 9: Features
1625nm, 1650nm) Automatic wavelength recognition for time saving and error-free (Must use with Ascentac OLS200 or OLM300 series) Analysis of cable status e.g. Low Power (Displayed on screen) (Threshold can be set up) Document results and generate reports to PC via USB connection ... -
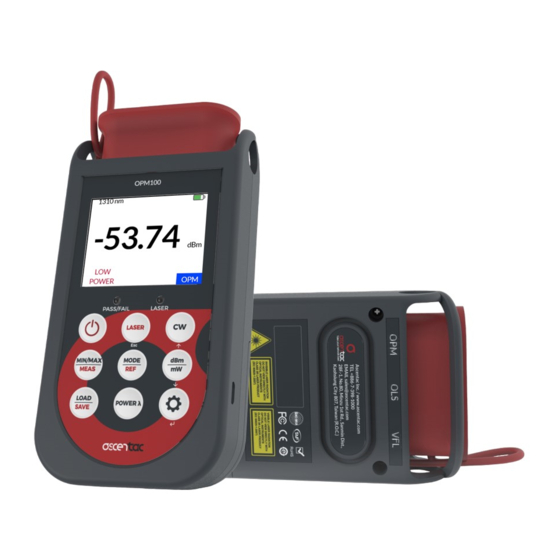
Page 10: Layout
3. Layout 3.1 Appearance Front Side Back 4 | OPM120... -
Page 11: Instruction
2. Charge rechargeable batteries 3. Transfer measured record to PC OPM optical connector SC, FC, LC, Universal 2.5mm or 1.25mm VFL optical connector Universal 2.5mm Dry batteries or rechargeable batteries Battery (Charged by USB connection): AAA-size x 4 5 | OPM120... -
Page 12: Led Indicator
1. Measured value of optical power is equal to or higher than low power Green threshold. 2. With setting REF value, the loss value is equal to or less than loss threshold. No emitting light LASER Emitting light 6 | OPM120... -
Page 13: Display
(CW, 270Hz, 1kHz, 2kHz) Measured value Max-Min Alarm indicator Function mode Low Power 0.5dB (OPM) Optical power monitoring (Max/Min/Max-Min) 4.2 Visual Fault Locator (VFL) (Option) Battery status Modulation output (CW, 1Hz, 2Hz) Laser status Function mode (VFL) 7 | OPM120... -
Page 14: Operation
] key for two seconds to turn off the meter. 5.3 Switching Function Modes Short press [ ] key to switch function modes. 1310nm Note ] & [ ] key are not available in OPM mode. 8 | OPM120... -
Page 15: Turning On Vfl (Option)
] key for two seconds to turn on VFL. Note “ ” refers to emitting light. 5.6 Turning off VFL (Option) Press [ ] key for two seconds to turn off VFL. Note “ ” refers to no emitting light. 9 | OPM120... -
Page 16: Setting Vfl Modulation Output (Option)
Short press [ ] key repeatedly until the desired modulation output is displayed. (CW 1Hz 2Hz CW) Note Modulation output can’t be selected by [ ] key if the current mode is OPM mode. 10 | OPM120... -
Page 17: Setting Wavelength
1. Wavelength can’t be selected in VFL mode. 2. [ ] key is not available in OPM mode. OPM120 series can automatically recognize the wavelength if the modulation output of optical light source is 2kHz from Ascentac OLS200 or OLM300 series. 1550nm* 2k Hz - 15.00 dBm... -
Page 18: Setting Reference Value (Default: Off)
] key for two seconds under unit mW. The unit of REF value will be dBm. The unit on display is dB. 5.10 Cancelling Reference Value Short press [ ] key to cancel the reference value. 1550nm 1550nm -15.00 dBm - 15.00 dBm 12 | OPM120... -
Page 19: Setting Measurement Units (Default: Dbm)
5.11 Setting Measurement Units (Default: dBm) 1. Short press [ ] key to switch to OPM mode. 1550nm - 15.00 dBm 2. Short press [ ] key to switch measurement units. Note The measurement units can’t be switched in VFL mode. 13 | OPM120... -
Page 20: Optical Power Monitoring
Max: Record the maximum value of optical power. Min: Record the minimum value of optical power. Max-Min: Record the difference of the above value. 3. Long Press [ ] key for two seconds to turn off monitoring mode. 14 | OPM120... -
Page 21: Saving Measurement Result
However, the status of REF will be “OFF” if users don’t set reference value. Loss: If there is a reference value, loss value will be saved. If there is no reference value, the status of Loss will be “--.--”. 15 | OPM120... - Page 22 2. Press [] to save measurement result and return to the display of optical power measurement; press [ESC] to discard saving and return to the display of optical power measurement. Note Measurement result can’t be saved in VFL mode. 16 | OPM120...
-
Page 23: Loading Measurement Result
Loss: If there is a reference value, loss value will be saved. If there is no reference value, the status of Loss will be “--.--”. MEAS: Without monitoring mode, the status of MEAS will be “OFF”. With monitoring mode, the value will be displayed. (e.g., MAX-MIN: 1.7dB) 17 | OPM120... - Page 24 Low Power Thr: -30 dBm Loss Thr: OFF Loss Thr: OFF 3. Press [ESC] to return to the display of optical power measurement. Note On the display of loading measurement result, only [↑] [↓] [ESC] are available. 18 | OPM120...
-
Page 25: Device Setting
Device Info. Date 2019 / 07 / 18 17 : 55 : 05 Time Power Saving 10 min Screen Saving High Brightness Battery Charge -35.0 dBm Low Power Thr. 1.0 dB Loss Thr. Device Info. 19 | OPM120... -
Page 26: Time
Device Info. Date 2019 / 07 / 19 17 : 55 : 05 Time Power Saving 10 min Screen Saving High Brightness Battery Charge -35.0 dBm Low Power Thr. 1.0 dB Loss Thr. Device Info. 20 | OPM120... -
Page 27: Power Saving (Default: 10 Mins)
Device Info. Date 2019 / 07 / 19 17 : 55 : 00 Time Power Saving 10 min Screen Saving High Brightness Battery Charge -35.0 dBm Low Power Thr. 1.0 dB Loss Thr. Device Info. 21 | OPM120... -
Page 28: Screen Saving (Default: 5 Mins)
Device Info. Date 2019 / 07 / 19 17 : 55 : 00 Time Power Saving Screen Saving 30 min High Brightness Battery Charge -35.0 dBm Low Power Thr. 1.0 dB Loss Thr. Device Info. 22 | OPM120... -
Page 29: Brightness (Default: Mid)
Loss Thr. Device Info. Date 2019 / 07 / 19 17 : 55 : 00 Time Power Saving Screen Saving High Brightness Battery Charge -35.0 dBm Low Power Thr. 1.0 dB Loss Thr. Device Info. 23 | OPM120... -
Page 30: Battery Charge (Default: Off)
Power Saving Screen Saving Brightness Battery Charge -35.0 dBm Low Power Thr. 1.0 dB Loss Thr. Device Info. Note Users are required to confirm whether to turn on battery charge again after the device detects USB connection. 24 | OPM120... -
Page 31: Low Power Thr. (Default: -30Dbm)
Low Power Thr. 1.0 dB Loss Thr. Device Info. Note “Low Power” will be displayed if the measured value of optical power is less than low power threshold. The Pass/Fail LED indicator on the device will be red. 25 | OPM120... -
Page 32: Loss Thr. (Default: 3Db)
Device Info. Note “Loss” will be displayed if the value measured with long wavelength and the value measured with short wavelength are all higher than loss threshold. The Pass/Fail LED indicator on the device will be red. 26 | OPM120... -
Page 33: Device Info
2019 / 07 / 19 17 : 55 : 00 Time Model : OPM110 Power Saving SN : 32A190000001 Screen Saving Brightness FW : V1.0.2B Battery Charge HW : V1.01.000 Low Power Thr. Loss Thr. Device Info. 27 | OPM120...
Need help?
Do you have a question about the OPM120 and is the answer not in the manual?
Questions and answers