
Related Manuals for Waterhouse FL-800


Summary of Contents for Waterhouse FL-800
- Page 1 Continuous Use Amphibious 12v DC Pump and Solar Kit – Installation Instruction Booklet Page 1 of 12...
-
Page 2: Table Of Contents
Table of contents Contents Kit Contents ..................................3 Effective Placement and Orientation of Solar PV Panels ....................4 Panel Direction ................................4 Shade ..................................... 4 Panel Tilt..................................4 Placement and Volt Drop .............................. 4 Mounting Structures ..............................4 Solar Charge Controller ..............................4 Features of the Charge Controller .......................... -
Page 3: Kit Contents
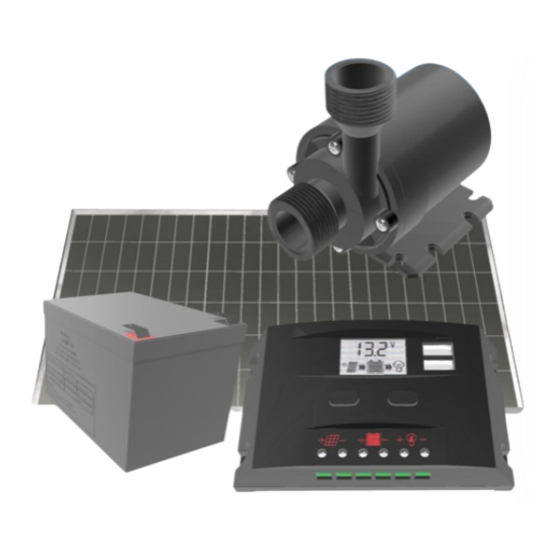
3. 1 X 12 Volt Gel Acid Battery P/N 12 AH 6-CNF-12 1 X PWM Solar Charge Controller 1 X 12 Volt Continuous Use Amphibious Pump P/N FL-800 1 X length of Red and Black Wire 4. 1 X Fuse Page 3 of 12... -
Page 4: Effective Placement And Orientation Of Solar Pv Panels
Effective Placement and Orientation of Solar PV Panels Panel Direction Face True North Shade Avoid Shade – Shade Reduces Panel Performance Panel Tilt Winter Tilt / Inclination Calculation Multiply Your Southern Latitude by 0.9 and then add 29°. Summer Tilt / Inclination Calculation Multiply Your Southern Latitude by 0.9 and then subtract 23.5°... -
Page 5: Features Of The Charge Controller
Features of the Charge Controller The features of your charge controller are Charges your battery when your solar panel is exposed to the sun. It does a Bulk Charge and then a Float (Maintenance) charge. Prevents damage to your battery through overcharging Protects your battery from harmfully excessive discharge Controls the load (Acts like a switch turning off your pump if the battery voltage become to depleted Acts as a timer which for lighting and a load reduction measure (A time switch is recommended for the pump) -
Page 6: Digital Display
Digital Display Numeric Display of Voltage (Mostly), Parameter Setting such as Battery Type and Time Switch Parameters Indication for a Solar Panel. Indicates that a Solar PV Panel is connected to the Controller. No Solar PV Panel Symbol Indicator, means that the Solar Panel is either Not Connected or the Solar PV Panel is not receiving Sun Light Charging Indicator –... -
Page 7: Menu / System State / Parameter Changes
The left-hand side button is used as a method to scan through the 6 states of the charge controller. (see table of States and Settings) Simply press it one press at a time to scroll through the different screen displays. The different screens provide information about the current setting of the charge controller. - Page 8 Menu Viewing and Setting Note the Cyclical Nature of the Screen Display Navigation Left-Hand Side Button Moves you through the various Displays As pictured at right, the Floating Charge Voltage is showed, and when it is in floating mode, the arrow between the solar panel and battery icons in the display View System State will flash.
- Page 9 Using the Left-Hand Side Button (MENU) one press at a time, will in turn cycle through the parameters that are Viewing and Setting set. Parameters If there are parameters at a particular display that might need to be set, do the following left button sequence. Press the Left-Hand Side Button (Menu) for >...
-
Page 10: Errors / Problems And Issues
voltage protection, the output of the load will be Under-Voltage recovered as soon as the battery voltage recovers to Recovery higher than the under-voltage value. Hold the Left-Hand Side Button for more than 5 seconds,numbers start flashing. To change the values, Left Hand Side Button, increases the setting value or Right Hand Side Button reduces the Under-Voltage Recovery setting value. -
Page 11: New System Best Practice
Battery is not connected unclamp connection of battery and reconnect to battery Battery voltage too low Pre-charge the battery Check to see whether your charge controller is set up for your battery Type. The external fuse in the battery connection cable has blown Replace the external fuse Battery is defective Unclamp all connections, connect a proper battery with... -
Page 12: Pump
14. A small sand filter can be used to remove small particulate matter form your pond water. For further illustration, watch our basic setup video here: https://youtu.be/ivb4-Nk5wb4 If you have any further questions, please contact us on shop@waterhouse.co.za or 011 466 8250 Page 12 of 12...
Need help?
Do you have a question about the FL-800 and is the answer not in the manual?
Questions and answers