Racelogic VBOX Touch Motorsport V1 Quick Start Manual
Hide thumbs
Also See for VBOX Touch Motorsport V1:
- Quick start manual (14 pages) ,
- Quick start manual (15 pages)
Table of Contents
Advertisement
Quick Links
VBOX Touch Lap Timing Mode - Quick Start Guide
VBOX Touch features a 10 Hz GNSS receiver and a responsive colour touchscreen. The Lap Timing Mode allows you
to view live Lap Timing information in relation to a set Start/Finish line.
Two Lap Timing screens are available; the
live reference lap time comparison (Delta-T), current reference lap time, last lap time, last lap time difference to best,
session time and completed lap count. The
time.
Registration
Please register your VBOX Touch so that Racelogic can
continue to provide you with notifications about the latest
software releases and firmware upgrades for your
Racelogic product, and offer technical support.
Register your device here.
What is in the box?
When you purchase a VBOX Touch Motorsport V1 (RLVBTOUCH-M), you will find the following items when you open
the box:
Main
Screen, which contains live reference lap speed comparison (Delta-V),
Basic Screen
https://en.racelogic.support//Product_Info/VBOX_Data_Loggers/VBOX_Touch/VBOX_Touch_V1/
Quick_Start_Guides_%E2%80%93_VBOX_Touch_V1/VBOX_Touch_Lap_Timing_Mode_-_Quick_Start_Guide
contains either just a rolling lap time or a static previous lap
1
Advertisement
Table of Contents

Related Manuals for Racelogic VBOX Touch Motorsport V1


Summary of Contents for Racelogic VBOX Touch Motorsport V1
- Page 1 Racelogic product, and offer technical support. Register your device here. What is in the box? When you purchase a VBOX Touch Motorsport V1 (RLVBTOUCH-M), you will find the following items when you open the box: https://en.racelogic.support//Product_Info/VBOX_Data_Loggers/VBOX_Touch/VBOX_Touch_V1/ Quick_Start_Guides_%E2%80%93_VBOX_Touch_V1/VBOX_Touch_Lap_Timing_Mode_-_Quick_Start_Guide...
-
Page 2: Optional Accessories
If you are looking to purchase a new SD card, it is recommended that any card used has a write speed of above 7 MB/s (4 MB/s absolute minimum) and a speed class of 10 (4 absolute minimum). Racelogic recommends SD cards from quality brands such as Transcend, SanDisk, Kingston or Lexar to ensure the best results. - Page 3 The VBOX Touch unit is powered by a power cable that is unterminated so that you can make a bare-wire connection to a power supply. The cable terminates in a 2-way connector that mates with the Power socket on VBOX Touch. On boot-up, the VBOX Touch will display a splash screen and automatically look for satellites and media. https://en.racelogic.support//Product_Info/VBOX_Data_Loggers/VBOX_Touch/VBOX_Touch_V1/ Quick_Start_Guides_%E2%80%93_VBOX_Touch_V1/VBOX_Touch_Lap_Timing_Mode_-_Quick_Start_Guide...
- Page 4 If you have come to a stop, but the Record Icon is still on, press the SD Card Icon to stop the logging before removing the card. Sometimes, due to poor satellite visibility in a garage or close to a building, the box may start recording, even if the car is stationary. Always check the Record Icon before ejecting the card. https://en.racelogic.support//Product_Info/VBOX_Data_Loggers/VBOX_Touch/VBOX_Touch_V1/ Quick_Start_Guides_%E2%80%93_VBOX_Touch_V1/VBOX_Touch_Lap_Timing_Mode_-_Quick_Start_Guide...
- Page 5 GNSS only; 2 = DGNSS. • Event 1 time: This is the digital input oversample timer used to interpolate the trigger event time between captured samples. You can find more information about the VBO file format here https://en.racelogic.support//Product_Info/VBOX_Data_Loggers/VBOX_Touch/VBOX_Touch_V1/ Quick_Start_Guides_%E2%80%93_VBOX_Touch_V1/VBOX_Touch_Lap_Timing_Mode_-_Quick_Start_Guide...
- Page 6 VBOX Test Suite via an RLCAB001 and conduct live testing, or output lap timing parameters. You can find more information about the Serial Output settings here. You can find more detailed connector information on the PIN OUTS page. https://en.racelogic.support//Product_Info/VBOX_Data_Loggers/VBOX_Touch/VBOX_Touch_V1/ Quick_Start_Guides_%E2%80%93_VBOX_Touch_V1/VBOX_Touch_Lap_Timing_Mode_-_Quick_Start_Guide...
-
Page 7: Satellite Reception
The placement of the GNSS antenna is crucial to the quality of the data recorded by VBOX Touch. Any metal close to a GNSS antenna can unpredictably disturb the signal due to interference from reflections of weak GNSS signals. https://en.racelogic.support//Product_Info/VBOX_Data_Loggers/VBOX_Touch/VBOX_Touch_V1/ Quick_Start_Guides_%E2%80%93_VBOX_Touch_V1/VBOX_Touch_Lap_Timing_Mode_-_Quick_Start_Guide... - Page 8 Tall buildings or trees can block GNSS signals, causing a reduction in the number and quality of satellites being tracked, leading to inaccurate position measurements and a noisy velocity signal. GNSS works best in open areas/ Avoid tree-lined roads https://en.racelogic.support//Product_Info/VBOX_Data_Loggers/VBOX_Touch/VBOX_Touch_V1/ Quick_Start_Guides_%E2%80%93_VBOX_Touch_V1/VBOX_Touch_Lap_Timing_Mode_-_Quick_Start_Guide...
-
Page 9: Gps Coldstart
‘SEARCHING FOR SATELLITES’ until the satellite lock has been acquired. It will take approximately 25 to 30 seconds for the unit to reacquire the satellite lock. LEDs The 4 LEDs at the top of the unit provide visual feedback dependent on what process is being performed: https://en.racelogic.support//Product_Info/VBOX_Data_Loggers/VBOX_Touch/VBOX_Touch_V1/ Quick_Start_Guides_%E2%80%93_VBOX_Touch_V1/VBOX_Touch_Lap_Timing_Mode_-_Quick_Start_Guide... -
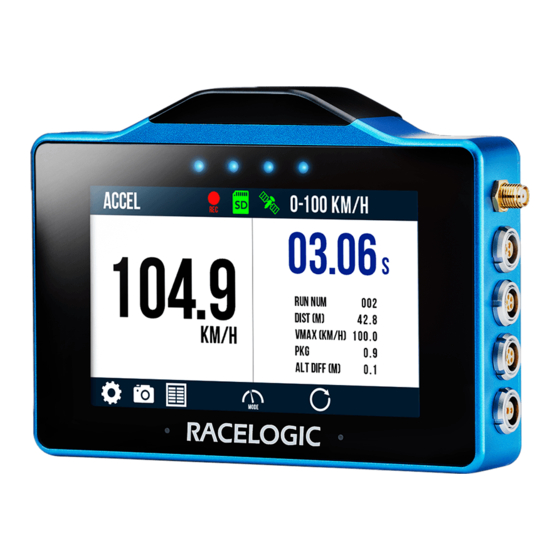
Page 10: Screen Overview
• Screenshot: If a screenshot has been saved successfully, the LEDs will illuminate yellow in sequence from left to right to display the progress of writing to the SD card. • Reset: The LEDs will briefly flash green twice when a screen has been reset. Screen Overview https://en.racelogic.support//Product_Info/VBOX_Data_Loggers/VBOX_Touch/VBOX_Touch_V1/ Quick_Start_Guides_%E2%80%93_VBOX_Touch_V1/VBOX_Touch_Lap_Timing_Mode_-_Quick_Start_Guide... - Page 11 Main screen example Setup 1. Connect the power via the Power socket. 2. Insert the SD card into the Side of the Unit. The SD Card Icon should display as green as long as the card has free space. https://en.racelogic.support//Product_Info/VBOX_Data_Loggers/VBOX_Touch/VBOX_Touch_V1/ Quick_Start_Guides_%E2%80%93_VBOX_Touch_V1/VBOX_Touch_Lap_Timing_Mode_-_Quick_Start_Guide...
- Page 12 Test Suite or output lap timing parameters, go to Serial Output within the Serial Port Settings and change the Output Mode to either VBOX Stream (live testing with VBOX Test Suite) or Lap Timing. Note: Ensure correct hardware connections are made. https://en.racelogic.support//Product_Info/VBOX_Data_Loggers/VBOX_Touch/VBOX_Touch_V1/ Quick_Start_Guides_%E2%80%93_VBOX_Touch_V1/VBOX_Touch_Lap_Timing_Mode_-_Quick_Start_Guide...
- Page 13 7. Take the vehicle outside and wait for the VBOX Touch to gain satellite lock. The Satellite Icon should display as solid green. Note: The first time that the unit is used, it may take up to 15 minutes to fully acquire satellites. After this, it will usually take 1 to 2 minutes to acquire satellites. https://en.racelogic.support//Product_Info/VBOX_Data_Loggers/VBOX_Touch/VBOX_Touch_V1/ Quick_Start_Guides_%E2%80%93_VBOX_Touch_V1/VBOX_Touch_Lap_Timing_Mode_-_Quick_Start_Guide...
- Page 14 • The 4 LEDs at the top of the screen provide a live reference lap speed comparison (Delta-V), varying in colour between green depending on whether you are travelling faster or slower than the reference lap at the current location on track. The settings for this can be changed within the Delta-V Range settings. https://en.racelogic.support//Product_Info/VBOX_Data_Loggers/VBOX_Touch/VBOX_Touch_V1/ Quick_Start_Guides_%E2%80%93_VBOX_Touch_V1/VBOX_Touch_Lap_Timing_Mode_-_Quick_Start_Guide...
- Page 15 16. To reset lap timing data, lap time history and the reference lap, press the Reset Button. 17. When you have finished, a history of the lap results can be viewed by pressing the Results Button. More information on the Lap Timing Mode can be found here. https://en.racelogic.support//Product_Info/VBOX_Data_Loggers/VBOX_Touch/VBOX_Touch_V1/ Quick_Start_Guides_%E2%80%93_VBOX_Touch_V1/VBOX_Touch_Lap_Timing_Mode_-_Quick_Start_Guide...
Need help?
Do you have a question about the VBOX Touch Motorsport V1 and is the answer not in the manual?
Questions and answers