Advertisement
Quick Links
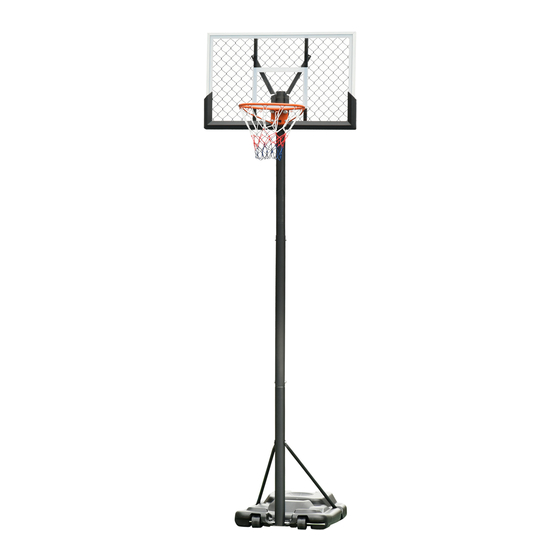
INaia008_US
A61-022
60
MIN
Notice to assemblers:
All the basketball systems, including those used for display purposes must be assembled and filled with weight
according to instructions. Failure to follow instructions could result in serious injury. Please read all warnings and
cautions before assembly. It is recommended to supervise children as they play with this product. This product is to
be assembled by 2 adults only!
We appreciate your purchase of one of our many fine products. We are assured that you will be very satisfied with
your selection.
READ AND SAVAE THIS INSTRUCTION FOR FUTURE USE
ASSEMBLY & INSTRUCTION MANUAL
Advertisement

Subscribe to Our Youtube Channel
Related Manuals for Soozier A61-022


Summary of Contents for Soozier A61-022
- Page 1 INaia008_US A61-022 Notice to assemblers: All the basketball systems, including those used for display purposes must be assembled and filled with weight according to instructions. Failure to follow instructions could result in serious injury. Please read all warnings and cautions before assembly. It is recommended to supervise children as they play with this product. This product is to be assembled by 2 adults only! We appreciate your purchase of one of our many fine products.
- Page 2 WARNING Read and understand warnings listed below before using this product. Failure to follow these warnings may result in serious injury and/or property damage. Owner must ensure that all players know and follow these rules for safe operation of the system. WARNING •...
-
Page 3: Important Safety Notice
IMPORTANT SAFETY NOTICE AILURE TO FOLLOW THESE SAFETY INSTRUCTIONS MAY RESULT IN S ERIOUS INJURY ORPROPERTY DAMAGE AND WILL VOID WARRANTY. know and follow these rules for safe operation of the system. To ensure safety, do not attempt to assemble this system without following the instructions carefully. Check entire box and inside all packing material for parts and/or additional instruction material. - Page 5 1) Tighten the locking screws (G) 2) Insert the Wheel Axle (Q) into Wheel (I), Base(U)and end of Bottom Pole (T) as shown...
- Page 6 1) Fasten Right Brace (P1)and Left Brace (P2) to base (U) with bolt sets (D) 2) Fasten Right Brace (P1)and Left Brace (P2) to the bottom pole section (T) with bolt set (E) As shown,bend Backboard Racks (M) by hands.
- Page 7 Fasten the Rim(L) and 2 Backboard Racks(M) simultaneously to the bottom of Backboard with bolt sets(B) and Spring sets(H). Fix upper end of backboard racks to backboard with bolts set (C)
- Page 8 Fasten Top Pole (R) to the middle of two Backboard Racks (M) with bolt sets (F) Slide the Middle Pole section(S) over the top of the Bottom Pole Section (T)untill it is tight...
- Page 9 Slide the Top Pole section (R) with the completely assembled top into the Middle Pole section (S) until you reach the standstill position Tighten the locking screws (G) and Height Adjustabel screw (A) Warning! Do not leave assembled unit unattended when empty. (May tip over)
- Page 10 Install net (N) to the rim (L) as shown Filing the Base(S) with water orsand to keep steady...
Need help?
Do you have a question about the A61-022 and is the answer not in the manual?
Questions and answers