Table of Contents
Advertisement
Quick Links
Advertisement
Table of Contents

Related Manuals for Appsys ProAudio Flexiverter MADI

Summary of Contents for Appsys ProAudio Flexiverter MADI
- Page 1 FLX-MADI MADI-to-anything Digital Audio Converter User's Manual...
-
Page 2: Table Of Contents
User's Manual Table of Contents QUICK REFERENCE.................... 4 INTRODUCTION....................5 2.1. Purpose....................5 2.2. Box Contents.................... 5 2.3. Conventions used in this manual..............5 POSSIBLE SETUPS..................... 6 3.1. Available AUX cards..................6 3.2. Available FLX devices................7 3.3. FlexLink connection...................7 AUDIO ROUTING....................8 4.1. - Page 3 FLX-MADI 11.5. Document Revision History..............20 11.6. About this document................20...
-
Page 4: Quick Reference
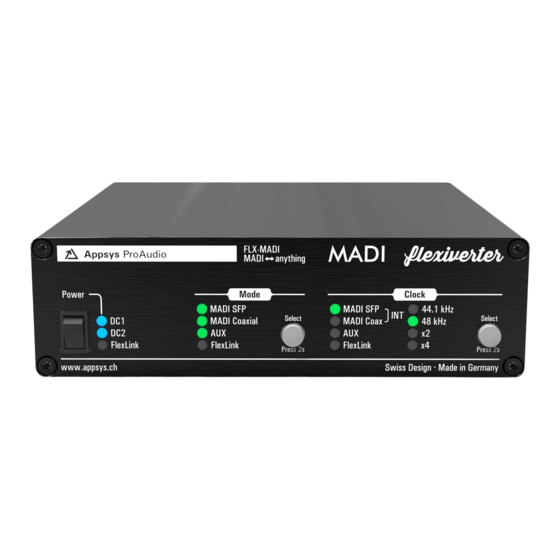
User's Manual QUICK REFERENCE Power switch and "power good" indicators. ➊ LEDs light up blue when power is available on the respective port. Mode indicators/selector. Long-press the "Select" button to change the audio ➋ routing between the interfaces. Wait four seconds to activate the selected mode. Clock indicators/selector. -
Page 5: Introduction
FLX-MADI INTRODUCTION 2.1. Purpose The FLX-MADI device is as digital audio converter, providing two built-in MADI interfaces and a third one (or many other interfaces) with optional AUX cards. It can be used in different setups, depending on the user's needs: standalone, to convert between the built-in MADI ports (media converter), ... -
Page 6: Possible Setups
User's Manual POSSIBLE SETUPS The device can be used in three different setups, shown below: SETUP flexiverter+AUX card Double-flexiverter flexiverter+multiverter How it works Converts between built-in Devices are connected via Flexiverter connected to interface and the AUX card. FlexLink cable. multiverter via FlexLink cable. -
Page 7: Available Flx Devices
FLX-MADI AUX-AVB 1 16x16ch / 32x0ch / 0x32ch MILAN-approved AVB AUX-DAC 1 8ch analog outputs (1xDB25) AUX-DANTE 64x64ch DANTE network card AUX-MADI-COAX 64x64ch MADI for coaxial cable (BNC connectors) AUX-MADI-OPTO 64x64ch MADI optical, SC connector (Multimode 125um 1310 nm) AUX-MADI-SFP 64x64ch MADI for SFP (Small-Factor Pluggable) modules AUX-WORDCLOCK BNC wordclock I/O 3.2. -
Page 8: Audio Routing
User's Manual AUDIO ROUTING The flexiverter can operate in various routing modes, allowing you to pass audio between the available interfaces (MADI SFP, MADI coaxial, AUX and FlexLink) in many different ways. The LEDs in the "MODE" section indicate the involved interfaces. -
Page 9: Selecting The Route Mode
FLX-MADI seconds, the selected mode is applied automatically. 4.2. Selecting the Route Mode Long-press the Mode button until the LEDs are blinking yellow. Current routing mode is shown by alternately yellow blinking LEDs, indicating the interfaces where the signal is passed between. Press the ... -
Page 10: Clock Settings
User's Manual CLOCK SETTINGS 5.1. Clock sources and indication The flexiverter can be clocked from every interface (acting as clock slave), or can run on its internal clock (acting as clock master). Clock source "Clock" Indication (Example) Remarks MADI SFP ⬤... - Page 11 FLX-MADI Press the Clock button repeatedly to cycle between the available clock sources. Depending on the source, you might need to select the desired sample rate ( 44.1 kHz or 48 kHz ) and/or the appropriate multipliers ( x4 ).
-
Page 12: Accessing Internals
User's Manual ACCESSING INTERNALS 6.1. Opening the device Required: Torx T10 screwdriver. Power off the device and detach all cables to avoid short-circuit or damage. Detach the device from the rack-mount kit. Remove the four top screws and the top cover by pulling it upwards: ... -
Page 13: Dip Settings
FLX-MADI DIP SETTINGS Fine-tuning of the flexiverter's built-in interface behavior and of the AUX card can be achieved via DIP settings on the back side. Changing the DIP settings will come immediately into effect. Default setting: all switches up. 7.1. Base device config (DIP1..3) The configuration below affects only the MADI outputs. -
Page 14: Aux Config (Dip4
User's Manual 7.2. AUX config (DIP4..6) Many AUX card provide additional settings, which can be adjusted using these switches. The actual meaning depends on the type of AUX card installed: AUX-ADAT Channels 1-8: Channels 9-16: AES3 (Professional) 3 ▀ ▀ ▀... -
Page 15: Flexlink Channel Mapping (Dip7
FLX-MADI 7.3. FlexLink channel mapping (DIP7..9) The FlexLink interface can transmit 192x192 channels, organized in three lanes with 64 channels each. The channel assignment can be adjusted to meet the user's needs, particularly when the device is used in double-FLX configuration (to make sure that all interfaces and channels are mapped to the desired target on the peer FLX device. -
Page 16: Special Operating Modes
User's Manual SPECIAL OPERATING MODES Special operating modes are accessible by holding down the Mode button while switching on the device. Press Mode again to switch to the next mode: Version Display LED Test Interface Self-Test Normal operation ... -
Page 17: Firmware Update
FLX-MADI Connect the Output to the Input of the MADI Coaxial Port using an coaxial (BNC) cable with 75 Ohms impedance. If an AUX card is installed, connect all output ports of the AUX card to the respective inputs using a loop-back cable. Note: NOT supported with AUX- ADC, AUX-AES67, AUX-AVB, AUX-DANTE. -
Page 18: Specifications
User's Manual SPECIFICATIONS Parameter Value Dimensions 152x44x153mm (WxHxD) excluding connectors/buttons 152x44x169mm (WxHxD) including device-side connectors/buttons Weight 560g Operating 0..+55°C, non-condensing temperature Storage temperature -40..+85°C, non-condensing Power consumption +15V DC, 9W max (18W to power two devices via FlexLink) Triple-redundant input (2x DC, 1x via FlexLink) Supported SFPs Ships with 1310nm, 125MBit Multimode SFP Accepts any SFP (not SFP+) modules. - Page 19 FLX-MADI 10.2. Additional (redundant) power supply PWR-FLX: Additional power supply to provide redundancy for single-FLX configurations FlexLink Cable 0.5m. HDMI cable with locking screws ...
-
Page 20: Appendix
* Not covered by the warranty are any damages resulting out of improper use, willful damage, normal wear-out (especially of the connectors) or connection with incompatible devices. 11.2. Manufacturer contact Appsys ProAudio www.appsys.ch Rolf Eichenseher info@appsys.ch Bullingerstr. 63 / BK241 Phone: +41 43 537 28 51 CH-8004 Zürich... -
Page 21: Recycling
About this document All trademarks mentioned in this document are property of the respective owners. All information provided here is subject to change without prior notice. Document Revision: 1 · 2021-11-29 Copyright © 2021 Appsys ProAudio · Printed in Switzerland IDENT 9.00.16146.00... - Page 22 User's Manual Declaration of Conformity The manufacturer: Appsys ProAudio Rolf Eichenseher Bullingerstr. 63 BK 241 CH-8004 Zürich Switzerland declares under sole responsibility that the products mentioned below: Flexiverter FLX-MADI meet the requirements of the following standards: EN 55024:2010 EN 55032:2015 Class B...
Need help?
Do you have a question about the Flexiverter MADI and is the answer not in the manual?
Questions and answers