
Related Manuals for Clarion DB185MP


Summary of Contents for Clarion DB185MP
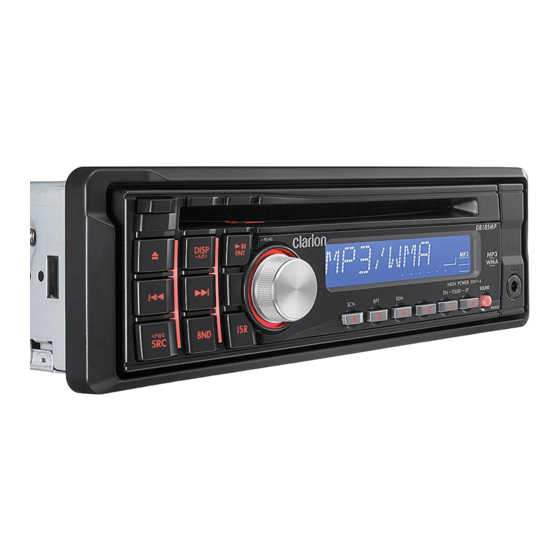
- Page 1 Owner’s manual Mode d’emploi Manual de instrucciones DB185MP CD/MP3/WMA RECEIVER AUTORADIO CD/MP3/WMA RECEPTOR CD/MP3/WMA...
- Page 2 Si este equipo causa interferencias perjudiciales en la recepción de radio, lo cual podrá determinarse conectando y desconectando la alimentación del equipo, se aconseja al usuario que consulte al abastecedor o que pida ayuda a un técnico en radio experimentado. DB185MP Bottom View of Source Unit Fond de l’appareil pilote...
-
Page 3: Table Of Contents
Once you’re registered, we can keep you informed of important product information. Register at www.clarion.com - it’s easy to keep your Clarion product up to date. Thank you for purchasing this Clarion product. Please read this owner’s manual in its entirety before operating this equipment. -
Page 4: Features
3. This unit uses a precision mechanism. Even in the event that trouble arises, never open the case, disassemble the unit, or lubricate the rotating parts. DB185MP CAUTION USE OF CONTROLS, ADJUSTMENTS, OR PERFORMANCE OF PROCEDURES OTHER THAN THOSE SPECIFIED HEREIN, MAY RESULT IN HAZARDOUS RADIATION EXPOSURE. -
Page 5: Handling Compact Discs
• Do not use any solvents, such as commercially available cleaners, anti-static spray, or thinner to clean compact discs. • After using special compact disc cleaner, let the compact disc dry off well before playing it. DB185MP... -
Page 6: Controls
30° in all directions) [CD SLOT] • CD insertion slot. [AUX] input jack • The input jack for connecting an external device. DB185MP [ IR RECEIVER ] [ CD SLOT ] [ SCN ] [ RPT ] [ RDM ] [SOUND] button •... -
Page 7: Rotary Knob
This button is used to make various settings. • Press and hold the button for 1 second or longer to enter the fast-forward or fast- backward mode. [Q] (EJECT) button • Eject a disc when it is loaded into the unit. DB185MP... -
Page 8: Display Items
Display Screen In extreme cold, the screen movement may slow down and the screen may darken, but this is normal. The screen will recover when it returns to normal temperature. DB185MP : Preset channel indication (1 to 6) : Enter indication... -
Page 9: Dcp (Detachable Control Panel)
Be careful not to damage it by pressing on it with fingernails, pens, screwdrivers, etc. DCP Rear Panel Main Unit Front connector Main unit connector Note: • If the DCP is dirty, wipe off the dirt with a soft, dry cloth only. DB185MP... -
Page 10: Remote Control
• Press and hold the button for 2 seconds or longer to store current station in ISR memory (radio mode only). [DISP] button • Press to select the desired display. DB185MP Signal transmitter [ BND ] [ DISP ] [ RDM ]... - Page 11 1 second or longer to perform folder repeat play. [RDM] button • Press to perform random play. • When in MP3/WMA mode, press and hold the button for 1 second or longer to perform folder random play. DB185MP...
-
Page 12: Inserting The Battery
• When replacing the battery, insert properly, with +/– polarities oriented correctly. • Do not subject battery to heat, or dispose of in fire or water. Do not attempt to disassemble the battery. • Dispose of used batteries properly. DB185MP Insertion guide... -
Page 13: Operations
30 seconds and the display returns to the screen saver display. For details, refer to the subsection “Turning the screen saver function on or off” in section “Operations Common to Each Mode”. Radio... DB185MP... -
Page 14: Sound Adjustment
: bass and treble emphasized EXCITE : bass and treble emphasized mid emphasized CUSTOM : user custom DB185MP When “B-BOOST/IMPACT/EXCITE” is set: 3-2. Press the [ 3-3. Turn the [ROTARY] knob to adjust the setting in the range of The factory default setting is “0”. -
Page 15: Adjusting The Treble
BASS EXTEND effect. “M-B EX” appears in the display for 2 seconds. 2. Press and hold the [SOUND] button for 1 – second or longer to turn off the MAGNA BASS EXTEND effect. “M-B OFF” appears in the display for 2 seconds. DB185MP... -
Page 16: Radio Operations
[BND] button for 1 second or longer. “MANU” is lit in the display and manual tuning is now available. 2. Tune into a station. DB185MP Quick tuning Press and hold the [x] or [v] button for 1 second or longer to tune in a station. -
Page 17: Preset Scan
Recalling a station with ISR In any mode, press the [ISR] button to turn on the radio function and tune the selected radio station. “ISR” appears in the display. Press the [ISR] button again to return to the previous mode. DB185MP... -
Page 18: Cd/Mp3/Wma Operations
Check box for RECORD PROTECTED MUSIC. Then, reconstruct files. Personally constructed WMA files are used at your own responsibility. DB185MP Precautions when creating MP3/ WMA file Usable sampling rates and bit rates 1. MP3: Sampling rate 8 kHz-48 kHz, Bit rate: 8 kbps-320 kbps / VBR 2. -
Page 19: Displaying Cd Titles
Tags. UNKNOW characters can be turned to ISO8859- 1 characters. • Titles up to 32 bytes can be displayed in CD/ MP3/WMA mode. mark and ] button to pause play. ] button Artist Track ... Title Album Artist DB185MP... -
Page 20: Selecting A Track
Press the [DN] button to move the previous folder. 2. To select a track, press the [x] or [v] button. DB185MP Other various play functions Scan play This function allows you to locate and play the first 10 seconds of all the tracks recorded on a disc. -
Page 21: Random Play
The various play mode is canceled and the various play off mode appears in the display for 2 seconds. When the error display indication “– –:– –” appears in the display, the various play (Scan/ Repeat/Random) functions can be canceled in play mode. DB185MP... -
Page 22: Operations Common To Each Mode
While setting the clock, if another button or operation is selected, the clock set mode is canceled. DB185MP Displaying the settings The number of indicator of this unit decreases, you can see the state of current settings at any operation mode. -
Page 23: Aux Function
1. Press and hold the [DISP] button for 1 second or longer. 2. Select “AUX SENS”. 3. Turn the [ROTARY] knob to select “HIGH”, “MID” or “LOW”. Note: • When AUX mode is selected, AUX IN sensitivity can be set. DB185MP... -
Page 24: Troubleshooting
Wrong filename File system is not correct. DB185MP Cause Replace with a fuse of the same amperage. If the fuse blows again, consult your store of purchase. Consult your store of purchase. -
Page 25: Error Displays
Cause This is a failure of CD deck’s mechanism and consult your store of purchase. Replace with a non-scratched, non-warped-disc. Eject the disc then reload it properly. Measure DB185MP... -
Page 26: Specifications
Treble Control Action (10 kHz): +14 dB, –14 dB Line Output Level (CD 1 kHz): 1.8 V Note: • Specifications and design are subject to change without notice for further improvement. DB185MP General Power Supply Voltage: 14.4 V DC (10.8 to 15.6 V allowable), negative... - Page 27 Clarion Co., Ltd. PE-3049B All Rights Reserved. Copyright © 2007: Clarion Co., Ltd. 2007/12 280-8589-00 Printed in China / Imprimé en Chine / Impreso en China...
Need help?
Do you have a question about the DB185MP and is the answer not in the manual?
Questions and answers