Table of Contents
Advertisement
Quick Links
Advertisement
Table of Contents

Related Manuals for Delta rDrive

Summary of Contents for Delta rDrive
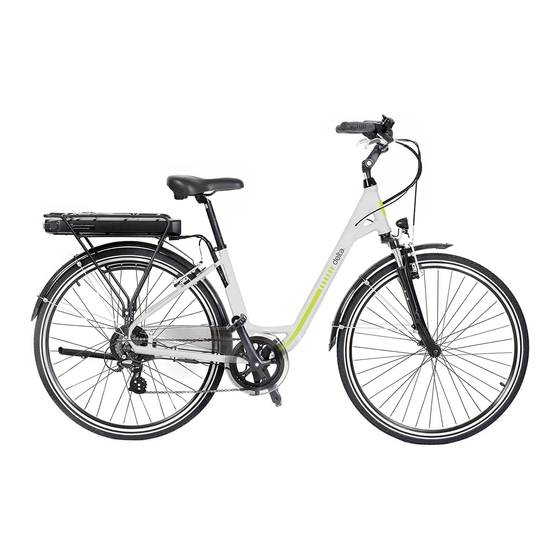
- Page 1 r Dri ve U SE R M A N UA L Page 1 31-01-2022...
-
Page 2: Table Of Contents
TABLE OF CONTENTS Table of contents Important safety instructions ..............3 BPSA Classification - Class 1 ..............4 Intended purpose ....................4 Getting started .....................6 Stem assembly ....................7 Handlebar adjustment ...................7 Stem angle adjustment .................9 Front wheel installation ................10 V-Brake assembly ................... 11 Pedal installation ....................12 Saddle and seatpost assembly ............14 Assembly complete ..................15... -
Page 3: Important Safety Instructions
IMPORTANT SAFETY INSTRUCTIONS IMPORTANT! Read the safety instructions in this manual before use. If the precautionary measures described are NOT followed, the warranty will be void. Failure to follow this user manual could result in serious injury or even death. WARNINGS •... -
Page 4: Bpsa Classification - Class 1
CONGRATULATIONS ON THE PURCHASE OF YOUR NEW E-BIKE! The Delta rDrive is a new generation of e-bike designed and developed based on many years of experience with our e-bike partner Promovec. Please read this user manual as it contains important information concerning the safe use and maintenance of this e-bike. - Page 5 WARNINGS: • Using the e-bike outside the specified terrain may result in injuries and/or damage to the e-bike. • Wet weather impairs traction, braking and visibility, both for the bicyclist and for other vehicles sharing the road. The risk of an accident is dramatically increased in wet conditions, take proper precautions.
-
Page 6: Getting Started
GETTING STARTED Assembly of this e-bike is recommended by a certified bicycle mechanic. If you choose to assemble your e-bike it is recommended that your bicycle be inspected by a certified bicycle mechanic prior to riding. It’s important to follow this assembly guide. E-bikes are great fun but improper assembly can result in serious injury and/or death. -
Page 7: Stem Assembly
STEM ASSEMBLY The handlebar comes mounted on the stem with brake levers and gear shifter mounted to the handlebar. Insert the stem into the headtube and ensure the minimum insertion mark is fully inserted into the headset. 1. Add grease to the stem, then insert it into the headset, the minimum insertion mark must be fully inserted into the headtube. - Page 8 WARNINGS! • The stems minimum insertion mark must not be visible above the top of the headset. If the stem is extended beyond the minimum insertion mark the stem may break or damage the fork’s steerer tube which could cause you to lose control and fall leading to serious injury and/or death.
-
Page 9: Stem Angle Adjustment
STEM ANGLE ADJUSTMENT The stem can be adjusted to raise the height of the handlebar to suit the desired riding position. 1. Loosen but do not remove the wedge bolt located on the underside of the stem. 2. If necessary, loosen the bolts on the side of the stem. 3. -
Page 10: Front Wheel Installation
FRONT WHEEL INSTALLATION Bicycle wheels are designed to be removeable for easier transportation and for repairing punctures. Insert the hub axle on the wheel into the fork dropouts. The wheels are secured with the supplied axle nuts and washers (where applicable) which are threaded onto the hub axle. - Page 11 WARNINGS Riding with an improperly secured wheel can allow the wheel to wobble or fall off the bicycle, which can cause serious injury or death. Therefore, it is essential that you: 1. Ask a certified bicycle technician to help you make sure your wheels are installed and removed correctly.
-
Page 12: V-Brake Assembly
V-BRAKE ASSEMBLY The V-brake is adjusted ready to ride at the factory and only needs to be reconnected by inserting the brake noodle into the quick release. If you have any doubts about doing this you should ask a certified bicycle mechanic. 1. -
Page 13: Pedal Installation
PEDAL INSTALLATION Important! The pedals are marked with L or R indicating which crank to mount them into. The pedal marked with an R fits only to the Right crank arm and the pedal marked with an L fits only to the Left Crank arm. CAUTION The left and right pedal have opposite threads. -
Page 14: Saddle And Seatpost Assembly
SADDLE AND SEATPOST ASSEMBLY The Saddle comes assembled onto SADDLE the seat post which needs assembling onto the bike. Getting the correct saddle height for you will allow a comfortable riding position and easy mounting and dismounting of the bike. 1. -
Page 15: Assembly Complete
WARNINGS! • If your seat post is not inserted in the seat tube as described above, the seat post may break, which could cause you to lose control and fall leading to serious injury and/or death. • After any saddle adjustment, be sure that the saddle adjusting parts are properly seated and tightened before riding. -
Page 16: Getting Started On The Electrical System
GETTING STARTED ON THE ELECTRICAL SYSTEM The e-bike features a simple-to-use Promovec e-bike system that feels like a regular bike but offers seamless electrical assistance. Please familiarize yourself with the operation of the system before your first ride. CHARGE THE BATTERY Before riding your e-bike, you need to charge the battery. -
Page 17: Display Led
DISPLAY LED The display is managed with 4 buttons from the left side of the handlebar. • 5 LEDs indicates the battery level. • 5 LEDs indicate the assist level. Note! The display of the battery indicator varies when driving up a hill, accelerating or driving down a hill. -
Page 18: Assist Functions
If there is no power to the LED display check the battery is correctly charged and correctly installed to the bike. If there is still no power then please contact your retailer or reach out to us at 800-474-6615 or www.designbydelta.com for Delta Customer Service. -
Page 19: Installing And Dismounting The Battery
INSTALLING AND REMOVING THE BATTERY 1. Slide the battery into the rails of the tray. Make sure the battery slides straight into the rails of the tray. 2. Lock the battery to the carrier by turning the key clockwise or to the right. 3. -
Page 20: Battery Charger/Charging
BATTERY CHARGER/CHARGING OVERVIEW Charging must be done indoors or under cover outdoors to avoid direct rain as the charger is only splash proof. Never charge a battery if the temperature is below 32°F (0°C) or over 113°F (45°C). Note! It is important that the order of the points for charging the battery is followed, Note! regardless of whether the battery is mounted/removed from the bike. -
Page 21: Battery Information
BATTERY CAPACITY AND USE The e-bike uses maintenance-free Li-ION batteries. The battery delivered in this kit is approximately 40-60% charged at the factory. Before using the battery, it must be fully charged with the supplied charger (Green LED light). We recommend that the battery stays connected to the charger for 24 hours after the green light appears, as it provides a better balance between each cell in the battery. -
Page 22: Battery Specifications
BATTERY SPECIFICATIONS This e-bike uses a unique battery, contact Delta customer service or Promovec America Inc. when purchasing a new battery/charger. You should only purchase original Promovec equipment for this bike. For more information, see the table below. WARNINGS! Do not dismantle or damage the battery. -
Page 23: Bike Maintenance
BIKE MAINTENANCE BRAKES The e-bike is equipped with V-brakes. The brake lever mounted on the left side of the handlebar controls the front brake and the brake lever installed on the right side controls the rear brake. The tension on the brake cable must be tight to ensure full function. It should not be possible to pull the brake lever all the way to the handlebar. -
Page 24: V-Brake Maintenance
V-BRAKE MAINTENANCE A V-brake works by squeezing the wheel rim between two brake pads. The friction on the rim will make the bike stop. A worn rim, brake pads or brake pads not adjusted correctly will affect the ability to brake. -
Page 25: Gear Shifter
GEAR SHIFTER The rDrive has 7 gears. The gear shifter is mounted on the right side of the handlebar. The red marker indicates the current position. For smooth gear operation it is recommend that you pedal lightly when operating the gear shifter and changing gears. -
Page 26: Tires, Tubes And Wheels
TIRES, TUBES AND WHEELS It is important that that the tires are inflated correctly. The recommended tire pressure is marked on the side of tire’s sidewall. Tire pressure is given either as maximum pressure or as a pressure range. How a tire performs under different terrain or weather conditions depends largely on tire pressure. -
Page 27: The Chain
THE CHAIN The bike chain must be lubricated with regular intervals with a lubricant dedicated for bike chains. This is done to increase the lifetime of the chain and to make it run smooth. A chain that is not lubricated will start to rust and will add extra wear to the drivetrain. Furthermore, the chain will become more fragile and over time there is a risk it will break. -
Page 28: General Maintenance
GENERAL MAINTENANCE Although some service and maintenance can and should be performed by the owner, and require no special tools or knowledge beyond what is presented in this manual, we recommend an annual inspection once a year by certified bicycle mechanic to maintain and preserve the electric bike’s condition. -
Page 29: General Information
TRANSPORTATION OF E-BIKES Your E-bike must be transported with an approved e-bike rack. Electric bikes are heavier compared to traditional bikes, and require a bicycle carrier with a larger load capacity. Always remove the battery before transporting your electric bike. ROAD TRAFFIC LAW While riding your e-bike, you must adhere to all traffic laws in your state. -
Page 30: Wet Weather Conditions
NIGHT TIME OPERATION Riding a bicycle at night is much more dangerous than riding during the day. A cycist is very difficult for motorists and pedestrians to see. Children should exercise extreme cauition at dawn, at dusk or at night. Adults who chose to accept the greatly increased risk of riding at dawn, dusk or at night need to take extra care both riding and choosing specialized equipment which helps reduce that risk. -
Page 31: Promovec Limited Warranty
PROMOVEC LIMITED WARRANTY Promovec warrants new Promovec branded components, parts, and accessories against defects in workmanship and materials, as specified below: NOTE: All warranty periods outlined below apply to original owner only TWO-YEAR WARRANTY Display, controller, sensor, motor and motor parts, control cables and lights (excluding light bulbs). - Page 32 ...WARRANTY CONTINUED This warranty gives the consumer specific legal rights, and those rights and other rights may vary from place to place. This warranty does not affect your statutory rights. The English version of the warranty shall prevail. Note: The 2-year guarantee does not apply to Promovec systems and batteries used in commercial applications, including bicycle rentals.
-
Page 33: Technical Data
TECHNICAL DATA Gear: Shimano, 7-speed Motor: 250W rear motor Controller: 250W, 36V, Max. speed 15.5 mph Mode: PAS (Pedal Assist System) (EU standard EN EPAC 15194:2017) Battery type: Carrier 4 Weight: Check the CE-label on the bike frame User weight: Max. -
Page 34: Register The Bike
REGISTER THE BIKE, BATTERY AND LOCK The numbers on the frame, key/lock and battery are unique and are usable in cases of warranty or theft of the e-bike. Below you can write the numbers for future reference. FRAME NUMBER: BATTERY SERIAL NUMBER: KEY/LOCK: Page 34... - Page 35 Page 35...
- Page 36 YOU R S E RV I C E S To maintain and preserve the e-bike’s condition, we recommend an inspection on a regular basis. The inspection should include a include a full tune up and complete inspection of your electric system including battery inspection. Date &...
Need help?
Do you have a question about the rDrive and is the answer not in the manual?
Questions and answers