Advertisement
Advertisement
Table of Contents

Related Manuals for MASINGO Allegro X8


Summary of Contents for MASINGO Allegro X8
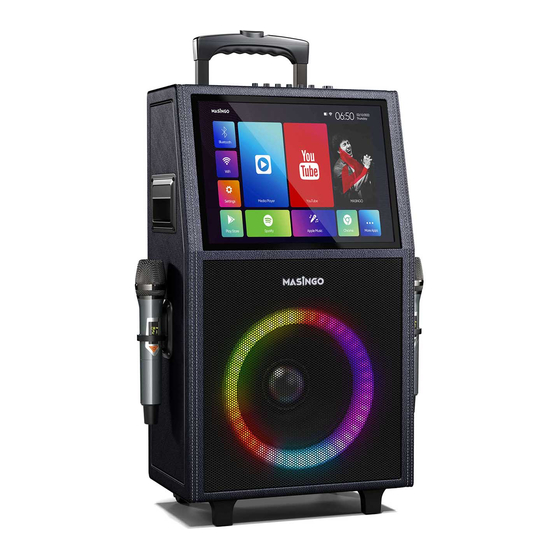
- Page 1 It’s time to like a pro Karaoke Machine Allegro X8 USER MANUAL...
- Page 2 User manual Karaoke Machine - Allegro X8...
- Page 3 Congratulations! You’ve just taken your party game up a notch. Meet the last karaoke machine you’ll ever need - the Allegro X8 from Masingo. Its fully-functional, WiFi-enabled, built-in Android 7.1 touch screen acts as a control panel, lyrics display, and music library simultaneously. This...
-
Page 4: Parts And Features
It’s the Whole Package! Parts & Features What’s included… 1x Masingo Karaoke Machine 1x Charging (DC15V) Cable 2x Wireless Microphones 1x Performer’s Manual 1x Remote Control 1x 3.5 mm Aux Cable Function Board USB 2 USB 1 HDMI VOLUME AUDIO OUT... -
Page 5: Remote Control
Remote Control MARKET Open Google Play store Open YouTube MUTE Mute volume POWER MIC PRIO Turn on/off standby mode Activate/deactivate mic priority mode APPS MAGIC Open more applications page Turn on/off magic mode MODE vocal effects Switch between Bluetooth, AUX, and Touch Screen mode VOLUME MEDIA Adjust volume up/down... - Page 6 Take Note Review Before using 1) Keep this manual for future reference. 2) Adhere to all warnings. 3) Keep ventilation openings clear; do not block any of this machine’s vents/ openings. 4) Install and set up the machine according to the manufacturer’s instructions provided in this manual.
- Page 7 Ready, Set, Sing! Quick Start Guide Charge the machine and insert two AA batteries into each microphone. Power on the machine and microphones. Select your preferred playback mode. Pull up your lyrics on the built-in display. Sing your heart out! Note: See the “Detailed Usage Guide”...
- Page 8 Never Miss a Note Detailed Usage Guide Machine How to charge the machine Plug in the machine’s charging cable into the DC15V (15) machine charging port on the function board and into a polarized wall outlet. Be sure to charge fully before each use. The indicator light will turn on to indicate charging.
- Page 9 Microphone How to turn the microphone on/off Press down on the triangular button with a Power symbol on each of the microphones to turn them on or off. How to replace the microphone batteries Screw off the bottom half of the microphone and insert two AA bat- teries (not included) into the proper slots.
- Page 10 To use Bluetooth, press the Bluetooth & AUX app on the touch screen or the BT (28) button on the machine’s function board. Search for the machine name (“Masingo”) under your device’s Bluetooth connection settings and click to connect. Note that once you exit the Bluetooth app on the touch screen, the Bluetooth mode will no longer be connected.
- Page 11 How to use AUX (in) mode Playing music *from* an AUX-compatible device (such as phone or MP3 player): When the machine is on, plug an Aux Cable into the Line In (5) port on the machine’s function board and into the designated input on the device you wish to connect.
- Page 12 How to use Karaoke Mode Karaoke mode allows you to instantaneously convert a song into a karaoke version by muting the vocals. In order to do so, 1) Connect your music via USB as instructed in the “How to start USB mode”...
-
Page 13: Touch Screen
Touch Screen How to connect to WiFi Click on the WiFi icon on the home screen and then select a WiFi network from one of the available options to connect to. How to use the slide-up menu on the touch screen The slide-up menu is located at the bottom of the touch screen and offers shortcut options that give you access to Bluetooth, Volume Down, Volume Up, Active Applications, Home Screen, Back, and Scroll Down. - Page 14 How to use Magic Mode and EQ Settings EQ and Magic Mode settings can be accessed through the DSP Adjuster app. Access the app by swiping from the right edge of the screen towards the center or by clicking on the DSP Adjuster app in the More Apps section.
- Page 15 Remote Operating and aiming the remote 1) Install two (2) AAA batteries in the remote. 2) Identify the speaker grill: The remote’s sensor is located behind the machine’s speaker grill right above the ring light. 3) Ensure you are directly in front of the machine: The remote’s sensor has a range of 60°, which means that a user cannot be more than 30°...
-
Page 16: Maintenance
For best results, clean and store the machine after each use. How to transport The Allegro X8 was designed intentionally for easy transport and mobility. Begin by unplugging all wires from the machine. Place the microphones in the two holders attached to the side of the machine. -
Page 17: Troubleshooting Guide
When Things Go Flat Troubleshooting Guide Problem Solution Machine is not The battery is depleted. Be sure to charge the turning on machine after each use. Microphone is not The Microphone battery is low or depleted. turning on Replace the AA batteries in the microphone. Touch screen is not Turn off the power and then turn it back on. - Page 18 The remote control is Ensure you are close enough to the machi- not working ne and standing directly in front of it. (See “Operating and aiming the remote” above). Aim the remote directly towards the speaker grill above the ring light. Aiming the remote towards the touch screen will NOT achieve desired results.
- Page 19 The remote control is Ensure you are close enough to the machi- not working ne and standing directly in front of it. (See “Operating and aiming the remote” above). Aim the remote directly towards the speaker grill above the ring light. Aiming the remote towards the touch screen will NOT achieve desired results.
- Page 20 If you encounter any issues with your machine—or if you have Warranty any questions or comments—please feel free to contact us. Have your warranty information on hand for faster service. 844-262-7464 support@masingo.net www.masingo.net Love your new machine? We want to hear about it!
Need help?
Do you have a question about the Allegro X8 and is the answer not in the manual?
Questions and answers
My touch screen turns off after 30 seconds