Table of Contents
Advertisement
Quick Links
Advertisement
Table of Contents

Related Manuals for SwiftSensors SG3-1010

Summary of Contents for SwiftSensors SG3-1010
- Page 1 Quick Start Guide Gateway and Sensor Setup...
-
Page 2: Table Of Contents
Contents What’s in the Box Coonect Your Gateway with WiFi Connect Your Gateway with Cellular Connect Your Gateway with Ethernet Connect Your Gateway with Power over Ethernet Register Your Gateway Turn On and Add Your Sensors Configure Your Console Add the Swift Console Web App to Your Mobile Phone 18 Troubleshooting Help/Support Resources 02 | Swift Sensors Quick Start Guide... -
Page 3: What's In The Box
What’s in the Box? Gateway Power Supply Antenna Quick Start Guide (SG2-1012 Only) Swift Sensors Quick Start Guide | 03... -
Page 4: Coonect Your Gateway With Wifi
*If connecting with Cellular, go to Page 9 *If connecting with Ethernet, go to Page 10 Connect Your Gateway Using WiFi Connect the antenna to gateway. Plug in gateway. Wait about 2 minutes until the light turns RED. PRESS AND HOLD the button in the center of the gateway label for 1 SECOND to start WiFi Hotspot setup. - Page 5 After 2 minutes Press for 1 Second After 20 seconds, the light will turn solid blue Swift Sensors Quick Start Guide | 05...
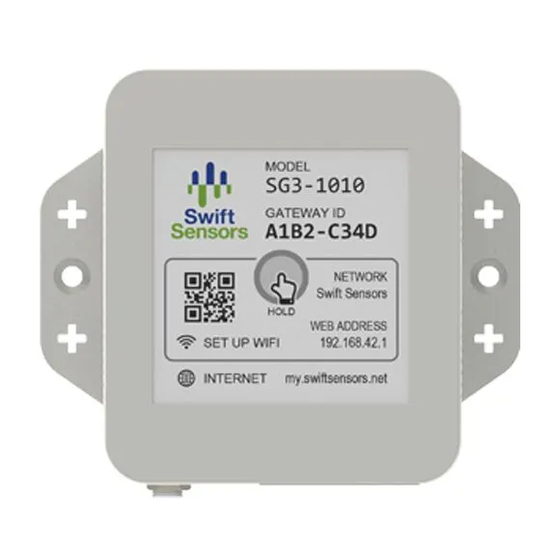
- Page 6 Connect to Gateway WiFi Hotspot • From your phone, go to Settings > WiFi. Select Swift Sensors (last four digits of your gateway ID). (It may take a few minutes before the network appears). • Scan the QR code on your gateway or below with your phone, or open your phone’s web browser and enter 192.168.42.1 to access your gateway’s WiFi Setup.
- Page 7 Swift Sensors Quick Start Guide | 07...
- Page 8 After 20 seconds, your gateway light will turn green indicating successful connection to the network. After 20 seconds, the light will turn green. 08 | Swift Sensors Quick Start Guide...
-
Page 9: Connect Your Gateway With Cellular
Connect Your Gateway with Cellular Plug the provided power cable into the gateway. 2. Plug the cellular modem into the gateway’s USB port. If the Internet light is green after 5 minutes, your gateway is online. If not, see Troubleshooting. After 2 minutes, the light will turn green. -
Page 10: Connect Your Gateway With Ethernet
Connect Your Gateway using Ethernet Plug the provided power cable into the gateway. 2. Plug the Ethernet cable into the gateway. If the Internet light is green after 2 minutes, your gateway is online. If not, see Troubleshooting. After 2 minutes, the Router light will turn green Ethernet... -
Page 11: Register Your Gateway
Register Your Gateway to a New Account* *If you already have a Swift Sensors account, go to Page 12 Go to my.swiftsensors.net 2. Click Create Account. 3. Fill out the form and click Create Account. If you see an error message, make sure you have connected your gateway. - Page 12 Register Your Gateway to an Existing Account Sign in to my.swiftsensors.net 2. Select List in the navigation bar. 3. Select Add Gateway from the Gear menu. 4. Enter the last four digits of your gateway ID and click the check button to save. Your new gateway will appear in your Hardware list.
- Page 13 Click on the Gear menu and select Add Gateway Enter the last 4 digits of your Gateway ID Swift Sensors Quick Start Guide | 13...
-
Page 14: Turn On And Add Your Sensors
Turn On and Add Your Sensors to Your Account Your sensor was shipped to you in the “Off” state. By simply turning on the sensor, your gateway will be able to detect it. To turn your sensor on, CLICK the center button on the sensor. - Page 15 Gear Menu To Turn Off Sensors HOLD the center button of the sensor until the green light stops blinking and glows solid for a few seconds to indicate the sensor is off. Swift Sensors Quick Start Guide | 15...
-
Page 16: Configure Your Console
Configure Your Swift Sensors Console Please sign in to my.swiftsensors.net and follow the Installation and Setup Guide on our Online Help page to configure your console. Setup your gateways and sensors according to location and function. 2. Create notifications and assign them to your measure- ments and users. - Page 17 Scan the following QR code to access additional tutorial information within the Console. Swift Sensors Quick Start Guide | 17...
-
Page 18: Add The Swift Console Web App To Your Mobile Phone
Add the Swift Sensors Web - App to Your Phone Apple iOS* *If using Android, go to Page 20 Using mobile Safari, sign into swiftsensors.net with your user credentials. 2. In the Safari footer, tap the Export button at the bottom center. - Page 19 Add the Swift Sensors Web - App to Your Phone Google Android* Using mobile Chrome, sign into swiftsensors.net with your user credentials. 2. In the Chrome header, tap the icon with three vertical dots in the upper right corner. 3. Select Add to Home screen from the popup menu.
- Page 20 20 | Swift Sensors Quick Start Guide...
- Page 21 Swift Sensors Quick Start Guide | 21...
-
Page 22: Troubleshooting
Troubleshooting If you encounter problems during installation, the following table provides solutions to the most common ones. For more information, please refer to our Online Help, which provides the most complete and up-to-date information. Problem Solution Red means the gateway is not able to connect to your WiFi router, a cell tower, or Ethernet jack. - Page 23 Problem Solution The gateway does not have power. Make sure the supplied power cable is securely No gateway plugged in and screwed on tight, and make lights are on. sure the power adapter is plugged into a powered outlet. Make sure your gateway is online and the sensor is within 50 meters (164 feet) of the gateway.
-
Page 24: Help/Support Resources
To go there now, scan the QR code on the left with your phone or open your web browser and go to my.swiftsensors.net/#/help Contact Us Our support team is ready to help. If you have more... - Page 25 Need a Sensor Specialist? Schedule a 1-on-1 new user onboarding meeting and learn from the professionals. We’ll assist you with setting up your account from start to finish. Already set up your account? Schedule an onboarding meeting and we’ll review your account to make sure everything is setup correctly and meeting your monitoring needs.
- Page 26 Notes 24 | Swift Sensors Quick Start Guide...
- Page 27 FCC Compliance Notice: Industry Canada (IC) Compliance Notice: This device complies with part 15 of FCC rules. This device complies with Industry Canada Operation is subject to the following two license-exempt RSS standard(s). Operation is subject conditions: to the following two conditions: 1.
- Page 28 © 2022 All Rights Reserved...
Need help?
Do you have a question about the SG3-1010 and is the answer not in the manual?
Questions and answers