Advertisement
Chorus PV
Quick Start Guide
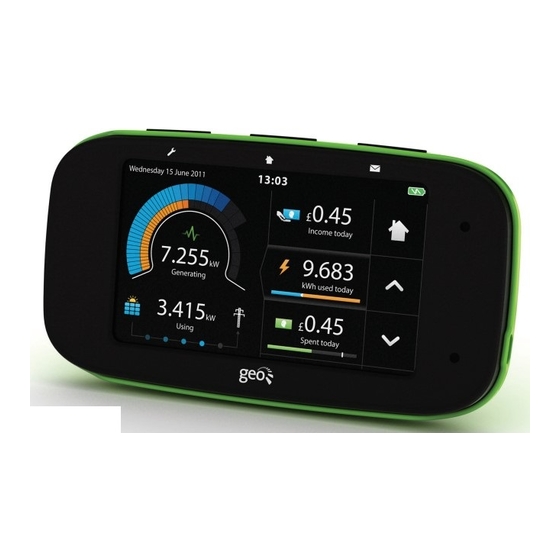
Putting you in control of your PV generation and consumption
▪
Shows import and export of energy
▪
Tracks energy use against budget
▪
Access to www.energynote.co.uk for in-depth analysis, support and hits & tips
for a simpler start, go to:
Setup
You can set up features, budgets and
tariffs here.
Home
This takes you to the home screen of
the feature you are viewing.
Messages
This takes you to your inbox, where you
will find messages from your Chorus.
Welcome
Welcome to your new Chorus PV system. The
system requires a mains electricity meter with
a LED pulse output. If you're unsure, check
the front and look for a red flashing light. The
system is not designed to work with a spinning
disc meter.
Safety
When fitting the sensors, if the cables
coming out of the meter look perished
(cracked, burned, or bare copper) or are
loose, or wet, or you have any doubts
about their condition, do not install the
sensor, contact a qualified electrician.
Don't force the CT sensor onto the mains
cable if the cable diameter appears to be
too big.
Keep the display away from water.
Clean with a soft, dry cloth.
If any of the components appear damaged,
contact us.
This is a user installable display. There is
no need for you to connect or disconnect
any cabling.
If you need to replace the batteries you
must only use NiMH rechargeable ones.
Non-rechargeable batteries must not
be used.
To protect the environment, please take
your batteries to a recycling centre for
safe disposal.
For use in a dry, indoor environment only.
Please only use the power supply provided.
This product is RoHS compliant and
CE approved.
www.energynote.co.uk
Step 1 - Power up
Unscrew the battery flap and insert the
batteries supplied. Replace the cover and
plug in the power supply. The display takes
around two minutes to start. Please note: the
batteries are for backup only. If you need to
replace the batteries you must only use NiMH
rechargeable ones.
Step 2 - Connect to the internet
In order to connect your display to the
internet you must pair your Chorus display to
the internet bridge, contained in the optional
web pack.
Remove the power supply then select the
correct set of pins for the UK. Insert and twist
clockwise to clip the pins to the power supply.
Insert the power cable into the
internet bridge and then plug it into
the wall but do not turn
it on yet, your Chorus
display will tell you
when to turn it on.
Step 3 - Installation status
Check the connectivity of the sensors by
selecting:
» Installation » Status
A green light shows that a sensor is working; if
a red or amber light is showing please see the
user manual at www.energynote.co.uk
Open each of the three transmitters by
pressing the button on the back and pulling
the outer cover away. Remove the red battery
tab. The flashing red light will show that the
unit is working.
battery tab
flashing red light
When you have connected your display to
the internet it will set up the time and date
automatically. If you want to do this manually
it's in the menu:
» Settings » Time and date.
Plug the Ethernet cable into the back of your
internet bridge and plug the other end into
your router.
pairing button
Pair the internet bridge to the Chorus by
selecting
» Installation » Network
Tap the internet bridge option and follow the
instructions on screen to pair your Chorus to
the internet bridge.
internet
bridge
Check the status of the internet bridge by
scrolling down the page.
Advertisement
Table of Contents

Subscribe to Our Youtube Channel
Related Manuals for Geo Chorus PV


Summary of Contents for Geo Chorus PV
- Page 1 Chorus. flashing red light Welcome Welcome to your new Chorus PV system. The system requires a mains electricity meter with a LED pulse output. If you’re unsure, check the front and look for a red flashing light. The...
- Page 2 Step 5 - Telling the Chorus about you There are a few additional settings to complete to get your Chorus PV fully up and running. This can be done on the Chorus (see below) or from the energynote website (see Step 6).
Need help?
Do you have a question about the Chorus PV and is the answer not in the manual?
Questions and answers