Table of Contents
Advertisement
Quick Links
Q
S
UICK
TART
INTRODUCTION
Thank you for purchasing the ikan VX9 LCD Monitor. We know that you will be satisfied with our "V" series monitors.
Please visit www.ikancorp.com for more information on our current and future products including our award-winning
fluorescent studio lights and light accessories.
PACKAGE INCLUDES
VX9 LCD Monitor
AC Power Adapter
MA206 Articulating Arm
DV Battery Plate (Check One)
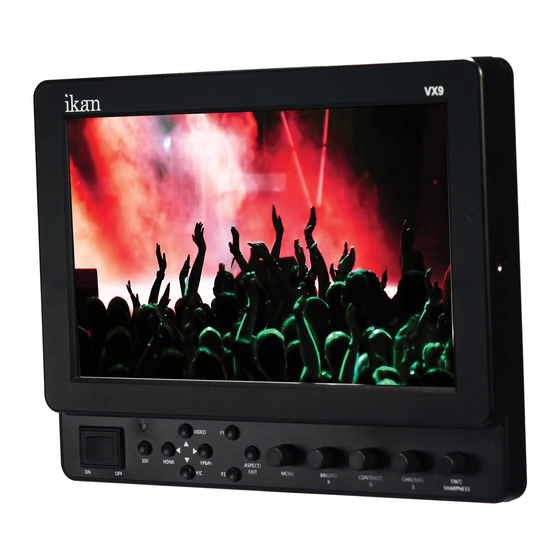
MONITOR DIAGRAMS
Front view
ON
OFF
1
2 3 4 5 6 7 8
Power Switch
1
Power ON / OFF
Power Indicator Light
2
When the power is ON, the LED green lights up.
SDI Selection Switch
3
Serial digital interface input (HD/SD compatible)
4
VIDEO Selection Switch
Video input
5
HDMI Selection Switch
High-Definition Multimedia Interface input
Y/C Selection Switch
6
SVHS input
7
YPbPr Selection Switch
Analog component or RGB input
3903 Stoney Brook Dr. Houston TX 77063. 1-713-272-8822. support@ikancorp.com © 2010 ikan Corporation. All right reserved. www.ikancorp.com
G
UIDE /
BP2-S
BP2-SU
BP2-C
BP2-P
VIDEO
F1
YPbPr
ASPECT/
SDI
HDMI
EXIT
MENU
Y/C
F2
9
VX9 LCD MONITOR
Sony "L" Series
Sony "BP-U" Series
Canon "900" Series
Panasonic "D54" Series
BRIGHT/
CHROMA/
CONTRAST/
SHARPNESS
R
B
G
10
1 1
12
13
F1 and F2 Buttons
8
Function key actions are selected in the menu.
ASPECT/EXIT Selection Button
9
Aspect: 16:9, 4:3, Full
In MENU, it is to exit the menu.
MENU Knob
10
It is to display menu, select settings, and adjustments.
(Push the knob to select, turn the knob to adjust settings.)
1 1
BRIGHT/R Knob
1: Adjust brightness 0 - 60 (30)
2: Adjust red channel
12
CONTRAST/G Knob
1: Adjust contrast 0 - 60 (30)
2: Adjust green channel
CHROMA/B Knob
13
1: Adjust chroma 0 - 60 (30)
2: Adjust blue channe
14
TINT/SHARPNESS Knob
1: Adjust tint 0 - 60 (30)
2: Adjust sharpness 0 - 60 (30)
VX9
User programmable function buttons.
For quick access, the user may program
the F1 and F2 buttons to enable frequently
accessed monitor features. Via the main
TINT/
monitor configuration menu, either button
may be assigned to perform the following
functions: Window 1, Window 2, HV
14
delay, Blue Gun, and Pixel to Pixel, .
Checked by
Advertisement
Table of Contents

Subscribe to Our Youtube Channel
Related Manuals for Ikan VX9


Summary of Contents for Ikan VX9
- Page 1 TART INTRODUCTION Thank you for purchasing the ikan VX9 LCD Monitor. We know that you will be satisfied with our “V” series monitors. Please visit www.ikancorp.com for more information on our current and future products including our award-winning fluorescent studio lights and light accessories.
- Page 2 DC 12V power terminal Standard DC Connection **NOTE – The user must turn the monitor off before making changes to the DIP switches. Failure to do so may damage the monitor or make the monitor unusable. DIGITAL TO ANALOG CONVERSION [SDI > YUV] The monitor can convert digital SDI signals to Analog YUV.
-
Page 3: Specifications
• Damage caused by abuse or misuse, dismantling, or changes to the product not made by the company. • Damage caused by natural disaster, abnormal voltage, and environmental factors etc. 3903 Stoney Brook Dr. Houston TX 77063. 1-713-272-8822. support@ikancorp.com © 2010 ikan Corporation. All right reserved. www.ikancorp.com UIDE / VX9 LCD MONITOR 1080/29.97p...
Need help?
Do you have a question about the VX9 and is the answer not in the manual?
Questions and answers