
Related Manuals for OKTANTA EM4000


Summary of Contents for OKTANTA EM4000
- Page 1 EM4000_M_921806721 Electromagnetic–acoustic thickness gauge EM4000 User Manual Saint Petersburg 2021 +7(812) 385-54-28 info@oktanta-ndt.ru...
-
Page 2: Table Of Contents
EMA Thickness gauge EM4000. User Manual CONTENT CONTENT ............................2 WORKING PRINCIPLE ........................3 SPECIFICATIONS ..........................4 DEVICE APPEARANCE ........................5 DESCRIPTION OF OPERATIONS WITH THE DEVICE ..............6 Enabling and disabling the device ....................6 Switching between device windows ..................... 6 The main window ......................... -
Page 3: Working Principle
EMA Thickness gauge EM4000. User Manual PURPOSE OF THE DEVICE Electromagnetic–acoustic thickness gauge EM4000 (hereinafter referred to as the device) is designed to measure the wall thickness of steel pipes, sheet metal, rods and other products made of steel, as well as aluminium and other metals, without the use of couplant and without preliminary surface preparation, with a working a gap between the sensor and metal up to 3 mm. -
Page 4: Specifications
EMA Thickness gauge EM4000. User Manual SPECIFICATIONS Measured thickness range for steel 2…80 mm Measured thickness range for steel without gap 2..220 mm Thickness measurement error 0.08 mm Permissible gap between the sensor and the test sample up to 3 mm Measured thickness range of non-conductive coatings 0..5 mm... -
Page 5: Device Appearance
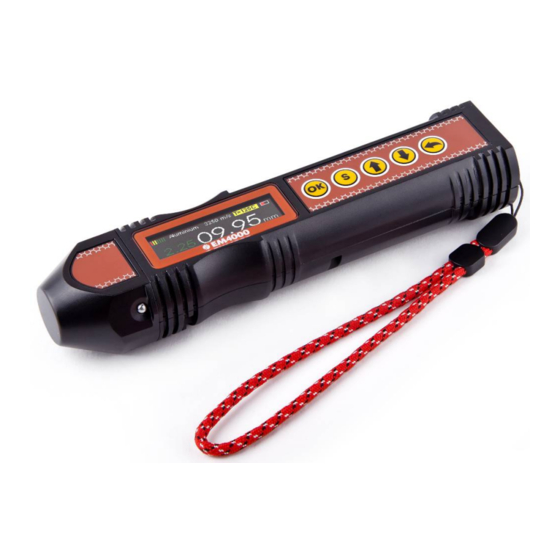
EMA Thickness gauge EM4000. User Manual DEVICE APPEARANCE Device appearance The device has a colour liquid crystal screen for displaying measurement results. The device is controlled using the keyboard. On the side of the device there is a USB- C connector for connecting a charger. The device has a removable sensor that can be easily replaced with a new one due to the presence of a quick-detachable connection. -
Page 6: Description Of Operations With The Device
EMA Thickness gauge EM4000. User Manual DESCRIPTION OF OPERATIONS WITH THE DEVICE Enabling and disabling the device To turn on the device, press the button and hold it for some time. After that, the following window will appear on the device screen:... -
Page 7: The Main Window
EMA Thickness gauge EM4000. User Manual The figure below shows the options for windows that appear when you press the button: Instrument window options You can also navigate through the windows with the button, in this case, the movement will occur in the other direction. - Page 8 EMA Thickness gauge EM4000. User Manual Signal level indicator. It shows how good the signal is at the measuring point. The more bars the indicator has, the stronger the useful signal. Material. This field displays information about what material is currently selected on the device.
- Page 9 EMA Thickness gauge EM4000. User Manual Further, by pressing the buttons, you need to select the desired field. The different options for the editing fields are shown in the figure below: After the required field is selected, you must press the button to enter the edit mode for the value of this field.
-
Page 10: A-Scan Window
EMA Thickness gauge EM4000. User Manual A-scan window The A-scan window is shown in the figure below: A-scan display mode The horizontal axis on the A-scan is measured in millimetres or inches, depending on the units of measurement selected in the instrument settings (see the “Settings window”... - Page 11 EMA Thickness gauge EM4000. User Manual In this case, the user can zoom in or out by pressing buttons. Pressing the button again switches the “scale” mode to the “offset” mode, in which you can move along the enlarged A-scan by selecting the necessary part of it.
- Page 12 EMA Thickness gauge EM4000. User Manual In this case, the user can change the gain by pressing or holding the buttons. To exit the manual gain control mode, press the button. Gate installation The device has three measurement modes: auto, one-gate and two-gates. To operate in manual one-gate and two-gates measurement modes, the device has the ability to install these gates on the A-scan.
-
Page 13: Settings Window
EMA Thickness gauge EM4000. User Manual Settings window The figure below shows the window with the device settings: Settings window To navigate through the lines in this window, press the button and after that select the desired line using buttons. - Page 14 EMA Thickness gauge EM4000. User Manual This parameter can take values of “0.1” and “0.01”. It determines how many decimal places are displayed on the device when measuring the thickness of the test sample and the thickness of the non-conductive coating.
-
Page 15: Files Window
EMA Thickness gauge EM4000. User Manual Date This menu allows you to set the date in the device. Time This menu allows you to set the time in the device. Language The device allows you to choose one of three interface languages: Russian, Chinese and English. -
Page 16: Presets And Calibration
EMA Thickness gauge EM4000. User Manual After that, you can select one of the saved files using the buttons. After the desired file is selected, you need to press the button to view or delete this file. In this case, the window will change and will be as shown below:... - Page 17 EMA Thickness gauge EM4000. User Manual The external view of the device with the EMT40004T sensor is shown in the figure below: Device with EMT40004T sensor Standard EMT40001 converter is designed for operation in the range of −20.. +80 °C ATTENTION! Using the EMT40001 converter at temperatures above 80 °C may damage it.
- Page 18 EMA Thickness gauge EM4000. User Manual ATTENTION! When working with test samples, the temperature of which is higher than 350 degrees, the thickness measurement with the EMT40004T converter must be performed for a short time, with pauses, according to the table above.
- Page 19 32..64, this will increase the operation rate of the device. 5) Select the measurement mode. In the EM4000 thickness gauge, three thickness measurement algorithms are implemented: an automatic algorithm, a one-gate thickness measurement algorithm and a two-gate thickness measurement algorithm.
- Page 20 EMA Thickness gauge EM4000. User Manual Calibration of the channel for measuring the thickness of the test sample. This calibration allows you to determine automatically the speed of sound in a sample with a predetermined thickness. To perform the calibration, you must perform the following steps: ...
- Page 21 EMA Thickness gauge EM4000. User Manual The menu “Calibration of the coating thickness measurement channel” can be accessed through the “Settings” window (see the “Settings window” section). The appearance of this menu is shown in the figure below: Coating thickness measurement channel calibration menu This menu consists of four items.
- Page 22 EMA Thickness gauge EM4000. User Manual and press the button. The third step is thickness calibration. To do this, select the appropriate menu item and press the button. After that, a field appears on the device screen, in which you can enter the value of the thickness of the reference coating.
-
Page 23: Measurement Of The Thickness Of The Test Sample
EMA Thickness gauge EM4000. User Manual Measurement of the thickness of the test sample The device can operate in three modes of thickness measurement: automatic, one-gate measurement mode, two-gate measurement mode. Automatic mode. To measure thickness in this mode, you need to: 1. - Page 24 EMA Thickness gauge EM4000. User Manual 6. Set the gate position (see the “A-scan window” section) so that it picks up the background signal. After that, the value of the measured thickness appears on the A-scan. An example of the position of the gate above the bottom signal is shown in...
-
Page 25: Measurement Of Coating Thickness At The Test Sample
EMA Thickness gauge EM4000. User Manual 3. If necessary, calibrate the device (see the “Presets and Calibration” section). 4. Install the device on the surface of the test sample. 5. Open the A-scan window (see the “Switching between device windows”... -
Page 26: Data Saving
EMA Thickness gauge EM4000. User Manual the device settings, set the parameter “measurement of coating thickness” to “on” (see the “Settings window” section). 3. If necessary, calibrate the device (see the “Presets and Calibration” section). 4. Place the device on the surface of the test sample. After a period of time... -
Page 27: Battery Charge
EMA Thickness gauge EM4000. User Manual Battery charge Use the supplied charger and USB-C cable to charge the battery. It takes at least five hours to charge a fully discharged battery to 100 %. It is recommended to charge the device in the off state. -
Page 28: Device Verification Technique
EMA Thickness gauge EM4000. User Manual ATTENTION! Prolonged operation of the device with a damaged sensor can lead to the failure of the device. Contact of a damaged sensor (with opening the coil wires) with metal can lead to spark formation. - Page 29 EMA Thickness gauge EM4000. User Manual Thickness / mm Roughness R / μm 2 ± 0.01 >10 10 ± 0.015 >20 60 ± 0.03 >20 It is allowed to use means other than those indicated above, but with characteristics that are not inferior to these means and are sufficient to obtain a reliable result.
- Page 30 EMA Thickness gauge EM4000. User Manual The device functionality check must be carried out in accordance with the instructions in the “Description of operations with the device” section and using a test sample from the delivery kit or another test sample that has the required certificate.
-
Page 31: Maintenance
EMA Thickness gauge EM4000. User Manual MAINTENANCE Converter replacement If the plastic cover of the EMT40001 converter is worn out or the protector of the EMT40004T converter is worn out, it is necessary to replace them with new ones. ATTENTION! It is recommended to replace the converter when the device is turned off To replace the EMT40001 converter, it must be disconnected from the device. -
Page 32: Battery Replacement
The replacement of the EMT40004T converter is carried out in a similar way. Battery replacement Battery replacement can be performed ONLY at the service centre of the Oktanta LLC. It is recommended to replace the battery every three years. ATTENTION! Do not replace the battery yourself!!! +7(812) 385-54-28 info@oktanta-ndt.ru... -
Page 33: Transportation And Storage
EMA Thickness gauge EM4000. User Manual TRANSPORTATION AND STORAGE When storing and transporting the device, the following climatic conditions must be followed: Air temperature +5…+30 °C Humidity 80 % at a temperature +25 °C Store and transport the device only in the case included in the delivery kit. In this case, it is necessary to avoid mechanical damage to the case and the device. -
Page 34: Delivery Kit
EMA Thickness gauge EM4000. User Manual DELIVERY KIT Basic kit EM4000 thickness gauge 1 pc. Device storage case 1 pc. Charger 1 pc. EMT40001 converter 1 pc. USB-C cable 1 pc. User manual 1 pc. CP40001 SOP 1 pc. Optional equipment EMT40004T converter 1 pc. -
Page 35: Manufacturer's Warranty
EMA Thickness gauge EM4000. User Manual MANUFACTURER’S WARRANTY The warranty period is 24 months from the date of purchase. During the warranty period, the Manufacturer undertakes to eliminate device malfunctions subject to the integrity of the case and the availability of warranty seals. -
Page 36: Repair Information
EMA Thickness gauge EM4000. User Manual REPAIR INFORMATION Date of Type of the defect Repairs carried Completion mark (date, request signature, seal) +7(812) 385-54-28 info@oktanta-ndt.ru... -
Page 37: Verification Information
EMA Thickness gauge EM4000. User Manual VERIFICATION INFORMATION Verification date Validity Implementer data +7(812) 385-54-28 info@oktanta-ndt.ru...
Need help?
Do you have a question about the EM4000 and is the answer not in the manual?
Questions and answers