MEGAlink ML2000 User Manual
Biathlon single use target
Hide thumbs
Also See for ML2000:
- User manual (39 pages) ,
- User manual (14 pages) ,
- User manual (4 pages)

Related Manuals for MEGAlink ML2000


Summary of Contents for MEGAlink ML2000
- Page 1 2016 User Manual for ML2000 User manual for ML2000 Biathlon Megalink AS V16.10 02.10.2015 Biathlon single use target...
-
Page 2: Table Of Contents
User Manual for ML2000 User manual for ML2000 Biathlon Table of Contents User manual for ML2000 ......................2 Biathlon ............................2 Table of Contents ........................2 General ..........................3 Wiring overview – single target .................. 3 Monitor image overview ..................... 4 Getting started........................ -
Page 3: General
User Manual for ML2000 1 General This document describes how to assembly, connect and use the Megalink BIA1200 target. 1.1 Wiring overview – single target 02.10.2015 Biathlon single use target... -
Page 4: Monitor Image Overview
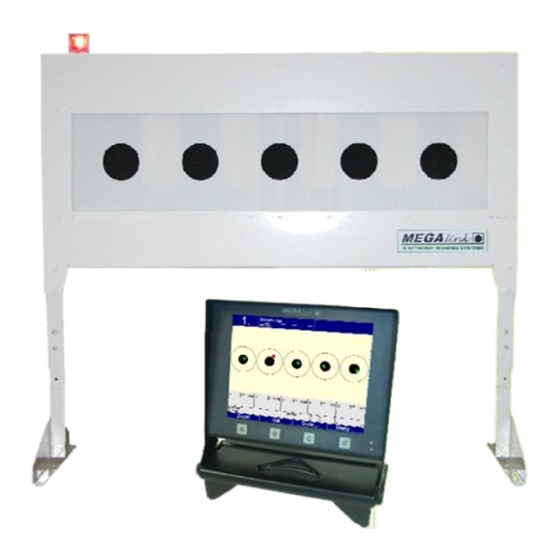
User Manual for ML2000 1.2 Monitor image overview Communication Target program / indicator Target type Target number Red shot marks a miss Green shot marks a hit Shots info with time Average Toggle stand and prone position 02.10.2015 Biathlon single use target... -
Page 5: Getting Started
User Manual for ML2000 2 Getting started 2.1 First time assembling of the target 1. Unscrew the wing nuts and remove the front steel cover from the target. 2. Mount the two target stands. 3. Loosen the wing nuts on the sides and remove the rear cover from the target. - Page 6 User Manual for ML2000 4. Mount the LED indicator. The two holes is placed over the two screws mounted on the top left of the frame. The cable is inserted in the hole below. 5. Plug the cable on the socket on the left of the motor controlling card inside the frame.
- Page 7 User Manual for ML2000 6. Connect the target cable to one of the connections marked "TARGET/NEXT". 7. Put in place the aiming cards. 02.10.2015 Biathlon single use target...
- Page 8 User Manual for ML2000 8. Adjust the self-indicators by turning the screw(s) located by the motor on the rear side. They should be able to run freely and not touch the rubber or the aiming cards. 9. Remount the rear cover.
-
Page 9: Connection Of The System
User Manual for ML2000 2.2 Connection of the system 1. Connect the other end of the target cable to one of the connections marked "TARGET" on the target cabinet. a. Check that the power switch inside the cabinet is set to "ON". -
Page 10: Monitor Configuration
User Manual for ML2000 3. Connect the monitor to the connection marked "MONITOR" on the shooting stand cabinet. a. Check that the power switch inside the cabinet is set to "ON". 4. Press the D button to power on the monitor. -
Page 11: Shooting
User Manual for ML2000 3 Shooting The Series menu can be used to quickly select the course of fire and target type. 3.1 5 target BIA The shooter can switch between stand and prone position by pressing the B button. The LED indicatior on the target will light red when target is in stand position. -
Page 12: Rings Target
User Manual for ML2000 3.2 10 rings target The target is displayed as a standard 10 rings target. All shots are plotted on the same target. Average position is also plotted. The last shot is marked red. 3.3 NSSF Test 1 Target The training target used by the Norwegian Biathlon Federation (Norges SkiSkytterForbund). -
Page 13: Maintenance
User Manual for ML2000 4 Maintenance 4.1 Rubber band The rubber band covering the detection camber must be in good shape. It is important that the band is moved upwards to prevent multiple shots making a bigger hole. Make a habit out of moving the band a little after each session. This can easily be done by moving the handle on the side of the target. -
Page 14: Aiming Card
User Manual for ML2000 4.2 Aiming card The aiming cards will over time be perforated. Make sure to remove any parts pointing towards or into the self-indicators. It's important that the self-indicator flaps are running freely. Replace the aiming card when needed, preferential before any significant events. -
Page 15: Additional Wiring Diagrams
User Manual for ML2000 5 Additional wiring diagrams 5.1 Up to five targets Target cabinet Twisted pair 1A/B Shooting stand cabinet 02.10.2015 Biathlon single use target... -
Page 16: Up To Ten Targets
User Manual for ML2000 5.2 Up to ten targets Double target cabinet Two twisted pairs 1 A/B 2 A/B Double shooting stand cabinet 02.10.2015 Biathlon single use target...
Need help?
Do you have a question about the ML2000 and is the answer not in the manual?
Questions and answers