Table of Contents
Advertisement
Quick Links
Advertisement
Table of Contents

Related Manuals for Davies Pump Hydropak-Xtra HP150


Summary of Contents for Davies Pump Hydropak-Xtra HP150
- Page 1 OWNERS MANUAL For correct operation & installation, it is essential to observe these instructions The Hydropak is covered by the Argon 3-Year Warranty for your piece of mind. Register online for extended warranty . argondistributors.co.nz/warranty-registration Year Warranty...
-
Page 2: Table Of Contents
Contents Contents Argon Customer Service ......................4 Warranty Registration for Extension ..................5 Overview..........................6 Scope of Delivery ........................8 Choose Your Location ......................9 Proven solutions through experience Power Surge Protection ......................9 Installation Requirements....................10 Initial Installation ........................11 Ever Since the first satisfied customer in 1931, Davies Pumps have Ultraviolet lnstallation ...................... -
Page 3: Argon Customer Service
Argon Customer Service Warranty Registration & Extension Argon Customer Service Congratulations on your purchase of a Davies Pump Hydropak®-Xtra, the all-in-one Pump, Multistage Warranty Registration Filtration & UV Sterilisation Water Supply System. You are about to enjoy the experience of pressurised and healthy water throughout your entire home. -
Page 4: Overview
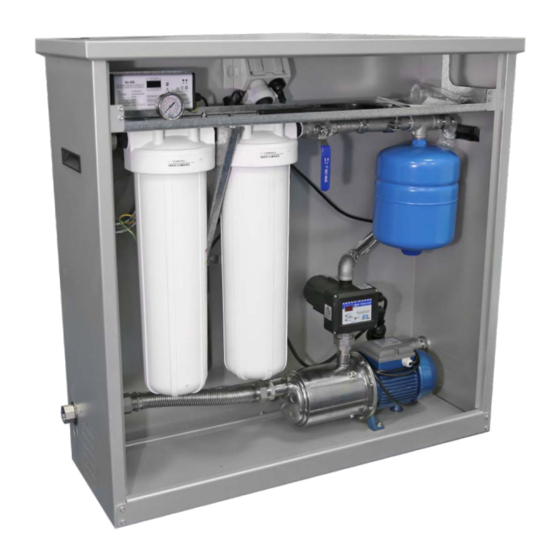
Overview Overview Overview Power Supply 230V 10A single Ph power supply required. The HPX system combines a high-quality self-priming pump, advanced pump control with dual-stage Optimum Control Second Line Defense Pressure gauge on filter outlet and pump controller High volume 10S UV treatment and quality to show if the filters are blocked and allow for timely ballast with 365-day timer and audible alarm sediment filtration and ultraviolet water treatment to provide clean, safe pressurised water for your... -
Page 5: Scope Of Delivery
Scope of Delivery Scope of Delivery Scope of Delivery Choose Your Location The HPX system is designed for many years of use but does require correct installation and periodic The HPX must be installed on a level, frost-free 700mm required above the maintenance. -
Page 6: Installation Requirements
Installation Requirements Initial Installation Installation Requirements Installation Procedure • Water supply: Coldwater line only 0 - 52 °C (protect from freezing) • Position the HPX unit on chosen location using a hand cart or a second person. • Supply pressure: Maximum of 5bar static pressure (install pressure limiting valve if •... -
Page 7: Ultraviolet Lnstallation
Ultraviolet Installation Ultraviolet Installation Always use soft gloves or a clean cloth when handling the UV lamps and quartz sleeves to prevent oil Ultraviolet Sleeve & Lamp Installation deposits on the surface. Oil deposits from your hands can create hot spots on the surface, leading to premature bulb failure. -
Page 8: Initial Setup
Initial Setup Final System Operation Initial Setup Final System Operation • Now all plumbing connections are complete, check the filter housings are tight, the UV • The recommendation is to leave the UV on at all times to ensure all water is being treated. lamp is fitted, and the taps are open. -
Page 9: Replacement Parts Guide
Replacement Parts Guide Cartridge Replacement Replacement Parts Guide Cartridge Replacement Procedure • Regularly changing the filter cartridges will maintain a high quality of purified water. The HPX is fitted with a dual 20” cartridge filter system. The first filter (right side) is a 20-micron polyspun cartridge and the second (left side) is a 5-micron polyspun cartridge. -
Page 10: Uv Lamp Replacement
UV Lamp Replacement UV Lamp Replacement UV Lamp Replacement Procedure UV Lamp Replacement Procedure During normal operation of the system, the green power LED light will be illuminated, and the • Remove the door and lid from your HPX system. display will indicate the number of days remaining until lamp replacement is required. -
Page 11: Uv Sleeve Maintenance
UV Sleeve Maintenance UV Sleeve Maintenance UV Sleeve Maintenance/ Replacement Procedure UV Sleeve Maintenance/ Replacement Procedure Mineral deposits and sediment build-up on the quartz sleeve will affect the system performance • Remove the sleeve retainer nut and the sealing o-ring. by decreasing the UV light transmitted through the quartz sleeve into the water column. -
Page 12: Pump Maintenance
Pump Maintenance Troubleshooting Guide Pump & Controller Maintenance Troubleshooting Guide The pump and controller do not require any special maintenance and should operate for many years before requiring service. Symptoms Possible Cause Possible Solution A periodic visual check is sufficient to detect any problems before they cause failure. Look for Leak detected at •... - Page 13 Put the priming plug back in and tighten. Your Davies pump should be mounted on a firm level foundation in an area that is not susceptible Switch on the pump, if it is 3 phase observe the rotation -is it according to the rotation arrow to flooding or is exposed to the weather or wet areas.
- Page 14 Pump User Instructions Pump User Instructions Before starting your pump check that the pump turns freely by inserting a screw driver into the Correct and incorrect use. groove of the main shaft at the fan end of the motor. Remove all tools and quickly turn power on and off, checking the cooling fan rotates the correct way. Correct use These pumps have been designed to pump clean water.
- Page 15 Hydrogenie 3.1 instructions Hydrogenie 3.1 WARNING: All connections must be done by qualified personal in accordance with all National electrical codes. Ensure all wiring is disconnected from mains supply before installation. Earth connections must be done first. Verify the power supply is between 110 and 230V. Use cables with enough section to power requirements.
- Page 16 Hydrogenie 3.1 instructions Hydrogenie 3.1 Basic Menu Configurations BUTTON PUSH Meaning Basic menu configurations can be set by simultaneously holding the ▲ and ▼ buttons for 5s, then using the When switch is on: Turns switch off. ▲ or ▼ buttons to change each configuration value and the power button to set and move to the next item.
- Page 17 Hydrogenie 8 instructions Hydrogenie 8 Technical Features: Rated motor power: 0.37-2.2Kw Supply Voltage: 1~ 230V Output Voltage: 1~ 230V/3~ 230V Frequency: 50-60Hz Max. Current per Phase: 10 A (~3 230 V) / 9A (~1 230 V) Max. Peak Current: 20% for 10s Fuses: 20A for inverter and 10A for main supply.
- Page 18 Hydrogenie 8 instructions Hydrogenie 8 Electrical Installation Main Connection Diagram: WARNING: All connections must be done by qualified personal in accordance with all National electrical codes. Ensure all wiring is disconnected from mains supply before installation. Earth connections must be done first.
- Page 19 Hydrogenie 8 instructions Hydrogenie 8 Master/Slave Connection: Low Level cut out Control Panel Layout: 1 LCD screen. Shows the pressure in working mode. 2 MANUAL START-STOP push button. 3 Push button for ENTER or EXIT menu. 4 With these push buttons we can change programming values showed in the LCD screen (1). 5 ENTER for saving programmed values.
- Page 20 Hydrogenie 8 instructions Hydrogenie 8 START UP: Screen Description Push Connect the HG8 to the electric supply with the mains switch. Wait for 10 seconds while the HG8 is running MIN. SPEED Using we can increase the lower limit of the speed of rotation of the pump´s motor. auto test.
- Page 21 Hydrogenie 8 instructions Hydrogenie 8 ALARMS: Failure – LED Indication Failure – LED Indication Description Description System Reaction System Reaction Solution Solution or or In case of simultaneous alarms, quit the automatic mode by pressing the pushbutton ‘AUTOMATIC ON/OFF’ (led light PUMP will turn off).
-
Page 22: Warranty Policy
↓ REGISTER STARTS. Number of cycles of operation, a cycle is a start and a stop. Your Davies Pump, when used for its designed purpose, correctly installed in an area that is well ↓ REGISTER SWITCH. Number of connections to the electric supply. - Page 23 Proven solutions through experience argondistributors.co.nz...
Need help?
Do you have a question about the Hydropak-Xtra HP150 and is the answer not in the manual?
Questions and answers