
Related Manuals for MANDREL welder EErgo

Summary of Contents for MANDREL welder EErgo
- Page 1 EErgo Hot paddle welder for mandrels Suitable for: Nylon (PA) / PP / TPEE / TPX Instruction Manual Bedienungsanleitung Version 115V Version 230V...
-
Page 2: Table Of Contents
1.8 Product information ................12 Welding ....................12 2.1 Set up of the mandrels that need to be welded ......... 12 2.2 Set up of the EErgo paddle welding tool ........... 13 2.3 Welding process ................13 2.4 Recovery from error modes .............. 14 Service / Maintenance 3.1 Preventive Maintenance .............. -
Page 3: Explanation Of Symbols
This operating manual describes the paddle welding tool in all its product varia- tions. The exact product identifi cation can be found on the product. Please make sure, the product fi ts your application. If applicable just sections of the instruc- tion manual might be signifi cant for several products. -
Page 4: Scope Of Delivery
1.1 Scope of delivery After receiving the products, check if the delivery is complete and without dam- age. The delivery contains the following: 1 pc. EErgo, 1 pc. Torx - wrench 1 pc. FZ01 Vario (guide 115V or 230V clamp, up to Ø... -
Page 5: Introduction
Optional Accessories: EErgo tool plate protection, Ratchet Cutters and/or Edge cutter SE02 protection holder and spare blades for welding bead cleaning bench vise for straight mandrel cut FZ02/2S (guide Storage Stand with Spare paddle EErgo Heat conducting clamp, Ø >26 mm) -
Page 6: Product Description
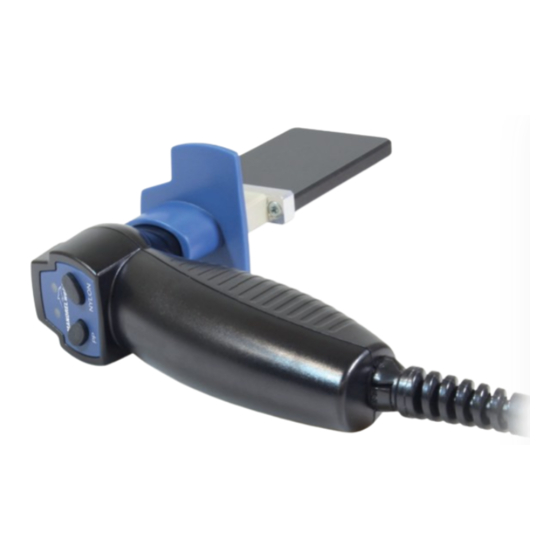
Torx Screws for change of hot paddle Handhold The BEHA EErgo paddle welding tool has the following properties: • Short heating-up time of approx. 5 minutes • Easy selection of welding temperature through push buttons (PP / 200°C, Nylon, TPEE, TPX / 260°C) •... -
Page 7: Safety Instructions
1.4 Safety instructions The BEHA EErgo paddle welding tool was manufactured and tested in accordance with standard DIN EN 60335-1 and has left the factory in perfect condition. To maintain it in perfect condition, the user has to observe the safety instructions in this manual. - Page 8 Safety of the user is no longer guaranteed in the follow- ing cases: • Visible damage such as cracks, ruptures, holes in insulation or housing etc. • The product does not function any longer • The product was stored in unfavorable conditions •...
- Page 9 overheating and damage to the product and jeopardize the safety of the user. The product is intended for use in dry and enclosed spaces. Do not use the product in a wet or humid envi- ronment. Avoid contact of the product with water. Never use the product in potentially explosive environments.
- Page 10 A scratched or contaminated paddle welding plate might lead to defective welding results. Only use clean and undamaged paddle welding plates. After each welding procedure the paddle welding plate has to be cleaned with a soft cotton cloth. In no case use peaked or sharp-edged objects for clean- ing.
-
Page 11: Intended Use
1.5 Intended use The unit may be used only under the conditions and for the purposes for which it was designed. Therefore, especially observe the safety instruc- tions and technological specifications such as environmental conditions and use in a dry environment. Only qualified personnel instructed in the use may operate the product. -
Page 12: Product Information
1.8 Product information The nameplate including product name, part number and serial number is attached to the back of the product. Please note these data in the operating manual. Product name Part number Purchase date 2.0 WELDING 2.1 Set up of the mandrels that need to be welded •... -
Page 13: Set Up Of The Eergo Paddle Welding Tool
2.2 Set up of the EErgo paddle welding tool • Plug in the welding tool into the socket. • Set up the temperature by pressing the button PP or Nylon. • Red LED indicates that the tool is heating up. -
Page 14: Recovery From Error Modes
• If both of the LEDs are blinking (green or red), alternating or simultaneously, the EErgo has entered one of the error modes. • It is possible to try to recover an error mode by pressing one of the keys, ac- cording to desired working temperatur, PP or Nylon. -
Page 15: Replacement Of The Paddle Welding Tool
• Attach the new paddle welding plate. Ensure not to damage the heating ele- ments. Attention: Only pull or push the hot paddle. Turning or twisting can dam- age the tool. • Screw the paddle welding plate with the adapter. Spare Parts information Spare paddle for EErgo, Order-No. FBWEE002... -
Page 16: Shipping To The Beha Customer Service
3.3 Shipping to the BEHA customer service Please always register the BEHA EErgo hot paddle welder by phone or e-mail before sending it to BEHA customer service. The goods must al- ways be declared with the IncoTerm "DDP" (delivered duty paid). In this way you avoid a possible rejection at customs and additional extra costs. -
Page 17: Warranty
5.0 WARRANTY BEHA EErgo hot paddle tools are subject to strict quality controls. Should, how- ever, defects in functioning occur in daily practice, we grant a warranty of 12 months (only valid in conjunction with the invoice). Productions or material defects will be removed by us free of additional charge if failure occurs without third party interference and the product returns to us unopened. - Page 19 EErgo Schweißspiegel für Schlauchdorne geeignet für: Nylon (PA) / PP / TPEE / TPX Bedienungsanleitung Version 115V Version 230V...
- Page 20 1.7 Transport und Lagerung ..............30 1.8 Informationen zum Gerät ..............30 Schweißen ....................31 2.1 Vorbereiten des zu verschweißenden Schlauchdorns......31 2.2 Vorbereiten des EErgo Spiegelschweißgerätes ......... 31 2.3 Schweißvorgang ................32 2.4 Wiederherstellen bei Fehlermodus ............ 32 Service / Maintenance 3.1 Vorbeugende Instandhaltung ............
-
Page 21: Erklärung Der Symbole
Diese Bedienungsanleitung beschreibt das Spiegelschweißgerät EErgo in allen Produktvarianten. Die genaue Produktbezeichnung befi ndet sich auf dem Gerät. Stellen Sie sicher, dass das Produkt zu Ihrer Anwendung passt. Ggf. sind Teile der Bedienungsanleitung nur für einige Produkte gültig. Dies ist in den entspre- chenden Abschnitten gekennzeichnet. -
Page 22: Lieferumfang
Anwenders bzw. Beschädigungen des Gerätes eintreten. 1.1 Lieferumfang Prüfen Sie nach Erhalt des Produktes, ob die Lieferung vollständig und unbe- schädigt ist. Folgende Produkte sind im Lieferumfang enthalten: 1 St. EErgo, 1 St. Torxschlüssel 1 St. FZ01 Vario (Führungs- 115V or 230V zange, bis Ø... -
Page 23: Einleitung
Halter mit Magnetfuß Ersatzspiegel EErgo Wärmeleitpaste zange, Ø >26 mm) für Ablage von EErgo 1.2 Einleitung Die Spiegelschweißgeräte wurden speziell für das Verschweißen von Schlauch- dornen aus den Materialien PP, Nylon (PA), TPEE und TPX entwickelt. Sie zeich- nen sich durch schnelle Aufheizzeit, einfache und ergonomische Handhabung sowie fehlerfreie Bedienung aus. -
Page 24: Produktbeschreibung
Schweißspiegel Torxschrauben für Spiegeltausch Griff Das BEHA EErgo Spiegelschweißgerät hat folgende Eigenschaften: • Schnelle Aufheizzeit von ca. 5 Minuten • Einfache Auswahl der Schweißtemperatur durch Drücken der Tasten (PP / 200°C oder Nylon, TPX, TPEE / 260°C) • Einfache Anzeige: grüne LED: Schweißtemperatur erreicht, rote LED: Aufheizen bzw. -
Page 25: Sicherheitshinweise
1.4 Sicherheitshinweise Die BEHA Spiegelschweißgeräte EErgo wurden gemäß den Sicher heitsbestimmungen DIN EN 60335-1 gebaut, überprüft und haben das Werk in einwandfreiem Zustand verlassen. Um diesen Zustand zu erhalten, muss der Anwender die Sicher- heitshinweise in dieser Anleitung beachten. Bei sämtlichen Arbeiten müssen die jeweils gülti- Unfallverhütungsvorschriften... - Page 26 Prüfen Sie insbesondere ob das Kabel oder das Gehäuse z.B. gebrochen, verschlissen, unzulässig geknickt, einge- schnitten oder in anderer Weise beschädigt sind. Die Sicherheit des Nutzers ist unter anderem in folgen- den Fällen nicht gewährleistet: • Sichtbare Beschädigungen (z.B. Risse, Brüche oder offene Stellen an Isolierungen oder Gehäuse, etc.) •...
- Page 27 Vermeiden Sie eine Erwärmung des Produktes durch direkte Sonneneinstrahlung. Nur so kann eine einwand- freie Funktion und eine lange Lebensdauer gewährleistet werden. Überhitzung durch direkte Sonneneinstrahlung kann zu Beschädigungen an der Steuerung führen und somit die Sicherheit des Benutzers beeinträchtigen. Das Produkt darf nur innerhalb von geschlossenen und trockenen Räumen verwendet werden.
- Page 28 Die Qualität der Schweißverbindung hängt von den Auf- schmelzzeiten, Abkühlzeiten, den Umgebungsbedingun- gen und der korrekten Durchführung der Schweißung ab. Nur eine korrekte Schweißung verbindet den Riemen sicher. Ermitteln Sie die notwendigen Zeiten und das Vor- gehen durch Probeschweißungen. Machen Sie sich mit dem Schweißvorgang vertraut.
-
Page 29: Bestimmungsgemäße Verwendung
wiesen wurden und die möglichen Gefahren verstanden haben. Das Gerät ist kein Spielzeug für Kinder Die Reinigung und Instandhaltung darf nur von geschul- ten Personen durchgeführt werden! 1.5 Bestimmungsgemäße Verwendung Das Gerät darf nur unter den Bedingungen und für die Zwecke eingesetzt werden, für die es konstruiert wurde. -
Page 30: Transport Und Lagerung
1.7 Transport und Lagerung Heben Sie die Originalverpackung für erneutes Verschicken auf (z.B. wegen Reparatur). Beschädigungen auf dem Transportweg werden nicht durch die Garantie abgedeckt. Das Produkt muss in geschlossen und trockenen Räumen aufbewahrt werden. Behandeln Sie das Produkt auf dem Transport vorsichtig, um Be- schädigungen zu vermeiden. -
Page 31: Schweißen
• Fixieren Sie den Schlauchdorn in den Führungszangen FZ01 oder FZ02/3 und richten Sie die Enden fluchtend aus. 2.2 Vorbereiten des EErgo Spiegelschweißgerätes • Stecken Sie das Schweißgerät in die Steckdose. • Stellen Sie die Temperatur ein, indem Sie die Taste PP oder Nylon drücken. -
Page 32: Schweißvorgang
2.4 Wiederherstellen bei Fehlermodus • Wenn die beiden LEDs (grün oder rot) blinken, abwechselnd oder simultan, befindet sich der EErgo im Fehlermodus. • Es ist jedoch möglich, das Gerät aus dem Fehlermodus zurück zu holen, indem entsprechend der gewünschten Betriebstemperatur die Taste PP oder Nylon ge- drückt wird. -
Page 33: Vorbeugende Instandhaltung
3.0 SERVICE / WARTUNG 3.1 Vorbeugende Instandhaltung Reinigen Sie den Heizspiegel nach jedem Schweißvorgang und tauschen Sie diesen aus, wenn die Oberfläche dauerhaft verschmutzt ist oder sich die Antihaftschicht ablöst/abnutzt. 3.2 Tausch des Schweißspiegels Der Schweißspiegel kann durch eingewie- sene Personen getauscht werden. Nicht korrekt montierte Schweißspiegel können zu fehlerhaften Schweißungen oder Ge- fährdung von Personen führen. -
Page 34: Versand Zum Beha-Service
Ersatzspiegel für EErgo, Best.-Nr. FBWEE002 3.3 Versand zum BEHA-Kundendienst Bitte melden Sie das BEHA EErgo Spiegelschweißgerät vor dem Versand zum BEHA-Kundendienst immer per Telefon oder E-Mail an. Die Ware ist immer mit dem IncoTerm "DDP" (delivered duty paid) zu deklarieren. -
Page 35: Technische Daten
4.0 TECHNISCHE DATEN Zulässige Umgebungstemperatur: 0…40°C (32…104°F) Betriebsspannung: EErgo 230 V: 230 V / 220 V AC, 50/60Hz EErgo 115 V: 115 V AC, 50/60Hz Aufheizzeit: approx. 5 minutes Leistung: 120 W Schweißtemperatur: 200°C, ± 10°C; 392°F, ± 10°F Nylon / TPEE / TPX: 260°C, ±... - Page 36 BEHA Innovation GmbH In den Engematten 16 · 79286 Glottertal · GERMANY Tel.: +49 7684 9070 · Fax: +49 7684 907 101 E-Mail: info@mandrel-welder.com · Internet: www.mandrel-welder.com PBXBMEG04 · 01/2021 · subject to change without notice · Änderungen und Irrtümer vorbehalten...
Need help?
Do you have a question about the EErgo and is the answer not in the manual?
Questions and answers