
Related Manuals for real living OAKMONT


Summary of Contents for real living OAKMONT
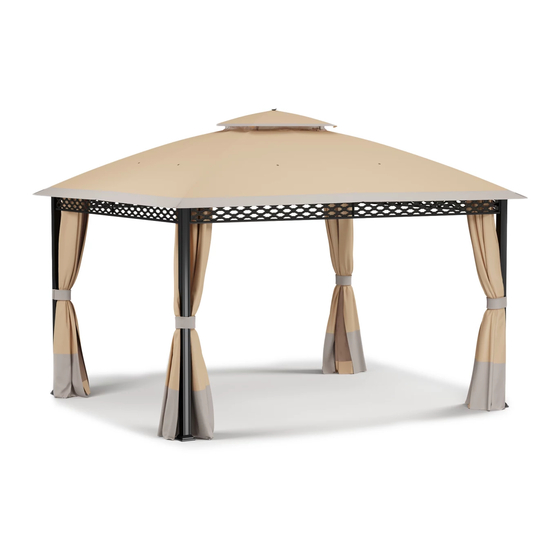
- Page 1 10x12 OAKMONT GAZEBO ASSEMBLY INSTRUCTIONS ITEM#: A101001700 SKU#: 810500467 Need help? We are here for you! 1(866)578 – 6569 24/7 • Toll Free...
-
Page 2: Warranty
GENERAL BEST PRACTICES FOR ASSEMBLY: • Please read and understand this entire manual before attempting to assemble or install the product. • Before beginning assembly of product, make sure all parts are present. Compare parts with package contents list and hardware contents list. -
Page 3: Parts List
PARTS LIST Label Part Number Description Part Image Post P000200396 Left Frame P000400801 (Long) Right Frame P000400800 (Long) Left Frame P000400803 (Short) Right Frame P000400802 (Short) Slant Beam For P000601208 Big Roof Middle Beam For P000601210 Big Roof (Long) Middle Beam For P000601211 Big Roof (Short) Middle beam... - Page 4 Base Cover P006100152 P000100392 Base Small Canopy P001100485 P001100486 Big Canopy P001200192 Mosquito Netting Curtain P001300096 Plug 20*20 (Pre-Asse P008100018 mbled on H) Plug 17*17 (Pre-Asse P008100017 mbled on E,F,J) 4/26...
-
Page 5: Hardware List
HARDWARE LIST Label Part Number Description Part Image Bolt M6*20 H010020012 Flat washer H050030001 Bolt M5*15 H010020523 Flat washer H050040002 Nut M6 H040010004 H010020013 Bolt M6*35 Plastic ring P005100264 StakeΦ 6*23 H070010001 Spring H050020017 Washer M6 Wrench H090020001 M5/M6 5/26... -
Page 6: Helpful Hints
HELPFUL HINTS • Tools needed and not included • Separating parts before starting Provided in hardware pack How many people are needed for the installation 6/26... - Page 7 STEP 1 Assembled View: Insert the Post (A) into Base Cover (P),attached Base (Q) to the Post (A) with Bolts (AA) and Flat washer (BB), tighten with Wrench (WW). 7/26...
- Page 8 STEP 2 Assembled View: Attached Left Frame (C1) to Right Frame (C2) with Bolts (AA),Flat washer (BB), Spring washer(LL) and Nut (EE), tighten with Wrench (WW). 8/26...
- Page 9 STEP 3 Assembled View: Attached Left Frame (B1) to Right Frame (B2) with Bolts (AA),Flat washer (BB), Spring washer(LL) and Nut (EE), tighten with Wrench (WW). 9/26...
- Page 10 STEP 4 Assembled View: Attached Middle beam connector (G) to assembled short frame (C1/C2) and long frame (B1/B2) with Bolts (CC) and Flat washer (DD), tighten with Wrench (WW). 10/26...
- Page 11 STEP 5 Assembled View: Attached Short Mosquito Netting Pipe (N2) to assembled short frame (C1/C2) with Bolts (CC) and Flat washer (DD), tighten with Wrench (WW). 11/26...
- Page 12 STEP 6 Assembled View: Attached Long Mosquito Netting Pipe (N1) to assembled long frame (B1/B2) with Bolts (CC) and Flat washer (DD), tighten with Wrench (WW). 12/26...
- Page 13 STEP 7 Assembled View: Attached the assembled short frame (C1/C2) to Post (A) with Bolts (AA), Flat washer (BB) and Spring washer (LL), tighten with Wrench (WW). 13/26...
- Page 14 STEP 8 Assembled View: Attached the assembled long frame (B1/B2) to Post (A) with Bolts (AA), Flat washer (BB) and Spring washer (LL), tighten with Wrench (WW). 14/26...
- Page 15 STEP 9 CLICK! Assembled View: Insert the Slant Beam For Big Roof (D) into Slant Beam End For Big Roof (H), click on. 15/26...
- Page 16 STEP 10 CLICK! Assembled View: Insert the Slant Beam For Big Roof (D) into Big Top Connector (K1), Attached Slant Beam End For Big Roof (H) to the Post (A) with Bolts (FF), Flat washer (BB) and Nut (EE), tighten with Wrench (WW). 16/26...
- Page 17 STEP 11 CLICK! Assembled View: Insert the Middle Beam For Big Roof (E) into Big Top Connector (K1), Attached the Middle Beam For Big Roof (E) to Middle beam connector (G) with Bolts (FF), Flat washer (BB) and Nut (EE), tighten with Wrench (WW).
- Page 18 STEP 12 CLICK! Assembled View: Insert the Middle Beam For Big Roof (F) into Big Top Connector (K1), Attached the Middle Beam For Big Roof (E) to Middle beam connector (G) with Bolts (FF), Flat washer (BB) and Nut (EE), tighten with Wrench (WW).
- Page 19 STEP 13 Assembled View: Spread the Big Canopy (S) on the big roof, don't tighten at this step. 19/26...
- Page 20 STEP 14 CLICK! Assembled View: Insert the Slant Beam For Small Roof (J) to Small Top Connector (K2), click on. 20/26...
- Page 21 STEP 15 Assembled View: Attached the Small Canopy (R) on the assembled small roof, fix the Finial (L) on the Small Top Connector (K2). 21/26...
- Page 22 STEP 16 CLICK! Assembled View: Attach the assembled Small top roof to Big top roof, then attached the Hook (M) to the Big Top Connector (K1). 22/26...
- Page 23 STEP 17 Assembled View: Attach the big canopy's corner (without belt) to Slant Beam, then attach the rest canopy corner (with belt) to Slant Beam. 23/26...
- Page 24 STEP 18 Assembled View: Please do the matching of zippers for different panels as showing the picture Attach Curtain (U) to the outer side of Netting Tube (N1/N2) by Plastic Ring (GG). 24/26...
- Page 25 STEP 19 Assembled View: Attach Mosquito Netting (T) to the inside of Netting Tube (N1/N2) by Plastic Ring (GG). 25/26...
- Page 26 STEP 20 Assembled View: Lift the Base Cove (P), fix the Gazebo to the ground by Stake (HH) through Base (Q) 26/26...
Need help?
Do you have a question about the OAKMONT and is the answer not in the manual?
Questions and answers