
Summary of Contents for Happy Trampoline Galactic Xtreme
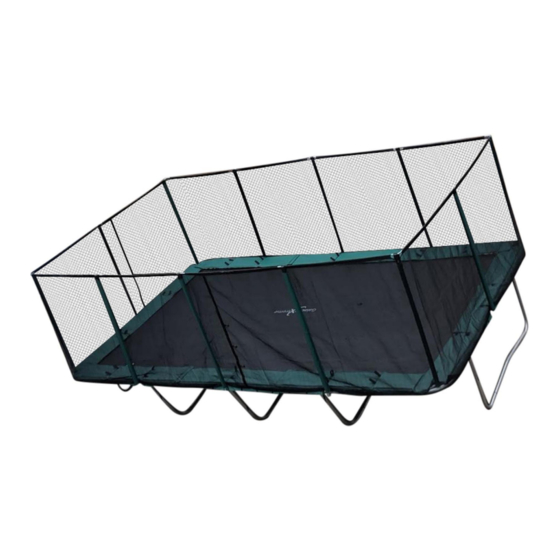
- Page 1 Galactic Xtreme Trampoline Installation Manual 10x23 Questions or Help with Installation Email: Customerservice@Happytrampoline.com 888-801-4403...
- Page 2 Part # Description Picture Quantity L leg frame Thicker of the L legs L leg connector Thicker leg connector Corner Frame (bottom left and top right) 12x2 Springs & 2 Corner Spring Slot Total of 16 Spring Slots Corner Frame (bottom right and top left) 12x2 Springs &...
- Page 3 End leg support connector The thinner leg connector Net Cups Bottom net enclosure poles (square bottom) 4 will be mark yellow (Corner Post) Top net enclosure pole (both ends round) Fiber glass net rod Net Enclosure Jumping Mat Net enclosure sleeves Green net sleeves 2.75”...
- Page 4 13 mm Nut (for trampoline frame) ½” Screw to connect 2 net enclosure poles 2 1/4” leg frame screw (Philips head) 10 mm Nut (for net and end trampoline leg) 1 7/8” Top net pole bolt (Philips Head) Short Side Spring Pad L cut on the edge Long side spring pad (2 panel)
- Page 5 Optional Tools Not Provided: 13 mm wrench / socket 10 mm wrench / socket 16 mm wrench / socket Mallet (not hammer, as it may damage/dent trampoline) Step drill bit (or large drill to drill out larger hole if necessary) Philips screw driver Black Electrical Tape Protective Eye Goggles...
- Page 6 Step 2: Building the mid frame Use the legs that you have just made in step one for the mid frame. Make sure the spring slots are pointed up and the net cups are on the outside of the frame Step 3: Finishing up the Frame Bolt together the frame with 2.75”...
- Page 7 Add the corners Part 3 and 4 All spring slots must be pointed up and the square net cups on the outside of the frame Add the short side rail. Make sure all the spring slots are pointed up and the cup for the net enclosure is on the outside of the frame...
- Page 8 Connect the End Legs Part 15 and 16 Use nuts/bolt 27 and 28 to connect together Connect the parts you just made to the corners of the frame. Connecting the end legs to the corner will be very heavy and will require 3 people to lug and pull the frame together.
- Page 9 Step 4: Installing the Jumping Mat Now open up the spring boxes. There will be 8 short springs, it will be for the corners. Please make sure no one is standing on the opposite side of the trampoline while springs are being installed to avoid injury.
- Page 10 Make sure the V ring is flat. If not it could cause premature wear and tear on the fabric tabs Step 5: Installing Spring Pad...
- Page 11 Lay all the spring pads as shown on the diagram. There will be either Velcro strap or cloth loops. Loop the closest springs thru the loop as shown here. Some of the spring pads will have loops on both side. These spring pads are reversible and you should flip them every few months to keep them clean.
- Page 12 Insert the net poles into the trampoline. The square bottom into the square fitting on the outside of the frame. There will be 4 post with color paint/or labeled corner on the bottom. These 4 post are for the corner. Make sure the slot on top of the black cap is parallel to the...
- Page 13 Feed the rod thru the top of the net. Start inserting the rod at each corner. Once all the fiber glass rod are connected and the zipper are in position, secure the rods with the black electrical tap. Connect all the segments of the rod together so it’s secure.
Need help?
Do you have a question about the Galactic Xtreme and is the answer not in the manual?
Questions and answers