
Related Manuals for Gracious Home GH3024SH-WH


Summary of Contents for Gracious Home GH3024SH-WH
-
Page 2: Hardware Bag
GH3024SH-WH GH3024SH-WN Hardware Bag '� ® Iii! � � � Qty22 Qty22 Qty20 Qty22 Qty18 Qty180 Qty 1 Qty 4 Qty 20 Qty2 Qty4 Cabinet Parts Detail • ITEM Right Side Panel Back Rail Left Side Panel Bottom Panel Shelf... - Page 3 GH3024SH-WH GH3024SH-WN After unpacking, place the panels on a soft surface 1. Screw the hardware into the side panel with drill Qty 22 A -------- Page3...
- Page 4 GH3024SH-WH GH3024SH-WN 2. Install the wooden dowels on the top, bottom panel, back rail and toe kick with the hammer. Connect with the right side panel. Tighten it with a screwdriver. Insert the back. D - - -- � --- - �...
- Page 5 GH3024SH-WH GH3024SH-WN 3. Fasten the left side panel with a screwdriver, then paste perfect paste to the hole � Qty 22 Q ty 11 4. Put the shelf support into the shelf hole � � � � Qty 20 Page 5...
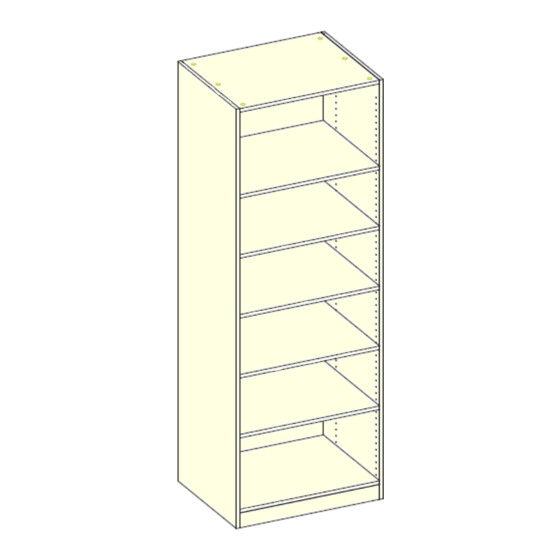
- Page 6 GH3024SH-WH GH3024SH-WN 5. Put the screw in to shelf hole, place the shelf, then lock it Qty 20 Page6...
- Page 7 GH3024SH-WH GH3024SH-WN 6. Insert the plastic plug to the rest of the shelf hole Qty 180 Page 7...
- Page 8 GH3024SH-WH GH3024SH-WN 7. When placing two cabinets next to each other use below hardware to connect the two cabinets for extra strength Drill a hole in the two side panels that are next to each other then secure the closet with the screw through the hole...
- Page 10 GH3024SH-WH GH3024SH-WN £ (2) Anti-tipping hardware kits are included to secure the closet to the Hardware Bag 5x60 SCREW AND wall. If there is not a stud in the ANCHORS TO WALL wall to secure the hardware, use the wall anchor for support and attach...
- Page 11 For daily cleaning, use a dry cloth and a soft liquid cleaner. Never use abrasive cleaners containing acetone, chlorine or strong bleach. Also, do not use tools as scrapers, metallic brushes, and other products which can scratch or tarnish surfaces. Under no circumstances should you use chrome cleaner on chrome-plated or brass trim, hinges, handles, sockets etc.
Need help?
Do you have a question about the GH3024SH-WH and is the answer not in the manual?
Questions and answers