
Subscribe to Our Youtube Channel
Summary of Contents for Xinuo Wal-way iChart
- Page 1 User's manual (Including the safe use of essentials) ◆ HM-5817 Electronic chart system Wal-way iChart® GPS satellite navigation systems ©1996-2017. Xinuo Information Technology (Xiamen) Corporation Limited...
-
Page 2: User Instructions
Warning: You must read the important safety information package box manual to understand the production safety statements and other important information. Disclaimer: The following article mentions of the "Xinuo" refers to "Xinuo Information Technology (Xiamen) Corporation Limited". Note: This equipment is not used for judging. navigation directly . - Page 3 Electronic chart system Notes: When you turn on the the navigator, make sure you have read the following precautions to avoid production failure caused by the improper operation: 1. Do not be left unattended without the system to be fixed, so as to avoid bumps or sailing and other factors cause to serious damage.
-
Page 4: Table Of Contents
Electronic chart system User Instructions:..........................1 Chapter I.............................. 5 Overview............................. 5 1-1 Appearance of the product....................6 1-1-1 Appearance of the product..................6 1-1-2 Accessories........................ 6 1-2 Installation instructions......................7 1-2-1 Installation and connection..................7 1-2-2 The installation of the GPS antenna................9 1-3 Switch on the system......................9 1-4 Keyboard introduces...................... - Page 5 Electronic chart system 2-7-4 Move Beacon......................30 2-8 The planned routes Operations................... 30 2-8-1 Add Routes......................30 2-8-2 Modify the routes....................31 2-8-3 Delete the routes......................32 2-8-4 Invoke the route....................33 2-8-5 Select waypoints in the route.................. 34 2-9 AIS Operation........................34 2-9-1 View the other Vessels on the chart................34 2-9-2 View the AIS vessel information................
-
Page 6: Chapter I
Electronic chart system Chapter I Overview This chapter describes the appearance of products, accessories and other related knowledge. -
Page 7: Appearance Of The Product
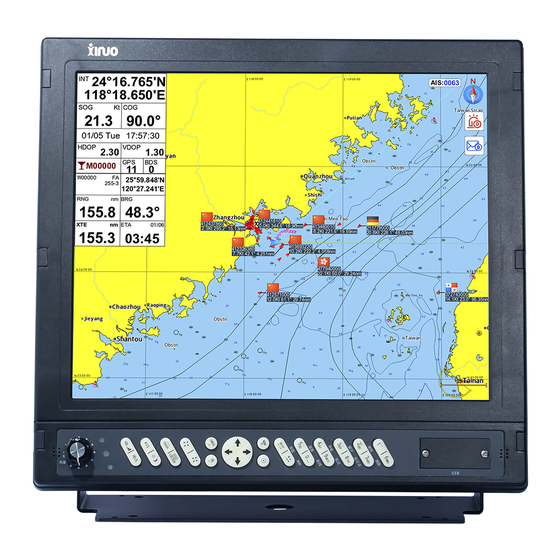
Electronic chart system 1-1 Appearance of the product 1-1-1 Appearance of the product The appearance of product as shown below 1-1-2 Accessories When you open the packing of XinNuo technology sailing's navigator. Please check various objects whether all the same.with the following list in the contents of the box .immediately.If the quantity does not meet or damaged, please contact your dealer in a timely manner. -
Page 8: Installation Instructions
Electronic chart system 1-2 Installation instructions HM-5817 is an integral whole machine, with 17 inches 1280 x1024 resolution of TFT color LCD screen It should be fixed on the operating table Or embedded installation, Connected to the associated auxiliary equipment , and adjusted to the Angle . 1-2-1 Installation and connection This manual is suitable for HM-5817 models (detailed installation in the appendix... - Page 9 Electronic chart system positive, Pin 2 is negative)! Power Interface definitions as shown right: The power of positive electrode The power of negative electrode The keyboard interface definitions as shown right: 1.VCC 2.KB—DATA 3.GND 4.KB—CLK interface definitions as shown right: 1.VCC 2.
-
Page 10: The Installation Of The Gps Antenna
Electronic chart system Tip: The air outlet connection must be tightened to avoid loose during the voyage 1-2-2 The installation of the GPS antenna The screw on the antenna connector must be rotated in a clockwise direction to ensure good contact,when you connect the GPS antenna. When you want to disconnect theGPS, you can rotate the antenna connector counter-clockwise and then disconnected.It can not receive GPS signal in the room Antenna must to be installed around obstacles block on the ship.The nearby obstacles... - Page 11 Electronic chart system It is the key of power for switch the machine and it is also the shortcuts to use to adjust screen brightness. Left adjusted, Brightness to darken Right adjusted, Brightness to brighten. 3: No define 4: AIS Settings Enter into the AIS listfast day/night switch To quickly switch display mode, provides the function to swap day and night.
- Page 12 Electronic chart system 18: Day/night mode switch Chart to enlarge 20: Ok button Ship's position Cursor center, return to the center ship position. 22: Next point Normal, 〖 〗 key is to enter into the Settings Display mode , when call the route Next guidance ,it can set a next point...
-
Page 13: The Background Of Gps (Global Positioning System)
Electronic chart system 7 : Add marked points Showns the location of this ship 8 : Next point direction key (Up / down / Left /right / upper left / upper right / Lower left / lower right) 9 : MOB point storage 10:Brightness adjustment knob Narrow chart 11 :... -
Page 14: Gps Structure
Electronic chart system 1-5-3. GPS structure: Space part: 24 satellite(6 tracks x 4 satellite) cluding preparations satellite。 Control part: The ground control station monitor and control the satellite. The user part: GPS receiver. Note:The direction angle Provided by the GPS (heading, etc) is the true north direction, Use distinguish true north with the direction of the magnetic north direction. -
Page 15: Chapter Ii
Electronic chart system Chapter II The basic operation and Settings This chapter will guide you gradually familiar with using the system navigation.you will grasp the system Settings and navigation operation quikly. -
Page 16: System Introduction
Electronic chart system 2-1 System Introduction 2-1-1 The main screen data Legend (1): Note: The actual screen may be different from the legend. l The ship's position data display window Explanation : The ship window is used to describe the ship of signal information received by the GPS.When GPS data is valid, Ship's position of latitude and longitude are displayed as white lettering;... -
Page 17: Chart Operating In The Normal State Of Navigation
Electronic chart system Note: When we measure the geographical distance between two points on the screen, The cursor disembarkation of the distance and direction of the cursor disembarkation are Indicating the distance and direction of two points being measured. The calendar window Satellite signal table window Explanation :... -
Page 18: Chart Zoom In / Out
Electronic chart system 2-2-2 Chart zoom in / out You can press the 〖 enlarge 〗 key to zoom the charts and the 〖 narrow 〗 key to narrow the charts on the remote control keyboard 2-2-3 Adjust the brightness You can press the 〖... -
Page 19: View Chart
Electronic chart system 2-2-6 View Chart Press 〖 chart 〗 to bring up the 【 】 View Chart menu, Move the arrow keys to select the area you want to see, And then 〖 OK 〗 key to view the chart of the region. The system provides 52 regions of the charts for viewing. -
Page 20: Track Operations
Electronic chart system 2-4 Track Operations To beigin ,select the 【 main menu 】 〖 ok 〗 to enter the 【 track "Track List", then press the list 】 menu. It showns the numbers of the tracks, name, range, he style and whether it 〖... - Page 21 Electronic chart system Second: Setting the recording track of way name, color,and style. You selects the 【 track 】 in the track menu,,It will enter into " Modify the Logging options "Modify track -*” Note: It sets the track of name, color, style track only effect for the single track through the second way.However,the setting of Recording time,distance interval...
-
Page 22: Delete Track
Electronic chart system 2-4-3 Delete track 〖 ok 〗 in the 【 track list 】 menu ,it will pop-up 【 track operations 】 menu,. When press select"delete track",it will delete the selected track,.If you choose "delete all tracks",the whole tracks will be deleted. - Page 23 Electronic chart system Method three: enter to Waypoint list to batch add 1.Input the number of keys on the remote control,you will add / modify the information at the cursor directly and quickly .Taking a operation of waypoint symbol, color, Previous, Next by the arrow keys quickly .When the cursor moves to the next one,It automatically saves the previous waypoint information 2.
-
Page 24: Modify Waypoints
Electronic chart system 2-5-2 Modify Waypoints Method one: modifing by selecting the waypoint on the chart Please move the cursor,select the waypoint you want to modify.Then Air click in the 〖 ok 〗 , box will Pop-up on the screen. At this time, press the pop-up the menu of waypoint operation, Select “modify waypoint”to enter into the edit box to modify. -
Page 25: Invoke Waypoints
Electronic chart system l Delete all the waypoints Please select one line ,then press the〖ok〗in the Waypoints list, choose "delete all"in the 【waypoint operation】.The System will pop-up a confirmation warning.box of clear waypoints .The waypoints will be deleted afte pressing the〖ok〗 Note: The following waypoints could’t be deleted alone: 1 、... -
Page 26: Marker Operations
Electronic chart system 〖 〗 , then pop-up 【 call navigationdata 】 , press the 〖 ↑ 〗〖 ↓ 〗 Press the call to enter 〖 〗 to the Waypoint number column.to input the number of waypoint . press navigation state. -
Page 27: Modify Markers
Electronic chart system 1.Input the number of keys on the remote control,you will add / modify the marker information at the cursor directly and quickly .Taking a operation of waypoint symbol, color,previous, next by the arrow keys quickly .When the cursor moves to the next one,It automatically saves the previous marker information. -
Page 28: Delete Markers
Electronic chart system 〖 ok 〗 marker " item, press Method three: shortcuts Please press the〖 〗key to enter the quickly edit mode in the marker list, and then modifies. Note: The number of markers can not be modified You must select the "Save" button of the menu after editing..Then press〖ok〗to save the modified values. -
Page 29: The Beacons Operation
Electronic chart system 2-7 The Beacons operation 2-7-1 Add Beacons The system can store 10000 beacons.You can add new beacons through the following methods Method one: goes to beacons list to add “Beacons 【 Please select a blank in the list"... -
Page 30: Set Beacons
Electronic chart system Note: 1. If the current input beacon information is incomplete, it will not continue. 2 When the cursor is in the latitude and longitude ,You select 〖cancel〗to lead to be zero quickly, it is to abandon the current date.The input data is invalid. 3.When the cursor in the Name field ,you can only delete the text. -
Page 31: Delete Beacon
Electronic chart system 2-7-3 Delete Beacon l Delete the single beacon list,then press the 〖 ok 〗 , Please select the beacon you want to delete in the Beacon "in the 【 operation 】 ..The choose "delete beacon beacon System will pop-up deleted afte pressing the 〖... -
Page 32: Modify The Routes
Electronic chart system 〖 〗 plan routes which inputed..If you presses cancel ,It will not save the route but preserve the inputed points saved to the Waypoint List.. Second: goes to Route List to add 【 Please select a blank in the Route list"... -
Page 33: Delete The Routes
Electronic chart system Kill 1: Remove a point on the route ①Place the cursor into the "route path" column (right), if the cursor is located in the left column, press the〖 〗to switch to the right . ② Move the cursor to the waypoints need to be deleted . Press〖ok〗, the color of waypoint is green, It said that it has been selected. -
Page 34: Invoke The Route
Electronic chart system 2-8-4 Invoke the route When you use the plan routes navigation,,there are forward navigation and reverse navigation two patterns. Method one: goes into the Route list menu, select routes navigation Press the 〖menu〗 on the remote control e keyboard, call up the 【main menu】 , from the main menu, select "... -
Page 35: Select Waypoints In The Route
Electronic chart system 2-8-5 Select waypoints in the route You can select a waypoint through the following methods in the route under the status of the planned route navigation ● Select the next waypoint in the normal navigation state. Press〖*〗,at this time ,the meaning of the button.is next. -
Page 36: View The Ais Vessel Information
Electronic chart system once about 3-6 minutes,.So when some ships have no name, its static information waited for the other ship returning to display. If the ships don’t update the datas in 9 minutes,we think the ships have left the range of identifing AIS or the AIS has shut down, so the data information of the ship will be deleted. -
Page 37: View The Information Of Vessel On The Chart
Electronic chart system The sort of AIS list 1.It is in ascending and descending order according to the MMSI number,distance from the self ship , the concrete speed value. 2. When the menu is shown below, press the〖ok〗.The sort of AIS list will from small to large by the value of MMSI . -
Page 38: Hardware Connection
Electronic chart system 2-9-4 Hardware connection Communication protocol: Please set the rate of output AIS to 38400 bits. It is connected with the SARACOM, AIS SI-10,IO 30 feet (ground) and 31 feet (data) to date output. If the AIS signal is no input,please reverse the polarity of feet 7,and feet 8.When properly connected, the three letters "AIS". -
Page 39: Cancel Navigation
Electronic chart system 2-10 Cancel navigation When in the navigation state, Please press the 〖menu〗to the 【main menu】 .Then select “cancel navigation” , press the〖ok〗to cancel the current navigation. 2-11 The Accessory Function 2-11-1 The tides inquires: 【tide】 Functions: The menu offers to inquire tides Contain 202 areas across the country and 200 years . -
Page 40: Calendar Inquires: 【Calendar
Electronic chart system 1.Press the 〖 chart 〗 on the remote control keyboard, call up the 【 Chart View menu 】 2.【main menu】->“accessory ”【 accessory】->“view Chart”. 〖 ← 〗 〖 → 〖 ↑ 〗 〖 ↓ 〗 to select the place you want Operation method: Please press to.view. -
Page 41: Material Inquires: 【Port Info
Electronic chart system remote control keyboard, call up the function. 2.【main menu】->“accessory ”【 accessory】->“Distance Measure”. Operation method: You can press the arrow keys to move the cursor.At the same time ,you can View the value of 【Cursor data display 】 on the screen lower left 〖... -
Page 42: Satellite Information
Electronic chart system 2-11-6 Satellite Information Functions: You can See the number of satellites, the number, position and the signal strength. received at this time. Methods:【main menu】->“accessory ”【 accessory】->“Satellite Information” 2-12 MOB List 〖 〗 key to save the current ship's position in the simulated Please press the 【... -
Page 43: Input Method】 Menu
Electronic chart system parallel dashed lines said yaw range.on the both sides of the planned route.When When the ship's position is beyond the yaw range. The system will take a alam “You have offset guide route ”to you. Kill:If you want to change course currently waypoint transferred to the later waypoint in the route under... -
Page 44: Parameter Settings
Electronic chart system 2-15 【Parameter Settings】 2-15-1 【System Settings】menu Function: Set the parameters of the system. Call Method: 【 parameters setting 】 -> "System Settings".Then press 〖 ok 〗 Operation method: Please press〖↑〗〖↓〗to select the parameters you need to modify.Press〖←〗〖→〗 to select the parameter‘svalues ,Press the 〖... -
Page 45: Chart Color Settings】Menu
Electronic chart system 〖←〗〖→〗to quitto set the alarm Kill: When you set the alarm range,you can use range. At this time , the alarm range is also setted successfully.. Note: 〖↑〗 〖↓〗can be used to select 1.When you set the alarm range,the the numbers. -
Page 46: Display Switch Setting】Menu
Electronic chart system 2-15-4 【Display switch setting】menu Function: It provides the function about setting the display switch which are data.and setting the information table to be on and off. informationtable Include cursor,Satellite table, calendar,etc Call Method: 【 parameters setting 】 -> "Display switch" 【 Display switch Setting 】 ->... -
Page 47: Display And Sound Settings】Menu
Electronic chart system 2-15-5 【Display and sound settings】menu Function: It provides the function about setting the chart display scene and key backlight and volume, etc. Call Method: 【 parameters setting 】 -> " Display and sound " 【 Display and sound setting 】... -
Page 48: View Hardware Information】 Menu
Electronic chart system 2-15-7 【view hardware information】 menu Function: It provides the function about viewing the system space usage. Call method: the【Parameters setting】-> “view hardware information” 2-15-8 【GPS channal settings】menu Function: Setting the GPS signal channel. Call method:【Parameters setting】-> “GPS channal settings” 2-15-9 【Versions】... -
Page 49: Appendix
Electronic chart system Appendix Appendix 1:HM-5817 Installation dimension Units: mm As shown below... -
Page 50: Appendix 2: Installation Drawings
Electronic chart system Appendix 2: Installation drawings... -
Page 51: Appendix 3:The Operation Of Embedded Installation
Electronic chart system The operation of Embedded installation Appendix 3: There are four manhole covers in the front part of the 5817 whole machine. 1.Four embedded holes in the Manhole covers as shown in the following chart (Note: The whole installation with different directions, pay attention to the asymmetry of the holes... - Page 52 Electronic chart system According to the direction of the arrow . 3 up to open the manhole cover. broke out of cover by a certain slope 4. Put the machine into the embedded slot. 5. Screw were screwed into the four holes, fixed 6.
-
Page 53: Appendix 4:The Operation Of Hm-5817 Upgrade
Electronic chart system The operation of HM-5817 upgrade Appendix 4: 1.Unscrew two screws on the USB cover in the 2 .Open the USB cover. side / front of the whole machine by counterclockwise. 3. Insert the U disk to upgrade operation in the USB upgrade mouth 4. - Page 54 Electronic chart system Appendix 6:Fix installation drawings and adjust the installation perspectiv...
- Page 55 Xinuo Information Technology (Xiamen) Corporation Limited Address: No.17-701 Wanghai Road, Software Park 2nd Phase, Xiamen, China. Tel: 0592-3300300 Fax: 0592-3300310 Http://www.xinuo.com E-mail: info@xinuo.com Service call: 400-8868-592...
Need help?
Do you have a question about the Wal-way iChart and is the answer not in the manual?
Questions and answers
How to setting language in ecdis xino hm 5817 ecs setting language