Table of Contents
Advertisement
Quick Links
Advertisement
Table of Contents

Related Manuals for PORT SHIELD


Summary of Contents for PORT SHIELD
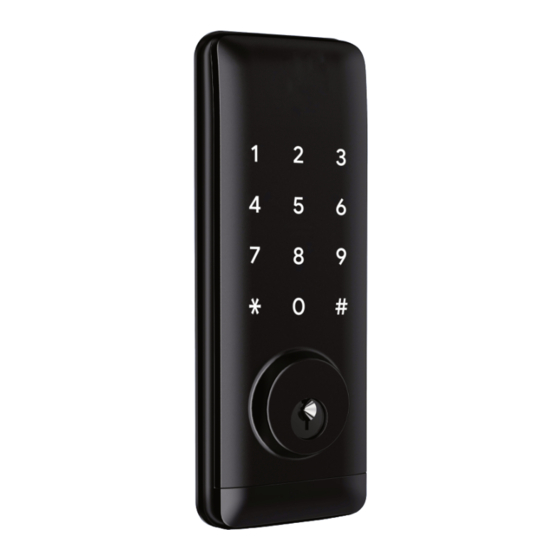
- Page 1 SHIELD Smart Lock User Manual...
-
Page 2: Table Of Contents
Table of Contents Page Before Getting Started Maintenance & Care Pre-Installation Specifications What's in the Box Panel Overview Panel Dimensions Installation: Determining Deadbolt Direction Installation Steps Initialization Programming Your Lock 9-10 Bluetooth Management Setting your Passcode Passcode Type & Management Sending E-Keys Managing E-Keys Adding IC Cards... -
Page 3: Before Getting Started
Before Getting Started This user manual will guide you through the function and usage of Shield. Please follow all the instructions of this manual. If you have questions not answered by this manual, please contact our customer support. Important Guidelines 1. -
Page 4: Maintenance & Care
Maintenance & Care 1. Keep corrosive materials away from this lock. 2. Replace batteries when the low power alarm is activated. 3. Lubricate the lock body and cylinder annually for optimal operation 4. Check whether the lock is properly fastened every 6 months. Pre-Installation Checklist Door lock stile must be minimum 3.5 inches, and the door thickness must be between 1 3/8 to 2 inches. -
Page 5: Specifications
Shield Specifications Specifications Suitable for Models Shield Materials IML + Aluminum Weight 1.5 Kg Unlocking Methods Password, Manual Key Colors Silver, Black Low Wattage Alarm Less than 4.8V Applicable Doors Aluminum Door, Wood Door Working Voltage 6V (4 AA Batteries) -
Page 6: What's In The Box
What’s In the Box Use the following diagram to verify that the package contains all the parts Name Name Front Panel Screw Stubs: M4*30mm Back Panel Screw Stubs: M4*40mm Mortise Screws: M4*25mm (For Mortise Wooden Door) Mortise Screws: M5*10mm (For Card Aluminum Door) M4*10mm Screws For Back... -
Page 7: Installation: Determining Deadbolt Direction
Installation Instructions Determining The Deadbolt Direction “Left Open” Setup “Right Open” Setup Instructions Always keep the spindle in the horizontal position Always keep the deadbolt pulled in Determine the proper direction (handing) for your deadbolt to open. Adjust the Switch on the back panel to “L”... -
Page 8: Installation Steps
Installation Diagram Step 2: Install Screws, Casing, and Water Step 1: Install Mortisse Rubber Plate Step 4: Secure Front Panel and Water Step 3: Install Front Panel Rubber Plate Always keep the spindle horizontal Always keep the deadbolt pulled in Step 5: Connect Front and Back Panels Step 6: Install Screws for Back Panel Step 7: Install Batteries... -
Page 9: Initialization
Initialization Instructions Long press the reset button on the back of the front panel for about 5s Input “000#” The initialization is successful when the buzzer short beep twice. -
Page 10: Programming Your Lock
Programming Your Lock Download "TTLock" in the App Store or Google Play Register Login Register Phone Email Country/Region American Samoa+1684 Enter your Phone number Password between 6-20 characters Phone number/ Email Confirm Password Password Verification Code Get Code Login Register Forgot Password? Login... - Page 11 1. Register a new account with your email address or login with an existing account (The verification code will be sent to the user’s mobile phone or email and registration will be successful after verification). 2. Touch the glass panel to light, click “+Add Lock’’ on the app (TTLock supports multiple types of lock devices.
-
Page 12: Bluetooth Management
Bluetooth Management Ensure the Bluetooth connection is sufficient. After connecting the phone to the door lock, click " " to unlock. The phone must be within 16 feet of the door for this to work. The door will always remain locked until unlocked or it is changed to the "Passage Mode". -
Page 13: Passcode Type & Management
Generate Passcode TTLock Generate Passcode One-Time Erase Custom Recurri Timed One-Time Erase Custom Recurri Timed 4-9 Digits in Length m Nam Cancel You can shgiosmglsingrislnvilsnvuirsjgusnrlvsurlnvl code via Success. The Passcode is Touch to UnLock. Long Press to Lock Bluetooth or Remotely via a Gateway 25097 Set Passcode Complete... -
Page 14: Sending E-Keys
Sending E-Keys 1. Click on “ ” as shown in the figure below. You can send the eKey to other users of TTLock to authorize the unlock (the receiver must download the app and setup an account). 2. Select e-key format (timed, permanent, one-time, recurring). 3. -
Page 15: Managing E-Keys
Authorized Admin Create Admin * You can authorize the admin status to other users. Admin List Managing E-Keys 1. Click “ ” to manage the eKeys you send. The Key Management here refers to the Bluetooth Key Management. 2. After the Administrator has successfully added the lock, the admin will have the highest rights of the lock. -
Page 16: Adding Ic Cards
Adding IC Cards The Shield Smart Lock supports the use of IC Cards. Before an IC Card can be used, it needs to be added first. The adding process needs to be performed by the app. The validity period of the IC can be set on a custom timetable, be made permanent, or time limited. -
Page 17: Lock Records
Lock Records Click “ ” as shown below to access the lock’s records. With "Lock Records,” you can view: E-Keys, saved passcodes, and unlock history. eKeys TTLock Pending... 2020.03.06 11:14-2021.03.06 11:14 Touch to unlock. Long press to lock Generate Send eKey Passcodes eKeys Passcode... -
Page 18: Wifi Management
Remote Wifi Management Adding a Gateway Please note that when adding a gateway, your smartphone and the gateway must be connected to the same Wi-Fi network. TTLock is directly connected via Bluetooth and is not connected to the network itself, which is why it is not vulnerable to network attacks. - Page 19 Privacy/Child Safety Lock As shown in the image, there is a button on the bottom of the inside panel. When activated, the door can only be opened using the Administrator app or a manual key. To activate the locked mode in the app: 1.
-
Page 20: Troubleshooting
Troubleshooting Programming Troubleshooting 1) How do I read operation records? In “Records” on the main interface or on the TTLock Website. 2) What is the maximum limit for e-Keys? There is no limit 3) Why does “pending” show when I send an The status will show ‘Pending’... - Page 21 Hardware Troubleshooting 1) After installation, the touch keypad is not Check that the positive and negative electrodes responding. of the battery have been installed directly, ensuring ample battery power. Remove the back panel and see if it is connected properly. Remove the lock, inspect the wires of the lock body and their fitment, then reinstall.
- Page 22 1 (800) 219-2366 http://www.portsmartlock.com/ authority@portsmartlock.com...
Need help?
Do you have a question about the SHIELD and is the answer not in the manual?
Questions and answers