
Related Manuals for Xylem YSI 910 COD


Summary of Contents for Xylem YSI 910 COD
- Page 1 OperatiOns Manual 910 COD Colorimeter InstruCtIOn Manual: Pages 2 - 13 MODe D‘eMPlOI: Pages 14 - 25 InstruCCIOnes: PágIna 26– 37...
- Page 2 Contact information OrDerinG & teCHniCal suppOrt telephone: (800) 897-4151 (937) 767-7241 Monday through Friday, 8:00 aM to 5:00 PM et Fax: (937) 767-9353 (orders) (937) 767-1058 (technical support) email: environmental@ysi.com Mail: YsI Incorporated 1725 Brannum lane Yellow springs, OH 45387 internet: www.ysi.com When placing an order please have the following information available:...
-
Page 3: Table Of Contents
englIsH table of Contents General notes . . . . . . . . . . . . . . . . . . . . . . . . . . . . . . . . . . . . . . . . . . . . . . . . . . . . . . . . . . . .4 general notes . -
Page 4: General Notes
General notes General notes • Prior to measurement ensure that the sample is suitable for analysis (no major interference) and does not require any preparation i.e. pH adjustment, filtration etc. • Reagents are designed for use in chemical analysis only and should be kept well out of the reach of children. • Ensure proper disposal of reagent solutions. • Material Safety Data Sheets: available on request. Chemical Method notes: Method: C for two hours in the presence of potassium dichromate, which is a the sample is heated at 150 strong oxidizing agent. Organic compounds in the sample are oxidized, reducing the dichromate ion 2– ) to the green chromic ion (Cr In the Low Range (LR) Test (0-150 mg/L), the amount of remaining Cr is measured;... -
Page 5: Display Backlight
englIsH Display backlight Press the [!] key to turn the display backlight on or off. The backlight is automati- cally turned off during the measurement. recall of stored data If the instrument is turned on, press the [!] key for more than 4 seconds to access the recall menu. replacement of batteries: (B) battery compartment cover (e) seal ring (F) instrument back (a) screws (C) notch (D) batteries CautiOn: To ensure that the instrument is waterproof: • seal ring (E) must be in position • battery compartment cover (B) must be fixed with the four screws If the batteries are removed for more than one minute the date and time menu starts automatically when the photometer is turned on the next time. -
Page 6: Methods
Methods COD reagents Select the appropriate vial for the desired range*: LR-Range: 0 – 150 mg/l, part number 251990Y, 25 count MR-Range: 0 – 1500 mg/l, part number 251991Y, 25 count HR-Range: 0 – 15000 mg/l, part number 251992Y, 25 count *Reagents are also availble in 150 count packages. preparing the sample Open a reaction vial with a white cap and add the specified volume. (Ensure that appropriate personnel safety equipment is used.) lr-/Mr: 2 ml water sample 0.2 ml water sample Prepare a blank (Note 1) by using deionized water (TOC-free) instead of the sample (lr/Mr: 2 ml, Hr: 0.2 ml). Replace the cap tightly. Invert the vial gently several times to mix the contents (The vial will become hot during mixing!) and digest the vials for 120 minutes in the reactor at a temperature of 150 °C. -
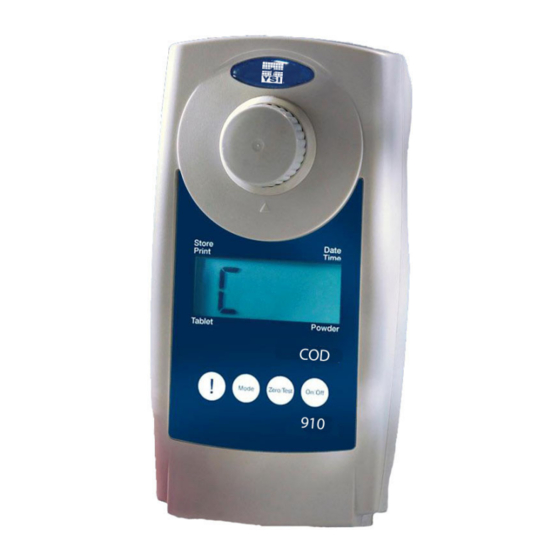
Page 7: Measurement
englIsH Measurement Fix the adapter for 16 mm vials on the sample chamber. Turn the unit on using the [ON/OFF] key. The display shows the following: Select the required test using the [MODE] key. R ANGE Mode scroll Memory (sM) To avoid unnecessary scrolling for the required test range, the instrument memorizes the last range used before being turned off. When the instrument is turned on again, the scroll list comes up with the last used test range. The display shows the following: Place the blank in the adapter (Note 1 –4) making sure that the R ANGE marks are aligned. Blanks are specially prepared for each individual test range. Press the [ZERO/TEST] key. -
Page 8: Menu Options
Menu Options Menu selections Mode Press the [MODE] key and hold. Turn the unit on using the [ON/OFF] key. Allow the 3 decimal points to be displayed before releasing the [MODE] key. Store Date The [!] key allows for selection of the following menu points: Time recall stored data printing stored data setting the date and time user calibration Store Date The selected menu is indicated by an arrow in the display. Time dis – recall of stored data After confirming the selection with the [MODE] key the photometer shows the last 16 data sets in the following format (automatically proceeds every 3 seconds until Mode result is displayed): Number n xx (xx: 16...1) Year... -
Page 9: Transmitting Stored Data
englIsH prt – transmitting stored data (to printer or pC) Store Date note: to print data, or to transmit to a PC, the optional Series 900 Data Hub (Inf- rared Interface Module) is required. Time the Series 900 Data Hub and the connected printer/PC must be ready. Press the [MODE] key to start the transmitting, the instrument displays “PrtG” (Printing) for approx. 1 second followed by the number of the first data set and its transmis- sion. All data sets will be transmitted one after the other. After finishing the instru- ment returns to test mode. The print job can be cancelled by pressing the [On/Off] key. The instrument turns PrtG off. -
Page 10: Calibration Mode
Calibration Mode Store Date Time user calibration (Display in calibration mode) factory calibration (Display in calibration mode) user calibration (cal) After confirming the selection with the [MODE] key the instrument will show Cal/lr. Scroll through ranges using the [MODE] key. Place the blank in the adapter making sure that the marks are aligned. Press the [ZERO/TEST] key. Zero Test The “Range“ symbol flashes for approx. 8 seconds. RA N GE The display shows the following in alternating mode: 0.0.0 Perform measurement with a standard of known concentration as described. Press the [ZERO/TEST] key. Zero Test The “Range“ symbol flashes for approx. 3 seconds. R A N GE the result is shown in the display, alternating with Cal. RESULT If the reading corresponds with the value of the calibration standard (within the specified tolerance), exit calibration mode by pressing the [ON/OFF] key. -
Page 11: Factory Calibration Reset
englIsH FaCtOrY CaliBratiOn reset Resetting the user calibration to the original factory calibration will reset all me- Store Date RESULT thods and ranges. Time A user calibrated method is indicated by an arrow while the test result is displayed. To reset the calibration press both the [MODE] and [ZERO/TEST] key Zero Mode and hold . Test Turn the unit on using the [ON/OFF] key. Release the [MODE] and [ZERO/TEST] keys after approx. 1 second. The following messages will appear in turn on the display: The factory setting is active. (SEL stands for Select) Calibration has been set by the user. (If the user calibration is to be retained, turn the unit off using the [ON/OFF] key). Calibration is reset to the factory setting by pressing the [MODE] key. Mode The following messages will appear in turn on the display: Turn the unit off using the [ON/OFF] key. -
Page 12: Technical Data
technical Data double instrument: wavelength, automatic wavelength selection, direct reading colorimeter light source: leDs, interference filters (IF) and photosensor in transparent cell chamber. Wavelength specifications of the IF: 430 nm = 5 nm 610 nm = 6 nm Wavelength accuracy: ± 1 nm photometric accuracy*: 3% FS (T = 20° C – 25° C) photometric resolution: 0.01 a 4 batteries (AAA /LR 03) power supply: lifetime: approx. 17 hours or 5000 tests instrument automatically turns off 10 minutes after last keypress... -
Page 13: Operating Messages
englIsH Operating Messages & error Codes Operating messages Measuring range exceeded or excessive turbidity. Hı Result below the lowest limit of the measuring range. Replace batteries, no further tests possible. Battery capacity is too low for the display backlight; btLo measurement is still possible. A user calibrated method is indicated by an arrow while the test result is Store Date RESULT displayed (see “Factory calibration reset“). Time error codes Light absorption too great. Reasons: e.g. dirty optics. E27 / E28 / E29 Calibration factor „out of range“ E 10 / E 11 too much light reaching the detector. E 20 / E 21 E23 / E24 / E25 too much light reaching the detector. - Page 14 Coordonnées Commande et assistance technique téléphone : +1 800 897 4151 (États-unis) +1 937 767 7241 (monde entier) Du lundi au vendredi, de 8h00 à 17h00, heure de l’est des États-Unis télécopie : +1 937 767 9353 (commandes) +1 937 767 1058 (assistance technique) Courrier environmental@ysi.com électronique : adresse : YsI Incorporated 1725 Brannum lane Yellow springs, OH 45387 États-unis internet:...
- Page 15 FrançaIs tables de matières informations générales . . . . . . . . . . . . . . . . . . . . . . . . . . . . . . . . . . . . . . . . . . . . . . . . . . . .16 Consignes relatives aux méthodes .
-
Page 16: Informations Générales
informations générales Consignes relatives aux méthodes • Tenir compte des possibilités d‘utilisation, des instructions d‘analyse et des effets de matrice des méthodes. • Les réactifs sont destinés aux analyses chimiques et ne doivent en aucun cas être laissés entre des mains d‘enfants. • Eliminer les solutions de réactif conformément à la législation. • En cas de besoin, demander des fiches de données de sécurité. Méthodes chimiques: Méthode: La masse volumique d‘oxygène, qui réagit dans des conditions standardisées avec les matières oxy- dables contenues dans l‘eau, est mesurée par voie photométrique comme équivalente au bichromate de potassium dans une solution sulfurique. possibilité d‘utilisation: La mesure est possible pour les échantillons dont la teneur en chlorure ne dépasse pas 1.000 mg/l (lr/Mr) ou 10.000 mg/l (Hr). Dans certains cas exceptionnels, les composants pour lesquels le pouvoir d‘oxydation du réactif n‘est pas suffisant peuvent provoquer des résultats de mesure trop faibles par rapport à la méthode de référence. Des modes de prélèvement d‘échantillons différents, le type de préparation de l‘échantillon et le temps écoulé entre le prélèvement de l‘échantillon et l‘analyse peuvent influencer le résultat de l‘analyse. -
Page 17: Affichage Rétro-Éclairé
FrançaIs Affichage rétro-éclairé Appuyer sur la touche [!] pour activer ou désactiver le rétro-éclairage de l‘affichage. Pendant l‘opération de mesure, le rétro-éclairage se désactive automatiquement. lecture de données mémorisées L’appareil allumé, appuyer sur la touche [!] pendant plus de 4 secondes pour ac- céder directement au menu de la mémoire. remplacement des piles: (B) Couvercle compartiment à piles (E) Joint d’étanchéité (F) Arrière de l’appareil (A) Vis (C) encoche (D) Piles attentiOn: pour garantir une parfaite étanchéité du photomètre, placer le joint d’étanchéité en position (e) et visser le couvercle du compartiment à... -
Page 18: Méthodes
Méthodes Utiliser le jeu de tubes selon la plage de mesure nécessaire: Plage LR: 0 – 1 50 mg/l, réf. de commande 251990Y Plage MR: 0 – 1 500 mg/l, réf. de commande 251991Y Plage HR: 0 – 1 5000 mg/l, réf. de commande 251992Y préparation de l‘échantillon Ouvrir un tube à réactif bouché par un bouchon à vis blanc (équipements de protection personnelle nécessaires) et le remplir du volume d‘échantillon indiqué. Plage LR/MR: 2 ml d‘échantillon d‘eau Plage HR: 0,2 ml d‘échantillon d‘eau Créer un tube de calibrage (rem. 1) en utilisant de l‘eau exempte de COT au lieu de l‘échantillon (lr/Mr: 2 ml, Hr: 0,2 ml). Fermer solidement les tubes avec le bouchon à vis. Mélanger le contenu en retournant le tube avec précautions (attention, développement de chaleur!) et chauffer pendant 120 minutes à 150 °C. Sortir les tubes du bloc de chauffage et les laisser refroidir à 60 °C ou moins. Mélanger soigneusement le contenu et retournant plusieurs fois les tubes encore chauds. Ensuite, laisser refroidir les tubes à la température ambiante et ne procéder qu‘ensuite à la mesure. -
Page 19: Mesure
FrançaIs Mesure Poser l‘adaptateur pour tubes de 16 mm sur le compartiment de mesure. Mettre en marche l‘appareil en actionnant la touche [On/OFF]. Le message suivant apparaît sur l’affichage: Sélectionner la plage de mesure avec la touche [MODE]. R ANGE scroll Memory (sM) Mode Dans les appareils multiparamétriques, l’ordre des différent de plage de mesure est défini. Après la mise en marche de l’appareil, ce dernier affiche automatiquement le plage de mesure qui avait été sélectionnée en dernier avant l’arrêt de l’appareil. De cette manière, l’appareil permet un accès privilégié aux de plage de mesure préférées. Le message suivant apparaît sur l’affichage: R ANGE Positionner le tube de calibrage dans la chambre de mesure (rem. 1–4). Les tubes sont spécifiques au jeu de réactif et ne doivent en aucun cas être inter- vertis. Zero appuyer sur la touche [ZerO/test]. Test Le symbole de plage de mesure clignote pendant 8 secondes env. -
Page 20: Menu Options
Menu Options sélection menu Mode Appuyer sur la touche [MODE] et la maintenir enfoncée. Mettre en marche l‘appareil en actionnant la touche [On/OFF]. 3 virgules décimales apparaissent à l‘afficheur, relâcher la touche [MODE]. Store Date La touche [!] permet la sélection des points de menu suivants: Time diS Lecture de données mémorisées Prt Imprimer des données mémorisées Réglage de la date et de l‘heure Réglage par l‘utilisateur Store Date Le point de menu sélectionné est indiqué par une flèche dans l‘afficheur. Time dis – lecture de données mémorisées Après la confirmation de la sélection par la touche [MODE], l‘appareil affiche les 16 dernières mesures au format suivant (ligne par ligne en une séquence automa- Mode...
Need help?
Do you have a question about the YSI 910 COD and is the answer not in the manual?
Questions and answers