Advertisement
Quick Links
Advertisement

Related Manuals for VINCENT PHO-701


Summary of Contents for VINCENT PHO-701
- Page 1 Vincent Instructions for use 한글 사용 설명서 PHO-701 MM/MC Phono Preamplifier 진공관 Hybrid 포노 프리앰프...
- Page 2 à la garantie ou pour les réparations après la période de garantie. Dans tous les cas, vosexpériences avec les produits Vincent l'intéressent, n'hésitez pas à lui en faire part. Nous vous souhaitons beaucoup de plaisir avec notre / votre produit.
- Page 3 안전 수칙 Safety guidelines 참고 사항 Other instructions 제품의 구성 Included in delivery 본 앰프의 소개 Description of the appliance 설치 Installation 좋은 음질을 위한 팁 Tips 이상 증상 대처법 Search for errors 제품 사양 Technical 용어 해설 specificationsGlossary Vincent...
-
Page 4: Safety Guidelines
Be careful with the volume setting, in order to prevent damage to hearing. do not Vincent. expose yourself to high volumes unintentionally, always set to a low 작업 전 전원끄기 Switching Off level before changing the input channel. - Page 5 본 포노 앰프는 정확한 RIAA 성능으로 포노단이 없는 앰프에 턴테이블을 사용할 수 있게 해줍니다. 게다가 외장 파워 서플라이를 채용하므로서 신호의 간섭을 최소화하였습니다. 본 기기의 디자인은 Vincent의 tube line에 매칭되도록 디자인되어 있으며, 높은 수준의 만듬새와 뛰어난 가성비는 더 말할 나위가 없습니다. Vincent...
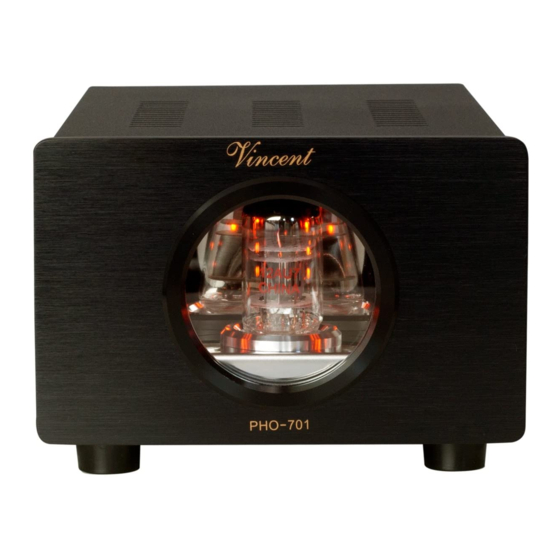
- Page 6 This LED is lit as long as the power supply PHO-701ps is connected to a vivid power grid (mains socket) and the device is switched on (3). 이 LED는 전원이 켜져 있는 동안 항시 켜져 있습니다. 2. Display window for the tube (진공관 표시 창) Vincent...
- Page 7 3. POWER: mains switch (전면 조명 밝기 조절) This is the main power switch for turning on and off the PHO-701. Always switch on the PHO-701 before you switch on the amplifier/ The setting of this switch affects the brightness of the preamplifier.
- Page 8 A pair of RCA input sockets of your system’s pickupsystem has to be selected to adapt the phono audio amplifier must be connected with these pre-amplifier PHO-701 to that system. See 앰프/프리앰프의 입력단자와 section“Setting the type of pickup system”. output sockets.
- Page 9 Make sure that you do get these connections confused during installation! cables, for example Vincent cables, should be used. Your local stockist will be glad to advise you about this. 위치 선정 Placement 전원이...
- Page 10 (DIGITIZATION FUNCTION Connect the USB socket of the PHO-701 (7) by using the USB cable with the USB socket of your computer. PHO-701 will be recognized by the name "USB-Audio". NOTE: You can download freeware software called Audacity. Manual how to use Audacity is provided by the developer website.
- Page 11 The purpose of the PHO-701ps is to convert the mains alternating power to a low DC voltage that is more appropriate to supply the phono preamplifier PHO-701. So in the first place both devices must be inter-connected using the supplied DIN cable (4)(9). After all other cable connections have been made, push the plug of the supplied power cable firmly into the power socket (5) on the back of the appliance.
- Page 12 However, there are still some very sophisticated MM systems available. The PHO-701 was designed to handle both systems without any loss in quality. To handle the differences between them (MC: higher amplification, adjusted by resistors MM: adjusted by capacitors) there are four adjustment units on the bottom of the appliance (two for each channel –...
- Page 13 스위치 1번과 스위치 2번을 사용해서 (조정 유니트 7), 추가적으로 매칭 캐피시턴스를 연 결할 수 있습니다. 아래 차트를 참고 하십시오. 캐패시턴스 값 설정 Table of values (capacitance) Switch “ON” Capacitance 15 pF none 사용하지 않음 115 pF 235 pF 350 pF Vincent...
- Page 14 Impedance Impedance 1000 Ohm No 사용하지 않음 783 Ohm 130 Ohm 600 Ohm 126 Ohm 514 Ohm 120 Ohm 405 Ohm 3+5+6 116 Ohm 364 Ohm 109 Ohm 319 Ohm 3+4+5 102 Ohm 4+5+6 293 Ohm 3+4+5+6 99 Ohm Vincent...
- Page 15 Sometimes this helps prevent noise caused by amplifier. Experience shows that this problem is mainly cau- errors in grounding. sed by antenna-connected components (as TV-sets or problem occurs cannot Tuners), personal computers, electrostatic loud- solved by yourself your audio specialist dealer will help you. Vincent...
- Page 16 턴테이블 연결확인 fier, if possible). the unit is ready for The output of the PHO-701 is not connected use (the LED (1) is lit). Correct the connection of the PHO-701 to the or is wrongly connected to the selected input amplifier.
-
Page 17: Technical Specifications
Signal-Noise-Ratio: > 81 dB > 69 dB Power Supply: 220V , 60Hz (15 watts max.) Inputs: 1x RCA stereo, 1x DIN (DC IN PHO-701) Outputs: 1x RCA stereo, 1x DIN (DC OUT PHO-701ps), 1x USB Tubes: 1 x 12AU7 130 x 82 x 225 mm (2x) - Page 18 Vincent Please keep the receipt, store it together with this manual. The receipt is your proof for the beginning of the warranty period. Note the serial number in the following box, you can read it from the rear side of the device.
- Page 19 [부록] PHO-701 1. Audacity www.audacityteam.org/download/windows/ 2. PHO-701 PHO-701 USB-B...
- Page 20 USB AUDIO DEVICE 4. AUDACITY...
- Page 21 Label Tracks ( From Audacity Development Manual (AUDACITY A Label Track is an additional track that can be created in your project. The labels in the label track can be used to reference points or regions in the project's audio tracks but the label track itself does not contain audio.
Need help?
Do you have a question about the PHO-701 and is the answer not in the manual?
Questions and answers