Table of Contents
Advertisement
Quick Links
ZCBBQ22TK-C Trolley Barbeque
Manual & Safety Instructions
WARNING: PLEASE ENSURE YOU HAVE READ THROUGH THE
SAFETY AND OPERATING INSTRUCTIONS BEFORE USE.
PLEASE RETAIN INSTRUCTIONS FOR FUTURE REFERENCE
For Customer Services & Spare Parts please call 0330 1230 597
Please scan the QR code for step by step video
assembly instructions. Alternatively, you can visit:
zanussiheatingandcooling.uk. From here, please select
the product that you are looking to build and view the
'How To' video located at the bottom of the page.
Or visit us at zanussiheatingandcooling.uk
Advertisement
Table of Contents

Related Manuals for Zanussi ZCBBQ22TK-C


Summary of Contents for Zanussi ZCBBQ22TK-C
- Page 1 ZCBBQ22TK-C Trolley Barbeque Manual & Safety Instructions WARNING: PLEASE ENSURE YOU HAVE READ THROUGH THE SAFETY AND OPERATING INSTRUCTIONS BEFORE USE. PLEASE RETAIN INSTRUCTIONS FOR FUTURE REFERENCE Please scan the QR code for step by step video assembly instructions. Alternatively, you can visit: zanussiheatingandcooling.uk.
- Page 2 ZCBBQ22TK-C Trolley Barbeque Safety Instructions Parts List & Feature Diagram 8-23 Pizza Oven Assembly Lighting Your Barbeque Food Safety Cleaning And Care Guarantee and Customer Services ZCBBQ22TK-C...
-
Page 3: Safety Instructions
CAUTION - if meat has been cooked sufficiently the meat juices should • be clear in colour and there should be no traces of pink/red juices or meat colouring. After cooking with your BBQ always clean the grill cooking surfaces and • utensils. ZCBBQ22TK-C... - Page 4 WARNING: Failure to follow instructions could result in death, serious • bodily injury and/or property loss. Carbon Monoxide Do not use in Do Not Use Do Not Use in Use in open Poisoning Hazard Motor Homes Indoors Tents Spaces ZCBBQ22TK-C...
- Page 5 Do not use these materials to light or relight also. DO NOT store the barbeque until the fire is completely out and • surfaces are cold; also do not store the barbeque with ashes or combustible materials inside. ZCBBQ22TK-C...
-
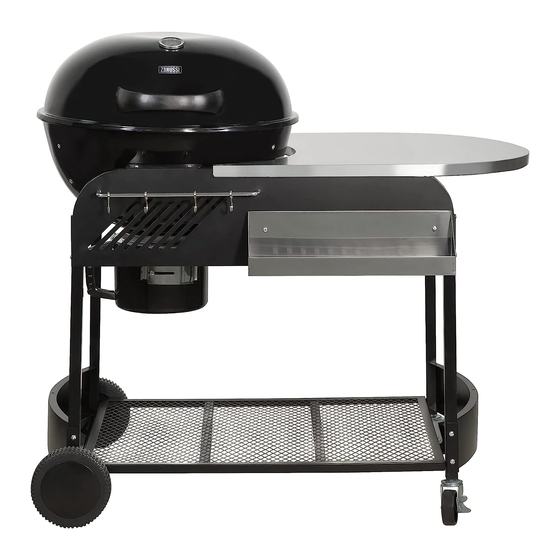
Page 6: What's Included
Front panel bar You will also need (not included): Condiment shelf Lid handle Phillips head screwdriver Wheel cap Hook Adjustable wrench Axle assembly Support frame Wrench Waterproof cover ATTENTION: Check that all parts listed above are present prior to assembly ZCBBQ22TK-C... - Page 7 WHAT’S INCLUDED? Here’s a feature diagram ZCBBQ22TK-C...
- Page 8 BBQ ASSEMBLY STEP 1 – Constructing the left legs • Attach one of the side panels (15) to the left front pole (13) and the left rear pole (12), using 4 each of the “A” bolts. 4 PCS ZCBBQ22TK-C...
- Page 9 BBQ ASSEMBLY STEP 2 – Constructing the right legs • Attach the other side panel (15) to the right front pole (17) and the right rear pole (16), using 4 each of the “A” bolts. 4 PCS ZCBBQ22TK-C...
- Page 10 STEP 3 – Attaching the storage shelf • Attach the storage shelf (18) to the legs that were assembled in steps 1 & 2, using 4 each of the “J” bolts. • The right legs should now slot inside the spaces in the left legs. ZCBBQ22TK-C...
-
Page 11: Step 4 - Attaching The Wheels
(12). • Attach the wheels (14) to ends of the axle rod (26), and secure using 2 each of the “C” nuts, tightening with a wrench. • Install the wheel caps (24) onto the wheels (14). 2 PCS ZCBBQ22TK-C... - Page 12 BBQ ASSEMBLY STEP 5 – Securing the legs • Secure the legs together using 2 each of the “A” bolts. 2 PCS ZCBBQ22TK-C...
- Page 13 (17), using 4 each of the “A” bolts and “F” washers. • Screw the two locking casters (19) clockwise into the bottom of the right front pole (17) and the right rear pole (16), and tighten with a wrench. ZCBBQ22TK-C...
- Page 14 • Attach the side shelf (10) to the right front pole (17) and the right rear pole (16), using 6 each of the “A” bolts. • NOTE: The side shelf (10) may become scratched when assembling. Please take care. 6 PCS ZCBBQ22TK-C...
- Page 15 2 each of the “K” bolts, “L” washers, “E” nuts and “M” lock nuts; tighten and secure with a wrench. • NOTE: The front panel (20), may become scratched when assembling. Please take care. 2 PCS 2 PCS 2 PCS 2 PCS ZCBBQ22TK-C...
- Page 16 • Place the hooks (25) onto the front panel bar (21), and then attach the front panel bar (21) onto the front panel (20) using 2 each of the “F” washers and “B” nuts; tighten and secure with a wrench. 2 PCS 2 PCS ZCBBQ22TK-C...
- Page 17 BBQ ASSEMBLY STEP 10 – Attaching the bowl supports • Attach the bowl supports (11) to the finished cart using 4 each of the “A” bolts. 4 PCS ZCBBQ22TK-C...
- Page 18 STEP 11 – Attaching the support frames • Attach the support frames (27) to the bottom of the bowl (7) using 6 each of the “B” nuts and “J” bolts; tighten and secure with a wrench. 6 PCS 6 PCS ZCBBQ22TK-C...
- Page 19 • Attach the bowl (7) to the bowl supports (11) using 4 each of the “J” bolts, “F” washers, and “G” wingnuts. • NOTE: The “F” washers must be placed on the inside of the bowl (7). 4 PCS 4 PCS 4 PCS ZCBBQ22TK-C...
- Page 20 STEP 13 – Attaching the ash cup support • Attach the ash cup support (8) to the bottom of the bowl (7) using 3 each of the “D” bolts and “E” nuts; tighten and secure with a wrench. 3 PCS 3 PCS ZCBBQ22TK-C...
-
Page 21: Step 14 - Assembling The Lid
• Ensure that dial is correctly aligned before securing. • Attach the lid handle (23) outside the lid (3) using 2 each of the “F” washers and “G” wing nuts. ZCBBQ22TK-C... - Page 22 • Then install the warming rack (6) using 2 each of the “F” washers and “M” nuts. • NOTE: The “F” washers must be placed on the inside of the bowl (7). 2 PCS 1 PCS 2 PCS 2 PCS ZCBBQ22TK-C...
- Page 23 STEP 16 – Attaching the ash cup • Attach the ash cup (9) to the ash cup support (8) at the bottom of the bowl (7), by sliding it in from the direction shown below. • The barbeque is now fully assembled. ZCBBQ22TK-C...
- Page 24 WARNING: Accessible parts will be hot – avoid touching the BBQ while hot, however if it is necessary, make sure to wear oven gloves when touching the barbecue. WARNING: Do not extinguish with water as this may damage the barbecue. ZCBBQ22TK-C...
-
Page 25: Food Safety
• To check whether meat, particularly poultry, is cooked, pierce the flesh with a skewer or fork; the juices should run clear. Ensure the product is piping hot throughout. ZCBBQ22TK-C... -
Page 26: Cleaning And Care
(5), can be cleaned using a dishcloth, warm water and a commercial detergent. Avoid using abrasive cleaners, and wire wool and brushes as these may scratch the surface. • When not in use this barbecue should be stored in a dry location or under the provided waterproof cover. ZCBBQ22TK-C... -
Page 27: Guarantee And Customer Services
This guarantee does not cover wear and tear, damage, • misuse or consumable parts. This does not affect your statutory rights. For Customer Services & Spare Parts please call: 0330 1230 597 Or visit us at zanussiheatingandcooling.uk ZCBBQ22TK-C... - Page 28 ZANUSSI is a registered trademark used under license from AB Electrolux (publ). Made by Product Care Trading Limited, Wigan, WN2 4AY/ PCT (NI) Ltd, Belfast, BT5 5AD. For Customer Services & Spare Parts please call: 0330 1230 597 Or visit us at zanussiheatingandcooling.uk The ‘wheelie bin’...
Need help?
Do you have a question about the ZCBBQ22TK-C and is the answer not in the manual?
Questions and answers