Advertisement
Quick Links
pmvmounts
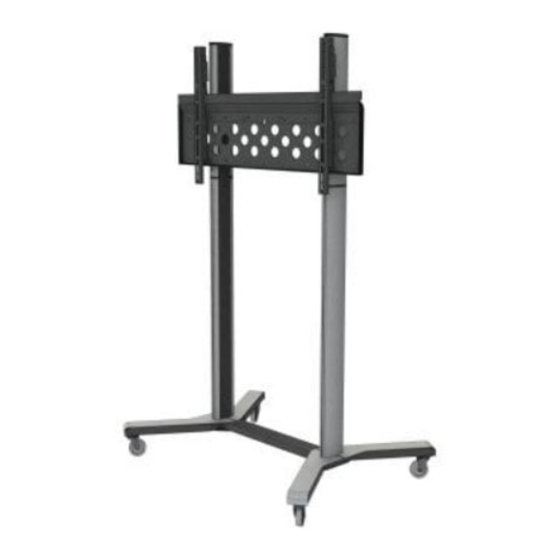
Assembly instructions for XXL TV trolley
Maximum TV fixing points up to 1200mm X 600mm - Up to 135Kgs
Model No.
PMVTROLLEYXXL
Component checklist
100mm braked castors X4
Glide feet X4
Welded base unit with colour coded trims X1
TV mounting plate X1
Assembly kit checklist
A - M6 x 12mm
B - M6 washer
C - M8 x 20mm
D - M8 x 16mm
E - M8 washer
F - M8 nut
TV Fixing Kit
G - M6 x 30mm
H - M6 x 50mm
I - M8 x 30mm
J - M8 x 50mm
K - M8 washer
L - M6 x 6.5mm
M - M8 x 6.5mm
N - M8 x 6mm
O - M8 x 12.5mm
P - M6 x 20mm
.co.uk
Factory No.
Z65100TR
X16
X16
Trim inserts: Flexible black trims can be popped in or slid down the extrusions during or after assembly.
Note: The trims can be cut with a safety knife or scissor to make small entry and exit points for cables.
X6
Top down view
X4
X4
X4
X4
X4
X4
X4
X2
Read these instructions carefully before assembling this equipment.
Check the equipment has been supplied with all parts and fixtures prior to assembly.
Assemble in a suitable location.
Two people will be required for assembly and three persons for installation of the screen on to the equipment.
Do not attempt to alter or modify any part of the equipment or its attachments.
Do not use if any parts are broken or appear to be damaged.
Tighten all bolts and fixings securely with appropriately sized tools.
Only use fixings provided with this bracket.
Do not position the equipment close to sources of heat or moisture.
TV mounting arms X2
TV mounting
plate slides X2
Outside face of extrusion
Slider gully
Inside face of extrusion
Cable
management
gully
Upright trim pieces X2
600mm Upright with
600mm Trim
joining plate X2
inserts X6
Trim insert
Isometric view
1200mm Upright with
joining plate X2
Trim insert
Advertisement

Related Manuals for pmvmounts PMVTROLLEYXXL


Summary of Contents for pmvmounts PMVTROLLEYXXL
- Page 1 Tighten all bolts and fixings securely with appropriately sized tools. Factory No. Model No. Only use fixings provided with this bracket. PMVTROLLEYXXL Z65100TR Do not position the equipment close to sources of heat or moisture. Component checklist 1200mm Upright with...
- Page 2 Attach castors or feet to base unit. The base comes preassembled with bonded aesthetic trim pieces - Do not remove! 1.1 Carefully turn the base upside down and attach x4 castor or x4 feet to all x4 corners as pictured Castors - Fig 1.1 / Glide Feet - Fig 1.2 Ax16 Bx16 Note: All four uprights are preassembled with joining plates on one end (Do not remove).
- Page 3 Assemble TV mounting plate. 3.1 Insert TV mounting plate slides in to uprights - Fig3.1 3.2 Position the sliders at an equal height. 3.3 Mount TV Plate over both sliders and secure - Fig3.3 3.4 Ensure TV mount is set to desired height, is level and then fully tighten all fixings.
-
Page 4: Lifting Precautions
Install tilting arms to the back of TV/screen. 4.1 Ensure Tilt-lock fixing is in position - Fig4.1 4.2 Secure arms to screen using fixings suitable to the screen, use stepped washes if necessary - Fig4.2 Outside Inside of arm of arm G-Jx4 *N-Ox4 *If required... - Page 5 Mount Screen Note: The TV and attached mounting arms will just hang on the trolley after being lifted into place but will also need a safety fixing installing to complete the installation. 5.1 Position screen so the arms are at equal height to the mounting plate - Fig5.1 5.2 Tip the upper edge of the screen towards the trolley to bring the ‘hook’...
Need help?
Do you have a question about the PMVTROLLEYXXL and is the answer not in the manual?
Questions and answers