Table of Contents
Advertisement
Quick Links
BMS 3000-OBPC
BRINELL HARDNESS TESTER WITH CLOSED
LOOP&TOUCH SCREEN
BMS Bulut Makina Sanayi ve Ticaret Ltd. Şti.
İkitelli Organize Sanayi Bölgesi ,Dolapdere Sanayi Sitesi
Ada : 4 No : 7-9 Başakşehir / İSTANBUL
Tel : 0212 - 671 02 24 / 25 Fax : 0212 - 671 02 26
web site :
www.bulutmak.com
e-mail :
bms@bulutmak.com
Advertisement
Table of Contents

Related Manuals for Bms Bulut Makina 3000-OBPC


Summary of Contents for Bms Bulut Makina 3000-OBPC
- Page 1 BMS 3000-OBPC BRINELL HARDNESS TESTER WITH CLOSED LOOP&TOUCH SCREEN BMS Bulut Makina Sanayi ve Ticaret Ltd. Şti. İkitelli Organize Sanayi Bölgesi ,Dolapdere Sanayi Sitesi Ada : 4 No : 7-9 Başakşehir / İSTANBUL Tel : 0212 - 671 02 24 / 25 Fax : 0212 - 671 02 26 web site : www.bulutmak.com...
-
Page 2: Table Of Contents
CONTENTS CONTENTS 1.TECHNICAL SPECIFICATIONS 1.1 TECHNICAL SPECIFICATIONS: ..........................4 1.2 FEATURES OF OPTOBUL SOFTWARE ......................... 4 1.3 STANDART ACCESSORİES: ..........................4 2.ABOUT MACHINE 2.1 PART LIST ................................. 5 2.2 PICTURES OF EQUIPMENT ..........................6 3.GENERAL INFORMATION 3.1 BRINELL HARDNESS TESTING (EN 6506-1,ASTM E10) ..................9 3.2 PRIOR TO TESTING .............................. - Page 3 IMPORTANT Plaese read this manual carefully before commissioning and runnig the equipment In manual,there are several warning notices which to be paid attention. And their meanings to be explained accordingly.. In case of facing problems, please get in touch with us.We will be pleased to solve your problems.
-
Page 4: Technical Specifications
1.TECHNICAL SPECIFICATIONS 1.1 TECHNICAL SPECIFICATIONS: Load cell ( closed loop) system Test Loads (kgf) : 62,5-3000 Load Selection : Automatic Test Method : Brinell Load Application : Automatic Measuring system : Digital camera Depth of Throat : 200 mm Max. Test height : 430 mm Power suppy : 220V, 50Hz... -
Page 5: About Machine
2.ABOUT MACHINE 2.1 PART LIST 1. Body 14. 12 Volt, 10 Watt Halogen lamp 2. Motoring Systems ON / OFF 15. Optical system position spindle 3. Mains cable 16. Step motor spindle 4. Light adjustment button 17. Driver for step motor 5. -
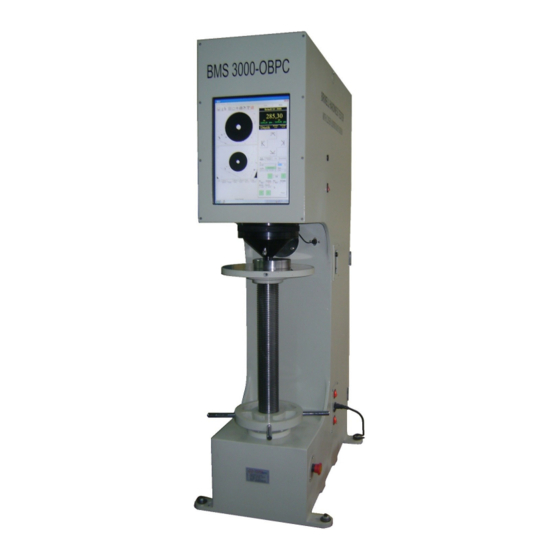
Page 6: Pictures Of Equipment
2.2 PICTURES OF EQUIPMENT PICTURE-1 Touch screen panel (5) Light adjustment button (4) Light ON/OFF(22) Clamping attachment (6) Ball indenter (7) Test Sample (9) Testing Table(8) Body (1) Elevating screw (10) Motoring systems ON/OFF(2) Elevating screw nut (11) Mains Cable (3) Computer systems ON/OFF (23) Arm (12) Emergency button(24) - Page 7 12 Volt,10 Walt halogen lamp (14) PICTURE-2 Optical system position spindle adjustment bolt (13) Clamping attachment(6) Testing table Optical system position spindle (15) PICTURE-3 PICTURE-3 Ball indenter (7) Clamping attachment (6) PICTURE-4 Step motor spindle (16)
- Page 8 PICTURE A Power supply (55V)for driver of step motor(18) Driver for step motor(17) Load cell indicator(20) Power supply for optical illuminator (12V-4.2A DC) (19) PC system(25) Loadcell (21) PICTURE 5...
-
Page 9: General Information
3.GENERAL INFORMATION 3.1 BRINELL HARDNESS TESTING (EN 6506-1,ASTM E10) Brinell Hardness testing method is actuated by balls with several sizes depending on material type,thickness and loads applied. Diameters of ball indentations can be evaulated by optical system built-in hardness tester. Relations with thickness of specimen,ball dia and material shown in related the table P=10D2 P=30D2... -
Page 10: Directions
4.DIRECTIONS Hardness Tester software OPTOBUL3 Once installed, the program is first opened Activation Code input window appears. After entering this code "Continue" button. - Page 11 Login window, the first user to setup the following window: BMS, Password: Enter BMS. (In later entries, pre-defined user name and password to enter).
- Page 12 Main Window the following menu headings Optobul3 are common; 1-Address information 2-Customer Information 3-Hardness Test procedures, 4-Logged; program user, 5-User management, 6-Database Backup and Restore 7-Language Selection, 8-Program update, 9-Program exit...
- Page 13 The first step, go to Main Window from the user and the program will use the item of the menu descriptions of people do. Name and Surname details will be written here, test reports "test," information will be used as. To define a new user, press New button once, then Login, Password, Name and Last Name boxes to fill.
-
Page 14: Address
4.1 ADDRESS : From the main menu by pressing the Address button, enter your company address information. First, press the New button, fill in the blank field and press Save button. -
Page 15: Customer
4.2 CUSTOMER : From the main menu by pressing customer, enter the customer address information.First, press the New button, Fill in the blank field and press the Save button. -
Page 16: Hardness Test
4.3 HARDNESS TEST: From the main menu, press the test and measurement from the screen you make the transition to the screen the following window fill in the fields and "forward" button. System, load calibration and calibration as will be made with the display settings. Do not need them to do initial setup. - Page 17 Test Method selection ball-diameter, Load, objective, lower limit and upper limit, check their values. Measurement and Test tab, you can make measurement by pressing Test button. After pressing Test button please wait untilthe machine completes it sprocess and shows you the figure below.
- Page 18 Measurement process starts by creating traces Monitoring the process of creating a starting on the material position and the device returns to its stops.
- Page 19 Press Start button to start measurement After you create something like the following figure in the window to create the image. From left to right and from top down approach from the buttons to perform the measurement.
- Page 20 From up From left From right Conversion Cycle of Device table makes From down measuement the staring result position...
- Page 21 To make precise measurements must be measured normal once, then tab precise measurement precision approach allows you to make more accurate your measurements you can use the button.
- Page 22 precise measurement of the left precise measurement from the right above approach below approach...
-
Page 23: Reports
4.4 REPORTS Measuring the job is complete, press the button with the picture above menu printer and prepare your report. in Microsoft excel program if it installed in PC. Otherwise program will show above window toreport and you can print out by pressing over print button in this window. -
Page 24: Care Instructions
5.CARE INSTRUCTIONS All maintenance by competent and qualified personnel following periyodlarda must be done properly. Any maintenance, electricity must be discontinued before. Periodic Checks and Treatments: Daily checks and maintenance: Finished using the device to avoid dust on the player into the case .. ...
Need help?
Do you have a question about the 3000-OBPC and is the answer not in the manual?
Questions and answers