Table of Contents
Advertisement
Quick Links
Advertisement
Table of Contents

Related Manuals for Atos BullSequana Edge nano


Summary of Contents for Atos BullSequana Edge nano
- Page 1 BullSequana Edge nano User's Guide 86 A1 75FS 01 - February 2022...
- Page 2 Yunano, Zero Email, Zero Email Certified and The Zero Email Company are registered trademarks of the Atos group. Atos reserves the right to modify this document at any time without notice. Some offerings or parts of offerings described in this document may not be available locally. Please contact your local Atos office for information regarding the offerings available in your country.
-
Page 3: Table Of Contents
Updating the system ................12 Chapter 4. Installing Nvidia software ..............15 Prerequisites ..................15 Preparing the BullSequana Edge nano server ..........16 Installing Nvidia software from the SDK manager ........17 Checking the installation ................ 19 Running an example ................20... - Page 4 User's Guide...
-
Page 5: Preface
Preface This guide contains a quick overview of the BullSequana Edge nano server and the first configuration steps. Note You are advised to consult the Bull Support Web site for the most up- to-date product information, documentation, firmware updates, software fixes and service offers: http://support.bull.com... - Page 6 − The equipment has obvious signs of breakage. DISCLAIMER: This set of instructions is given according to IEC 704-1. Atos disclaims all responsibility for the accuracy of any statements contained herein. CAUTION Follow these simple precautions to protect yourself from harm and the products from damage.
- Page 7 Preface...
-
Page 9: Chapter 1. Overview
Chapter 1. Overview The BullSequana Edge nano server addresses challenging AI workloads with a strengthened design. It runs compute-intensive embedded AI predictive analytics and computer vision applications for edge computing. The server contains a Nvidia Volta GPU, which enables the inference of complex AI models with lowest possible latency. - Page 10 User's Guide...
-
Page 11: Chapter 2. Hardware Specifications
Chapter 2. Hardware specifications Technical specifications Processors ARM V8.2, 3*dual core Max frequency 1.9 GHz Type Nvidia Carmel Nvidia Volta Capacity 384 CUDA Core 48, Tensor Cores, Performance up to 21 TOPS (INT8) Max operating 1100 MHz frequency Architecture Chipset Nvidia Jetson Xavier NX (SOM) Memory Min/Max... - Page 12 I/O continued Connectivity 1x MiniPCie 2 ports USB expansion, or 2 ports PoE expansion External router for WIFI, LTE Mounting options Standalone DIN rail kit (optional) Dimension Height 52 mm (2.0”) Width 147 mm (5.7”) Depth 118 mm (4.6”) Operational conditions Operating temperature -10°C to +60°C with 0.7 m/s air flow (Max-P ARM mode)
-
Page 13: Connectors And Leds
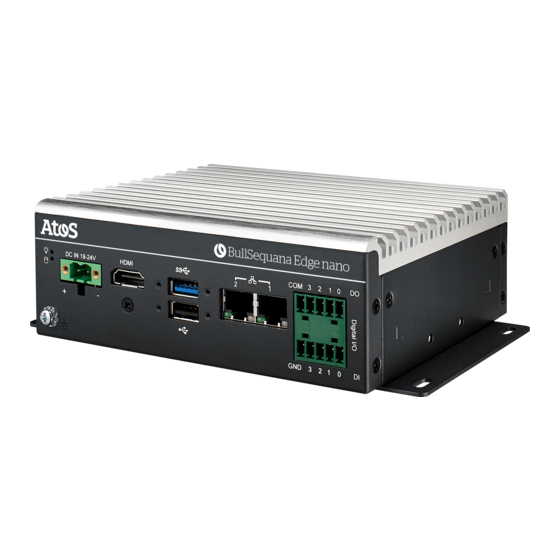
Connectors and LEDs 2.2.1 Connectors At the front Mark Description Power supply 19-24 V HDMI output 2 USB port (1xUSB 2.0 and 1xUSB 3.0) 2 RJ45 10/100/1000 MBps LAN ports GPIO 4bit in + 4bit out At the rear Mark Description COM port (male) RS232/422/485 Chapter 2. -
Page 14: Leds
2.2.2 LEDs At the front Mark Description Power on Disk access Ethernet up Ethernet link activity User's Guide... - Page 15 Chapter 2. Hardware specifications...
-
Page 17: Chapter 3. Initial Installation And Configuration
2. Connect the power supply (19-24V DC) to the server. The power supply can either be server AC converter (which can be provided by Atos), or a DIN rail DC power supply (not provided by Atos). 3. Connect the network cable to the server. -
Page 18: Configuring The Server For The First Time
Configuring the server for the first time Procedure 1. Login to the server. Username Factory default: admin Password Factory default: Yop9e4rPb Important It is strongly recommended to change the default user password. 2. Configure the keyboard layout. The keyboard default layout is QWERTY. This can be changed. Example to set a French keyboard: sudo setxkbmap fr 3. - Page 19 Example to set the time zone to Europe/Paris: sudo timedatectl set-timezone Europe/Paris timedatectl status Chapter 3. Initial installation and configuration...
-
Page 20: Updating The System
Updating the system Prerequisite The Ubuntu repositories must be accessible. Procedure 1. Update the system. The OS is Ubuntu 18.04 and needs to be updated. Run the commands: sudo apt update sudo apt upgrade sudo apt autoremove 2. Remove the unused software. Only 16 GB of eMMC storage is available for the basic configuration, which is quite small. - Page 21 Chapter 3. Initial installation and configuration...
-
Page 23: Chapter 4. Installing Nvidia Software
Chapter 4. Installing Nvidia software Prerequisites • A developer account on http://developer.nvidia.com to obtain packages and documentation. • A host system, i.e. a dedicated computer with a display, with Ubuntu 18.04 and Nvidia SDK Manager installed. Host system specifications CPU : Intel Corei5 recommended •... -
Page 24: Preparing The Bullsequana Edge Nano Server
3. Unscrew the four fixing screws and remove the cover. 4. Locate the internal micro-USB port. 5. Connect the host system to the BullSequana Edge nano server with the USB cable supplied. 6. Plug the power cable to turn on the BullSequana Edge nano server. -
Page 25: Installing Nvidia Software From The Sdk Manager
Installing Nvidia software from the SDK manager Procedure 1. If not already installed, install Nvidia SDK Manager on the host system a. Download Nvidia SDK Manager from https://developer.nvidia.com/nvidia- sdk-manager. b. Follow the installation instructions. 2. Start SDK manager on the host system. 3. - Page 26 5. STEP 02: a. Uncheck the Jetson OS check box. b. Click CONTINUE to install 6. STEP 03: The software is installed. Installation may take around 30 minutes. 7. STEP 04: The software installation completes. 8. Disconnect the USB cable. 9.
-
Page 27: Checking The Installation
Checking the installation Once the installation is done, it is possible to add the jetson-stat component to monitor and control the device. 1. From the Bullsequana Edge nano server, launch the following commands: sudo -H pip3 install -U jetson-stats reboot 2. -
Page 28: Running An Example
Running an example The usage of the GPU can be tested with the following command example. Example using a display From the BullSequana Edge nano Ubuntu GUI, run: cd /usr/local/cuda-10.2/samples/5_Simulations/nbody sudo make ./nbody User's Guide... - Page 29 Bull Cedoc 357 avenue Patton BP 20845 49008 Angers Cedex 01 FRANCE...
Need help?
Do you have a question about the BullSequana Edge nano and is the answer not in the manual?
Questions and answers