
Subscribe to Our Youtube Channel
Related Manuals for THERAGUN mini


Summary of Contents for THERAGUN mini
- Page 2 Turn on and float To turn on the Theragun mini, firmly press and hold the multi-functional power/ speed button on the side of the device, then float the Theragun mini across the areas in need. Apply light to moderate pressure as needed.
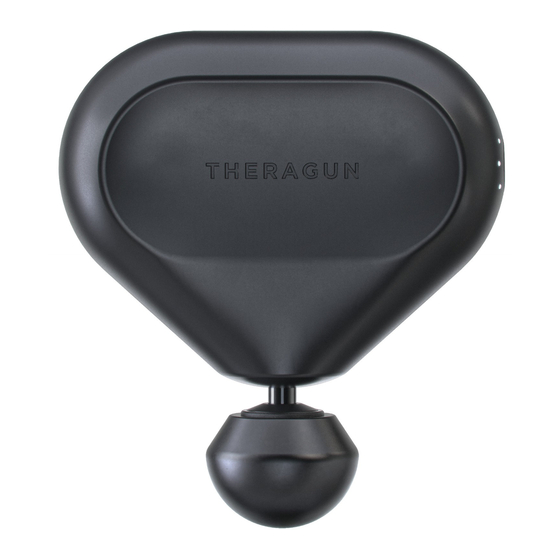
- Page 3 The Theragun mini™ See warnings insert for important safety instructions Ergonomic grip Multi-functional power/ speed button LED battery indicator light LED speed indicator USB-C charging port Interchangeable attachment connector...
- Page 4 2. Float the device across areas in need of treatment, gradually applying light to moderate pressure as needed. 3. Press the power/speed button again to toggle between 3 speeds. 4. To turn off the Theragun mini, firmly press and hold the power/speed button until the device shuts off. Connecting the attachments 1.
- Page 5 Charging the Theragun mini 1. The Theragun mini is USB-C enabled. For charging, after turning off the device, plug one end of the cable included in the package into your USB of choice and the other end to the device.
- Page 6 Cleaning the Theragun mini For the most hygienic Theragun device experience, sanitize it after each use by: 1. Wiping the device with a disinfectant wipe to remove any residue. 2. Once the device is residue-free, use a new wipe to disinfect the surface area by wiping all sides in a downward motion.
- Page 7 Attachments Your Theragun mini comes with 3 attachments designed for a more customized treatment. • Made of comfortable closed-cell PU foam • Easy to clean for a hygienic experience • Won’t absorb sweat, lotions, or oils A more targeted option for overall use. The Standard Ball attachment is specifically designed for overall use on both large and small muscle groups.
- Page 8 시작하기 1 단계 전원 켜기 및 작동하기 Theragun mini 의 전원을 켜려면 기기 측면에 있는 다기능 전원/속도 버튼을 길게 누 릅니다. 그런 다음 Theragun mini 를 필요한 부위에 갖다대고 작동시킵니다. 필요한 만 큼 적당한 압력을 가합니다. 2 단계 Therabody 앱 다운로드...
- Page 9 중요한 안전 지침을 위해 주의사항을 The Theragun mini 읽어주십시오 인체공학적 그립 다기능 전원/속도 버튼 LED 배터리 표시등 LED 속도 표시기 USB-C 충전 포트 교체 가능한 헤드 커넥터...
- Page 10 Theragun mini 사용하기 1. Theragun mini 의 전원을 켜려면 기기 오른쪽에 있는 다기능 전원/속도 버튼을 길게 누릅니다. 2. 필요한 부위에 기기를 갖다대고 필요한 만큼 가벼운 정도에서 점점 중간 세기로 압력을 가하며 마사지합니다. 3. 전원/속도 버튼을 다시 눌러서 3 가지 속도를 전환합니다.
- Page 11 Theragun mini 충전하기 1. The Theragun mini 는 USB-C 를 지원합니다. 충전을 하려면 기기를 끈 후 패키지에 포함된 케이블의 한쪽 끝을 원하는 USB 에 연결하고 다른 한쪽 끝을 기기에 연결합니다. 2. 전원/속도 버튼의 LED 등이 완전히 충전될 때까지 깜박입니다. 3. 전원/속도 버튼의 LED 등이 완전히 녹색이 되면 충전이 완료되었다는 뜻입니다.
- Page 12 2. 기기에 잔여물이 없어지면 새 물티슈를 사용하여 모든 면을 위에서부터 아래 방향으로 닦아서 표면을 소독합니다. 스마트 기능 Theragun mini 는 블루투스 연결이 가능한 스마트 기기로, Therabody 앱과 원활하게 페 어링할 수 있습니다. 앱을 다운로드하면 단계별 설정에 따라 기기를 페어링하는 방법을 안 내해드립니다.
- Page 13 교체용 헤드 Theragun mini 에는 보다 맞춤화된 경험을 위해 설계된 3 개의 교체용 헤드가 함께 제공됩니다. 편안한 폐쇄형 셀 PU 폼으로 제작 • 청결한 경험을 위한 간편한 청소 • 땀, 로션 또는 오일을 흡수하지 않음 • 전반적인 사용을 위해 더욱 표적화된 옵션. Standard Ball 교체용...
- Page 14 使い方 ステップ 1 電源をオンにして使用を始める 電源をオンにするには、Theragun mini 右側にある多機能電源/スピードボタン をしっかりと長押しします。次に、Theragun mini を必要な部位にかざします。 必要に応じて、軽度から中度の圧力をかけてください。 ステップ 2 Therabody アプリを入手する ストレスフリーなセットアップをご案内し、Theragun mini を最大限に活用す る方法をご紹介します。 ステップ 3 Feel the difference. ™ 毎日。 深呼吸をして、事前に設定されたルーティンまたはフリースタイルモードをお 楽しみください。すべてはお客さまのためにデザインされています。...
- Page 15 同梱されている、安全に関する重要 The Theragun mini な注意事項をご確認ください 人間工学に基づいたグリップ 多機能電源/スピードボタン LED 電池インジケーターライト LED スピードインジケーター USB-C 充電ポート 交換可能なアタッチメン トコネクター...
- Page 16 Theragun mini の使用方法 1. 電源をオンにするには、Theragun mini 右側にある多機能電源/スピードボタン をしっかりと長押しします。 2. ケアが必要な部分全体に Theragun mini をかざし、必要に応じて徐々に軽度から 中度の圧力をかけます。 3. 電源/スピードボタンを押して、スピードを3段階に切り替えることができます。 4. 電源をオフにするには、Theragun mini が停止するまで電源/スピードボタンを しっかりと長押しします。 アッタチメントの取り付け 1. アームの先端にアタッチメントを合わ せ、押して取り付けます。 取り外すに は、プラスティックコネクターの各サ イドを指で挟み、アタッチメントを握 ります。 2. アタッチメントを引き抜きます。...
- Page 17 Theragun mini の充電方法 1. The Theragun mini は USB-C 対応です。充電するには、Theragun mini の電源をオフにした後、付属ケーブルの先端をご自身のUSBに差し込み、 もう一方の先端をTheragun mini の端に差し込みます。 2. 充電が完了するまで、電源/スピードボタンのLEDライトが点滅します。 3. 電源/スピードボタンのLEDライトが緑に点灯すると、充電完了です。 4. 電源がオンの時は、電源/スピードボタンのLEDライトにバッテリー残量が 表示されます。 5. 電源がオフの時にバッテリー残量を確認するには、電源/スピードボタンを軽 く押すと、LED電源ライトが点滅し、バッテリー残量を表示します。 バッテリー残量 赤色の点滅:少ない Theragun mini では、バッ 青色の点滅:半分 テリー残量が次の色で表示 緑色の点滅:十分 されます。 緑の点灯:フルバッテリー...
- Page 18 Theragun mini の清掃方法 最適な衛生状態で Theragun デバイスをご使用いただくため、使用する度に以下の方 法で清掃してください。 消毒用のシートを使って、 デバイスに付着した汚れを拭き取ります。 2. 汚れがなく なったら、 新しいシートを使っ て、 全側面を下向きに拭いて表面を消毒します。 スマート機能 Theragun mini はBluetooth接続が可能なスマートデバイスです。Therabodyアプ リとシームレスにペアリングするようデザインされています。アプリをダウンロ ードすると、設定手順がステップごとに表示され、デバイスのペアリング方法を 確認することができます。 デバイスとのペアリングが完了すると、アプリ経由でスピード調節、事前に設定 されたルーティンの開始、用途に適したリアルタイムのアドバイス機能が遠隔で 操作できるようになります。 ユーザーサポート専用ページ 製品についてお困りの場合は、 以下をご確認ください https://rd.snxt.jp/42468 QRコードをスキャン して始めまし ょ う。...
- Page 19 アタッチメン ト 3つのアタッチメン トを活用すれば、 さらにカスタマイズされた体験を楽しむことがで きます。 快適なクローズドセルPUフ ォームを使用 • 衛生的でお手入れ簡単 • 汗、 ローション、 油分を吸収しない • 的確な箇所に使用できるオプション。 標準ボールのアタ ッチメン ト は、 大小両方の筋肉グループに使用できるようデザインされていま す。 ダンプナーよりも小型かつ高い衝撃レベルで、 総合的な用途でよ 標準ボール り的確な箇所に絞った機能で、 ワークアウ ト中にも使用できるアタ ッ チメン トです。 柔らかい部位や骨のある部位、 総合的な用途に。 ダンプナーのアタ ッ チメン トは、 柔らかい部位や骨のある部位のため、 総合的かつ低い衝 撃を使ったルーテ ィ ン用にデザインされています。 ベースの幅が広いた め、...
- Page 20 使用方法 第 1 步 开启并浮动按摩 用力长按设备一侧的多功能电源/速度按钮,开启 Theragun mini,然后在需要按 摩的部位使用 Theragun mini 浮动按摩。根据需要,施加轻微到中等压力。 第 2 步 获取 Theragun 应用程序 我们将指导您进行简单的设置,并向您展示如何充分利用 Theragun mini。 第 3 步 每一天都 Feel the difference. ™ 深吸一口气,通过带有指示的预设程序或自由模式为自己进行理疗。 这是专为您的需要而设计的。...
- Page 21 查看警告标志上的重要安全说明 The Theragun mini 符合人体工学的握把 多功能电源 /速度按钮 LED 电量指示灯 LED 速度指示灯 USB-C 充电插口 可更换按摩头接头...
- Page 22 Theragun mini 使用说明 1. 用力长按设备右侧的多功能电源/速度按钮,开启 Theragun mini 。 2. 在需要按摩的区域使用设备进行浮动按摩,根据需要逐渐施加轻微到中等压力。 3. 再次按下电源/速度按钮,在 3 种速度之间切换。 4. 如需关闭 Theragun mini 用力长按电源/速度按钮,直至设备停止运行。 连接按摩头 1. 将按摩头和肘臂的尖端对齐并按入。 如需取下按摩头,请握住按摩头, 将手指分别放在塑料接头的每一侧。 2. 拉下按摩头。...
- Page 23 Theragun mini 充电说明 1. Theragun mini 已通过 USB-C 启用。如需充电,请在关闭设备后,将包装内 随附的电缆的一端插入您选择的 USB,另一端插入设备。 2. 充满电后,电源/速度按钮上的 LED 指示灯将闪烁。 3. 当电源/速度按钮上的 LED 指示灯显示为绿色常亮时,表明充电已完成。 4. 设备开启时,电源/速度按钮上的 LED 指示灯会持续显示电量。 5. 如需在未开启设备的情况下查看电量,只需按下电源/速度按钮,随后 LED 指 示灯将会闪烁,以显示电量。 电量 指示灯为红色闪烁:低電量 Theragun mini 上的电量将 指示灯为蓝色闪烁:电量半满 通过以下颜色显示: 指示灯为绿色闪烁:高電量 指示灯为绿色常亮:满电...
- Page 24 Theragun mini 清洁说明 为了干净卫生地体验 Theragun 设备,请在每次使用后通过以下方式对其进行消毒: 用消毒湿巾擦拭设备以清除任何残留物。 2. 设备无残留物后, 使用新的湿巾向下擦拭所有侧面, 对设备表面进行消毒。 智能功能 Theragun mini 是一款带有 Bluetooth 连接功能的智能设备,可与 Theragun 应用 程序进行无缝配对。下载应用程序后,我们将逐步提示您进行设置并指导您如何与 您的设备配对。 设备配对完成后,可通过应用程序远程调整速度,启用带指示的理疗程序预设并根 据您的使用给您提供实时建议。 扫描二维码开始。...
- Page 25 按摩头 附带 3 个按摩头, 旨在打造更个性化的体验。 采用舒适的独立气泡聚氨酯泡沫制成 • 易于清洁, 带来干净卫生的体验 • 不会吸收汗水、 乳液或油脂 • 更有针对性的全身使用选择。 标准球形头按摩头专为针对大肌肉群 和小肌肉群的全身使用而设计。 外形小于缓冲按摩头, 冲击力级别 高于缓冲按摩头, 是更有针对性的全身使用选择, 也是您在锻炼时的 标准球形头 必选按摩头。 适合用于柔软或有骨头的部位及全身使用。 缓冲按摩头特别设计用 于一般用途和柔软或有骨头部位周围区域的低冲击力理疗程序。 设备 底座宽大, 增大表面积, 从而更好且更有效地接触身体。 缓冲按摩头 用于痉挛触痛点和腰部理疗。 拇指按摩头采用模仿真实人类拇指的 特别设计, 是用于痉挛触痛点和腰部理疗的理想选择。 在您可能曾 用过真实拇指的地方使用拇指按摩头, 无需离开舒适的家即可获得 拇指按摩头 所需体验。...
- Page 26 使い方 步驟 1 開啟並浮動使用 如要開啟 Theragun mini,請牢牢長按壓住裝置側邊的多功能電源/速度按鈕, 然後將 Theragun mini 浮動使用在需要的區域範圍。根據需要施加輕度到中度 的壓力。 步驟 2 取得 Therabody 應用程式 我們將引導您進行簡單輕易的設定,並向您展示如何充分利用 Theragun mini。 步驟 3 Feel the difference. ™ 每一天。 深吸一口氣,並使用指導性預設程序或自由模式為自己進行療程。 這是 為您專門打造而設計的。...
- Page 27 請參閱警告插頁 , The Theragun mini 了解重要的安全性說明 符合人體工學的握柄 多功能電源/速度按鈕 LED 電池指示燈號 LED 速度指示燈 USB-C 充電埠 可替換式按摩頭連接器...
- Page 28 使用 Theragun mini 如要開啟 Theragun mini , 請長按壓住裝置右側的多功能電源/速度按鈕 。 2. 將裝置浮動使用在需要的區域範圍 , 根據需要逐漸施加輕度到中度的壓力 。 3. 再次按壓電源/速度按鈕可在 3 種速度之間切換 。 4. 如要關閉 Theragun mini , 請長按壓住電源/速度按鈕直到設備關閉 。 連接按摩頭 將按摩頭對齊肘臂的尖端 , 然後推入連接 。 如要移除 , 請握住按摩頭 , 將一根手指放在 塑 料連接器的每一側 。 2. 拉下按摩頭 。...
- Page 29 為 Theragun mini 充電 Theragun mini 搭載 USB-C 功能 。 若要充電 , 在關閉裝置後 , 請將包裝中隨附的 電線一端插入自選的 USB 孔 , 另一端則插入裝置 。 2. 電源/速度按鈕上的 LED 指示燈將會閃爍 , 直到充飽電為止 。 3. 當電源/速度按鈕上的 LED 指示燈呈現實心綠燈時 , 即代表充電完成 。 4. 當裝置開啓時 , 電池電量將持續地顯示在電源/速度按鈕的 LED燈上 。...
- Page 30 為能享受最衛生的 Theragun 裝置體驗 , 請於每次使用後透過下列方式消毒 : 使用消毒布擦拭裝置 , 以清除任何殘留物質 。 2. 裝置無殘留物質後 , 使用新的擦拭布向下擦拭各面以消毒表面 。 智慧功能 您的 Theragun mini 是能夠與 Bluetooth 連接的智慧裝置 , 目的在於與 Therabody 應 用程式流暢配對 。 下載應用程式後 , 系統將引導您逐步進行設定 , 並說明如何配對裝置 。 一旦與您的裝置配對後 , 應用程式可以遠端調整速度 、 啟動指導性預設程序並根據您 的使用情況提出實時建議 。...
- Page 31 按摩頭 您的 Theragun mini 隨附 3 個按摩頭 , 可提供更客製化的體驗 。 以舒適的密閉式 PU 泡棉製成 • 易於清潔 , 提供衛生的使用體驗 • 不會吸收汗水 、 乳液或油脂 • 更具針對性的整體使用選項 。 標準球型按摩頭專為大肌群和小肌群 的整體使用而設計 。 其形狀比減震型按摩頭更小 、 衝擊力更高 , 專為整體使用設計的針對性選項 , 也是健身時不可或缺的配件 。 標準球型 適用於敏感區域或骨骼區域以及整體使用 。 減震型按摩頭專為一般 用途和低衝擊程序而設計 , 適用於敏感區域或骨骼區域 。 寬底基座可...
- Page 32 2nd Generation VN Born in Los Angeles, CA. Designed for everybody. @Therabody @Therabody_JP...
- Page 33 Therabody and only as instructed by Therabody. Do not get the Theragun mini wet. Only clean the Theragun mini with a magic eraser or with a lightly damp towel. Do not block the vents of the motor. Never attempt to disassemble the Theragun mini.
- Page 34 6. CHARGING LOCATIONS. The Theragun mini should be charged indoors in a well ventilated, dry location. Do not charge the Theragun mini outdoors, in a bathroom, or within 10 feet (3.1 meters) of a bathtub or pool. Do not use the Theragun mini or cable on wet surfaces and do not expose the USB-C cable to moisture, rain, or snow.
- Page 35 20. DO NOT USE WHILE BATHING OR IN THE SHOWER, TUB, OR SINK. Do not place or store the Theragun mini, batteries, or USB-C cable where it can fall or be pulled into a tub or sink. Do not place in or drop into water or other liquid.
- Page 36 radiate radio frequency energy and, if not installed and used in accordance with the instructions, may cause harmful interference to radio communications. However, there is no guarantee that interference will not occur in a particular installation. If this equipment does cause harmful interference to radio or television reception, which can be determined by turning the equipment off and on, the user is encouraged to try to correct the interference by one or more of the following measures: ●...
Need help?
Do you have a question about the mini and is the answer not in the manual?
Questions and answers