
Related Manuals for Compass ALU WIND


Summary of Contents for Compass ALU WIND
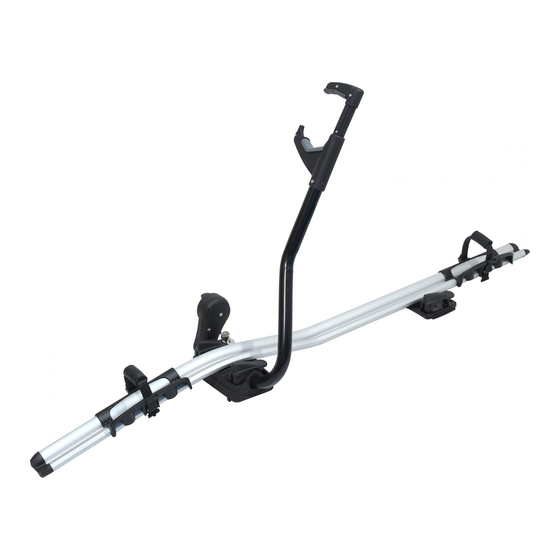
- Page 1 ALU WIND Bicycle Carrier article 02 106 Nosič jízdního kola Nosič bicykla Fahrradträger ATEST Kerékpárszállító 2718...
-
Page 2: Bicycle Carrier
Bicycle Carrier Locking bicycle carrier with a unique quick-release frame clamp with TÜV Rheinland homologation. The wheel is fastened simply with the quick-release frame holder and wheel feet with clamping clips. The bicycle and the carrier itself are lockable, thus preventing possible theft. The carrier is suitable for all bicycles weighing not more than 15 kg. - Page 3 Maker / Výrobce / Výrobca / Produzent / Termelő: ZHEJIANG JINHUA RUNCHN TOOLS CO., LTD. NO1, KANGJI ROAD, JINHUA, CHINA Importer / Dovozce / Dovozca / Importeur / Importőr: Compass CZ s.r.o., Pražská 17, 250 81 - Nehvizdy, CZ, e-mail: info@compass.cz...
- Page 4 EN Before montage -This carrier is only mounted on approved roof racks. -The carrier is intended only for bicycle transport. Other items cannot be transported. -Never exceed the maximum permitted load capacity of the carrier, the load capacity of the roof racks, or cars roof load capacity.
- Page 5 Carrier installation / Instalace nosiče / Inštalácia nosiča / Träger Installation / Telepítés hordozók EN - Insert the locking rollers 4 into the locking handles 10 CZ - Zasuňte pojistné válečky 4 do zajišťovacích rukojetí 10 SK - Zasuňte poistné valčeky 4 do zaisťovacích rukoväťou 10 DE - Schieben Sie die Verriegelungsrollen 4 in die Verriegelungsgriffe 10 HU - Csúsztassa a zárgörgőket 4 a reteszelőfogantyúkba 10 EN - Pass the plastic tire clips 11 as shown and provide them with a rubber member 3...
- Page 6 EN - Install for U-profiles, if the roof racks are not provided with a T-slot, or if the T-slot has a dimension other than 20 mm. Follow the picture using screws 5 and 6 and handle 10. CZ - Montáž pro U profily, provádějte pokud střešní nosiče nejsou opat- řeny T drážkou, nebo pokud má...
- Page 7 EN - Secure with anchoring members 7 CZ - Zajistěte pomocí kotvících členů 7 SK - Zaistite pomocou kotviacich členov 7 DE - Mit Verankerungselementen sichern 7 HU - Rögzítse rögzítő tagokkal 7...
- Page 8 EN - Nastavte doporučenou vzdálenost střešních nosičů (700 mm) připevněte zkompletova- ný nosič pomocí zkompletovaných kotvících prvků ke střeše automobilu. -> Spojení je potřeba dotáhnout pomocí 10, tak, aby došlo k zaklapnutí silou, zajištění pomo- cí rukojetí musí být dostatečně důsledné. CZ - Nastavte doporučenou vzdálenost střešních nosičů...
- Page 9 EN - Fastening on T-profiles is performed whenever the roof carrier is provided with a 20 mm T-groove. -Attach the T-screws 8 and 9 to the carrier as shown in the figure and attach the locking handle 10 to the end of the T-screws (the handle with the lock belongs to the front part) CZ - Upevnění...
- Page 10 EN - Set the recommended distance of the roof racks (700 mm) and fas- ten the assembled rack by inserting the t-screws into the t-slots. -> the connection must be tightened so that it snaps in by force, the loc- king with the handle must be sufficiently consistent CZ - Nastavte doporučenou vzdálenost střešních nosičů...
- Page 11 EN Placing the bicycle in the carrier Place the bicycle in the carrier so that the wheel tires are in line with the plastic pads. The pads can be moved as needed. The mounting arm needs to be attached to the lower tube of the bicycle frame. CZ Umístění...
- Page 12 EN Securing a bicycle Bicycles with a frame diameter of 22-80 mm, max. Atypical frame size 80 x 100 mm can be attached to the carrier. The arm of the frame holder should be placed as close as possible to the center of the bicycle.
- Page 13 EN Taking off the bike Use the key to unlock the locking system and release it with the press of a button. After unbuckling the bike straps, the bike can be removed. CZ Sundání bicyklu Pomocí klíče odemkněte zamykací systém a stsikem tlačítka jej povolte. Po odepnutí pásek kol, lze bicy- kl vyjmout.
- Page 14 EN CAUTION! Never exceed the permitted load capacity of the car roof. Bicycles whose frame has a different size than specified cannot be attached to the carrier. There is a risk of their spontaneous falling out of the carrier. Transport of the wheel without a firm attachment with plastic straps to the carrier is not permitted. Please be aware of what you are driving on the roof, when braking, in crosswinds and when cornering.
- Page 16 EN Maintenance After use, disassemble and clean the carrier, preserve the screw con- nections and the carrier. Failure to do so may result in damage and consequent loss of warranty. CZ Údržba Po použití nosič demontujte a očis- těte, šroubové spoje a nosič nakon- zervujte.
Need help?
Do you have a question about the ALU WIND and is the answer not in the manual?
Questions and answers