Table of Contents
Advertisement
Quick Links
Advertisement
Table of Contents

Related Manuals for Euroboor B45S


Summary of Contents for Euroboor B45S
- Page 1 User manual V1.3 EN | January 2022 Beveling machine B45S...
- Page 2 Congratulations on the purchase of your EUROBOOR B45S Beveling machine. At EUROBOOR we strive to exceed our customers’ expectations by developing and providing premium and innovative portable drilling and cutting solutions. We believe that a professional like you must be able to rely on a professional supplier.
-
Page 3: Table Of Contents
Table of contents 1. Safety ............................4 1.1 General safety instructions ......................4 1.2 Specific safety information ......................7 2. Description ..........................10 2.1 Intended use ..........................10 2.2 Case content..........................10 2.3 Description and features ......................11 2.4 Technical data ..........................12 2.5 Noise and vibration information .................... -
Page 4: Safety
1. Safety 1.1 General safety instructions WARNING: When using the bevelling machine, basic safety precautions should always be followed to reduce the risk of fire, electric shock and personal injury. READ AND UNDERSTAND ALL SAFETY INFORMATION AND INSTRUCTIONS. Failure to follow the warnings and instructions may result in electric shock, fire and/or serious injury. - Page 5 WORK AREA SAFETY 1. Keep your work area clean and well lit. Cluttered benches and dark areas increase the chance of accidents; 2. Do not operate power tools in explosive atmospheres, such as in the presence of flammable liquids, gases or dust. Power tools create sparks which may ignite the dust or fumes.
- Page 6 PERSONAL SAFETY WARNING: Wear ear and eye protection when using this power tool. 1. Stay alert, watch what you are doing and use common sense when using a power tool. Do not use machine while tired or under the influence of drugs, alcohol, or medication. A moment of inattention while operating power tools may result in serious personal injury.
-
Page 7: Specific Safety Information
8. Use only accessories that are recommended by EUROBOOR for your power tool. Accessories that may be suitable for one machine, may become hazardous when used on another power tool. - Page 8 2. PERSONAL SAFETY a) Check the plug, cable and machine for damage each time using the machine b) Remove the plug from the plug socket before undertaking an maintenance work on the power tool WARNING: Risk of injury from high-temperature chips.
- Page 9 3. TOOL USE AND CARE WARNING a) Hold power tool by insulated gripping surfaces, because the cutter may contact its own cord. Cutting a “live” wire may make exposed metal parts of the power tool “live” and shock the operator...
-
Page 10: Description
The user is liable for damages and accidents resulting from any modifications made or incorrect use. 2.2 Case content 1 x B45S Beveling machine 1 x 45° milling head with cutting plates 1 x User manual... -
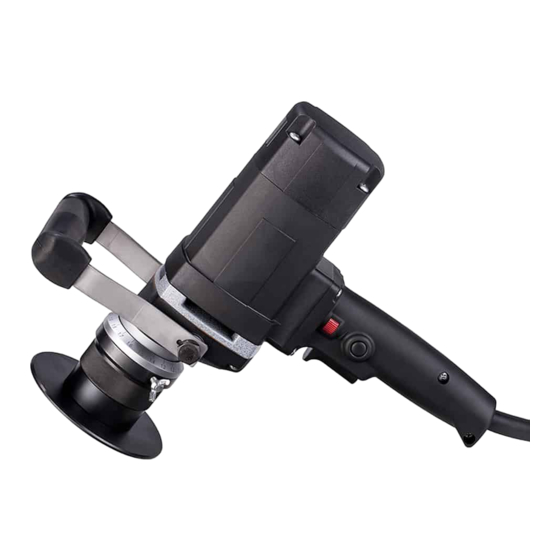
Page 11: Description And Features
2.3 Description and features [image 1-1] 1. Main handle 9. Clamping ring 2. Auxiliary front handle 10. Milling head 3. Motor housing 11. Impeller 4. Motor cover 12. On/off trigger switch 5. Gear casing 13. Lock pin 6. Power cord 14. -
Page 12: Technical Data
2.4 Technical data Metric Imperial Spindle speed 1,750 – 5,250 rpm Max. bevel depth 6 mm (45°) 1/4" (45°) Min. diameter for inside bevels 20 mm 13/16" Spindle thread M12 x 1,75 Length 458 mm 18" Width 137 mm 5 3/8"... -
Page 13: Noise And Vibration Information
2.5 Noise and vibration information WARNING: Wear hearing protection while operating the Beveling machine 2.5.1 Noise 86.47dB(A) 97.47dB(A) Uncertainty K: 3dB(A) The declared vibration total value has been measured in accordance with a standard test method and may be used for comparing one tool with another. The declared vibration total value may also be used in a preliminary assessment of exposure. -
Page 14: Symbols
2.6 Symbols Symbol Term, meaning Explanation Be absolutely sure to read the documentation in this user Read documentation manual and specifically the “General safety instructions” and ‘’Specific safety information’’. Wear ear protection Use ear protection during operation. Wear eye protection Use eye protection during operation. -
Page 15: Environmental
2.7 Environmental Separate collection. This product must not be disposed of with normal household waste. Separate collection of used products and packaging allows materials to be recycled and used again. Re-use of recycled materials helps prevent environmental pollution and reduces the demand for raw materials. -
Page 16: Preparation & Adjustment
3. Preparation & adjustment 3.1 Assembly WARNING: To reduce the risk of injury, turn machine off and disconnect from power source before installing and removing accessories, before adjusting or changing set- ups or when making repairs. An accidental start-up can cause injury. - Page 17 Setting bevel depth 1. Loosen the clamping ring lever. 2. Rotate the entire support deck assembly, use the dial ring as indication for the depth adjustment. Each complete rotation corresponds to a bevel depth of 1.5 mm (1/16"), this is indicated on the scale.
-
Page 18: Prior To Use
Do not use this tool continuously for a period over 30 minutes. Electrical safety Always check that the power supply corresponds to the voltage on the rating plate. If the supply cord is damaged, it must be replaced by a specially prepared cord available at EUROBOOR or your EUROBOOR dealer. -
Page 19: Using The Machine
4. Using the machine WARNING: Always observe the safety instructions and applicable regulations. WARNING: To reduce the risk of serious personal injury, turn the machine off and disconnect the machine from power source before making any adjustments or removing/installing attachments or accessories. - Page 20 Switching on Press the On/Off trigger switch to start the machine. The anti-kickback and breakthrough torque control provides a “slow start”: the machine needs a couple of seconds to reach its set running speed. The On/Off trigger switch can be locked in the “on” position by pressing the lock pin while the machine is running.
-
Page 21: Working With The Machine
4.2 Working with the machine 1) Set the speed adjustment wheel to the highest speed. 2) Switch the machine on. Do not move the machine towards the workpiece until full speed has been reached. 3) Hold the machine in such a way that the support deck is flat on the workpiece. -
Page 22: Maintenance
5. Maintenance Your EUROBOOR beveling machine has been designed to operate over a long period of time. Continuous satisfactory operation depends upon proper tool care and regular cleaning. CAUTION: To reduce the risk of injury, turn the machine off and disconnect machine from power source before installing and removing accessories, before adjusting or changing set- ups or when making repairs. - Page 23 Cleaning Clean all dirt, dust and metal of your beveling machine; Blow dirt and dust out all air passages with dry air as often as dirt is seen collecting in and around the air vents. Wear approved eye protection and an approved dust mask;...
-
Page 24: Changing Or Replacing The Milling Head
The Beveling machine is standard equipped with a 45° milling head. When showing signs of wear, a replacement piece (part number B45.1011) can be ordered from your EUROBOOR reseller. For every type of milling head the replacement procedure is the same. -
Page 25: Rotating And Replacing Cutting Plates
5.2 Rotating and replacing cutting plates Each of the 3 cutting plates on the milling head have 3 usable sides. When the used side of either of the 3 cutting plates is dull, the cutting plates can be rotated to position a sharp side in the correct direction. -
Page 26: Replacing The Impeller
Once all 3 sides of the cutting plates are used, they need to be replaced. Use official EUROBOOR cutting plates to ensure the same quality and endurance. Replacing cutting plates: 1. Undo mounting screw with the supplied L-type Torx wrench. -
Page 27: Replacing Carbon Brushes
4. Place the new carbon brushes in the destined slots, ensuring they align properly and slide freely. 5. Place back the top cover and screw in all four screws. WARNING: Always replace carbon brushes as a pair. Always use official EUROBOOR carbon brushes which can be ordered from your EUROBOOR reseller. -
Page 28: Exploded View & Spare Part List
6. Exploded view & spare part list 6.1 Exploded view... -
Page 29: Spare Part List
6.2 Spare part list Part number Description B45S.0003 Screw M4 x 8 B45S.0004 Guide plate B45S.0008 Connection sleeve B45S.0016 Butterfly bolt M5 x 16 B45S.0006 O ring B45S.0010 Dial ring B45S.0136 Set screw M3 x 4 B45S.0009 Locknut M5 B45S.1011... - Page 30 B45S.0032 Armature 220V B45S.0032A Armature 110V 032.0126 Bearing 608ZZ 8 x 22 x 7 050T.0180 Ring magnet 050.0261 Baffle 020.0024 Screw M4 x 60 B45S.0151 Field 220V B45S.0151A Field 110V 38-41 + 43- 050.0142 Housing 055.1015 Carbon brush set 220V 055.1016...
-
Page 31: Troubleshooting
Accessory may be damaged, worn or tool is used on Tool does not bevel effectively the wrong type of material. If any problem that you are having with your EUROBOOR B45S cannot be solved using this troubleshooting guide, please refer to your EUROBOOR distributor. -
Page 32: Warranty And Service
Date of purchase: Service To maximize the lifetime of your EUROBOOR bevelling machine always use service and parts from an official EUROBOOR distribution channel. Whenever in need of such, always contact original point of sales or if no longer existent the distributor of EUROBOOR products in your country. -
Page 33: Certification
9. Certification 9.1 CE declaration of conformity EUROBOOR BV declares that the following appliance complies with the appropriate basic safety and health requirements of the EC guidelines based on its design and type, as brought into circulation by EUROBOOR BV. -
Page 34: Certificate Of Compliance: Usa / Canada
Kryptonstraat 110, 2718 TD Zoetermeer, Netherlands Certified Product: Class II Bevelling Machine Model Designation: B45, B45S Fulfilled Standards: UL 62841-1, 1st Ed., Issue Date: 2015-02-20, Revision Date: 2020-08-21 The standard(s) listed here reflect the status at the time of the release of this certificate. - Page 35 Kryptonstraat 110, 2718 TD Zoetermeer, Netherlands Certified Product: Class II Bevelling Machine Model Designation: B45, B45S Fulfilled Standards: CAN/CSA C22.2 NO. 62841-2-1, 1st Ed., Issue Date: 2018-04-30 The standard(s) listed here reflect the status at the time of the release of this certificate.
Need help?
Do you have a question about the B45S and is the answer not in the manual?
Questions and answers