Table of Contents
Advertisement
Available languages
Available languages
Quick Links
Pro
line
Pro
Gavita
®
1
Introduction
Thank you for purchasing the Gavita
product. Mounting and installing of the LED fixture may only be performed by certified service personnel. Please read and
understand this manual completely before using the product. Only use the product as specified in this manual.
1.1
Used Symbols
Warning! A warning indicates severe damage to the user and/or product may occur when a procedure is not carried
out as described.
Caution! A caution sign indicates problems may occur if a procedure is not carried out as described. It may also serve
as a reminder to the user.
Note: A note gives additional information, e.g. for a procedure.
This symbol is an internationally recognized symbol used to designate recyclable materials.
This symbol is an authorized use mark employed on electronic products manufactured or sold in the United States,
which indicates that the electromagnetic emissions from the device have been measured to be under the limits
published by the Federal Communications Commission. The FCC logo is a mark that declares that the equipment is
authorized to market and operate under the FCC's SDOC procedure.
This symbol shows that a product has been independently tested and certified to meet recognized standards for safety.
The symbol on the material, accessories or packaging indicates that this product may not be discarded as household
waste. By properly disposing the equipment, you will be helping to prevent possible risks to the environment and public
health, which might otherwise be caused by improper handling of the discarded equipment. Recycling of materials
contributes to the conservation of natural resources. Therefore, please do not dispose of old electronics and electrical
appliances via household waste.
A
This symbol indicates the minimum distance (B) between the LED fixture (A) and the lit surface.
B
2
Product description
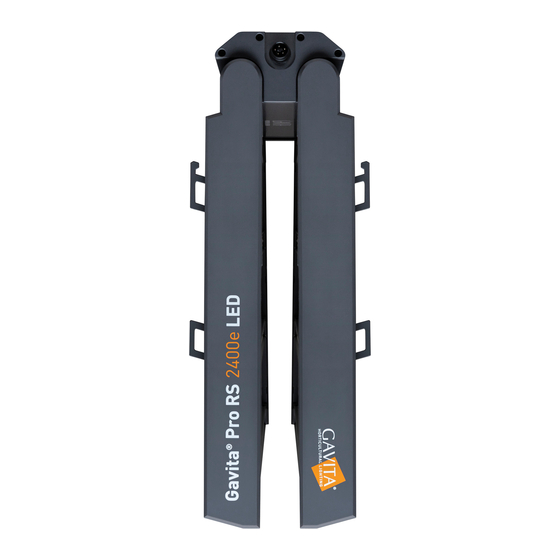
The Gavita
Pro RS 2400e LED is an electronic horticultural LED fixture. It drives eight LED rails. The Gavita
®
LED is intended to be used in greenhouses or in climate rooms. In this manual, the Gavita
to as: "the LED fixture".
Photobiological Safety
Caution! Possibly hazardous optical radiation emitted from this product.
Attension! Rayonnement optique potentiellement dangereux émis par ce produit.
Photobiological safety assessment: Risk Group 1
Évaluation de la sécurité photobiologique: Groupe de risque 1
RS 2400e LED
Pro RS 2400e LED. This manual describes the mounting, installation, and use of the
®
Pro RS 2400e LED will be referred
®
1
Pro RS 2400e
®
Advertisement
Table of Contents

Related Manuals for Gavita Pro RS 2400e LED


Summary of Contents for Gavita Pro RS 2400e LED
- Page 1 This symbol indicates the minimum distance (B) between the LED fixture (A) and the lit surface. Product description The Gavita Pro RS 2400e LED is an electronic horticultural LED fixture. It drives eight LED rails. The Gavita Pro RS 2400e ®...
-
Page 2: Product Information And Specifications
® Controllers Unit will function Gavita EL3 Master controller HGC906174 ™ with EL3 HGC906147 Gavita 8 ft Power Cord 120 Volt for Gavita ™ ® HGC906148 Gavita 8 ft Power Cord 208-240 Volt for Gavita ™ ® Power cords Gavita... -
Page 3: Safety Recommendations And Warnings
LED fixture. Damage to the LED fixture and electronic circuitry as a result of incorrect installation and use voids the warranty. Contents (1) Gavita Pro RS 2400e LED ® 1. LED drivers 2. LED rails 3. -
Page 4: Installation Preparations
Installing the LED fixture The Gavita Pro RS 2400e offers multiple mounting points for increased versatility. When using the Gavita Rail System Hanging Bracket (fig. 3) (sold separately), use the innermost mounting point (fig. 4A). If utilizing Sungrips ratchet style rope hangers, included mounting hardware, or hanging from a single point;... - Page 5 Connecting up to 512 LED fixtures • Remove the dummy plug from the input port on the first LED. Note: Keep the dummy in a safe place! The dummy is necessary to operate the LED fixture in standalone mode. • Use the controller cable (RJ45 to RJ45) (fig.
- Page 6 Connecting the LED fixture to the mains Warning! Make sure mains power is switched off. Warning! Ensure the cord is not coiled and does not touch any hot surfaces. Warning! Connect the cables according to local rules, safety regulations and electrical code. Warning! Ensure external switching gear can cope with the inrush current of the LED fixture (see section 3.2).
-
Page 7: Inspection, Maintenance And Repair
Inspection, maintenance and repair Warning! Disconnect the LED fixture from mains before performing any maintenance or repairs. Warning! Do not connect or disconnect the LED fixture under load. Warning! Do not open or disassemble the LED fixture, it contains no serviceable parts inside. Opening the LED fixture can be dangerous and will void the warranty. - Page 8 The Hawthorne Gardening Company 3204 NW 38th Circle, Vancouver, WA 98660 HawthorneGC.com | Canada: HawthorneGC.ca | +1-360-883-8846 | info@gavita.com ®/™ used under license by Hawthorne Canada Limited. ©2022. World rights reserved. LB19144 Instruction Manual - Gavita Pro 2400e LED 220404aSD...
-
Page 9: Description Du Produit
Le Gavita® Pro RS 2400e LED est un dispositif électronique d'horticulture à DEL. Le dispositif comporte huit traverses à DEL. Le Gavita® Pro RS 2400e LED est recommandé pour une utilisation en serre ou dans des pièces tempérées. Dans ce manuel le Gavita® Pro RS 2400e LED sera dénommé... - Page 10 HGC906147 Cordon d'alimentation Gavita™ de 2,5 m (8 pi) et de 120 volts pour Gavita® LED Cordon d'alimentation Gavita™ de 2,5 m (8 pi) et de 208 à 240 volts pour Gavita® LED HGC906148 Cordons d'alimentation Cordon d'alimentation Gavita™ de 2,5 m (8 pi) et de 277 à 400 volts pour Gavita® LED HGC906458 Cordon d'alimentation Gavita™...
- Page 11 à DEL. Des dommages au dispositif à DEL et aux circuits électroniques résultant d'une mauvaise installation ou utilisation annulent la garantie. Contenu (1) Gavita Pro RS 2400e LED ® 1. Moteurs DEL 2. Traverses DEL 3.
- Page 12 Le Gavita Pro RS 2400e offre plusieurs points de montage pour une polyvalence accrue. Lorsque vous utilisez la ferrure de suspension pour système de traverses Gavita (fig. 3) (vendue séparément), utilisez les points de montage les plus centraux (fig. 4A). Si vous utilisez des supports à...
- Page 13 Brancher jusqu'à 512 dispositifs à DEL • Retirez la fiche isolante du port d'entrée du premier dispositif à DEL. Remarque : Placez la fiche isolante dans un endroit sûr! La fiche isolante est nécessaire au fonctionnement du dispositif à DEL en mode autonome.
- Page 14 Branchement du dispositif à DEL au conducteur principal Avertissement! Assurez-vous d'éteindre l'alimentation au conducteur principal. Avertissement! Assurez-vous que le cordon n'est pas enroulé et qu'il n'est pas en contact avec des surfaces chaudes. Avertissement! Branchez les câbles conformément aux règlements locaux, aux règlements de sécurité et au code de l'électricité. Avertissement! Assurez-vous que l'équipement de commutation externe peut soutenir l'appel de courant du dispositif à...
-
Page 15: Garantie Limitée
Inspection, entretien et réparation Avertissement! Débranchez le dispositif à DEL du conducteur principal avant d'effectuer tout entretien ou toute réparation. Avertissement! Ne branchez pas ou ne débranchez pas le dispositif à DEL lorsqu'il est sous tension. Avertissement! N'ouvrez pas ou ne démontez pas le dispositif à DEL; il ne contient aucune pièce réparable à l'intérieur. Ouvrir le dispositif peut s'avérer dangereux et annulera la garantie. - Page 16 The Hawthorne Gardening Company 3204 NW 38th Circle, Vancouver, WA 98660 HawthorneGC.com | Canada: HawthorneGC.ca | Tél. +1-360-883-8846 | Courriel info@gavita.com ®/™ utilisee licence par Hawthorne Canada Limited. ©2022. Tous droits mondiaux réservés. Manuel d'instruction LB19144l - Gavita Pro 2400e LED 220404aSD...
- Page 17 THIS PAGE DOES NOT PRINT AND ONLY FOR TITLE BLOCK Hawthorne Production O set per SAP 119235 Sheri Deane Potamus Press. Temecula, CA HGC906052-01_LB19144_Gavita_RS_2400e_LED_LAUNCH_Manual-ENG-FRNCH_220404aSD.indd Cyan Magenta HGC906052-01_LB19144_Gavita_RS_2400e_LED_LAUNCH_Manual-ENG-FRNCH_2200404aSD.indd Yellow SKU #: HGC906052 Manual/Instructions Component #: LB19144 04/04/22 Hawthorne Project Number: 119235 Hawthorne Project Lead: Nicole Downs 8.5 x 11...
Need help?
Do you have a question about the Pro RS 2400e LED and is the answer not in the manual?
Questions and answers