
Related Manuals for Linear Logic ScangaugeD


Summary of Contents for Linear Logic ScangaugeD
- Page 1 www.ScanGauge.com Quick Start Guide Plugs into the J1939 or J1708 diagnostic connector already built into most 1987 or Newer Diesel Pusher Motor Homes, RV’s and Large Diesel Over-The-Road Trucks SGDQS101...
- Page 2 1) Quick Start Installation Locate the Diagnostic Connector The connector is generally located under the dash at the fire wall on the driver side and is usually protected by a plastic cover. To remove the protective cover, you must push the cover while turning Typical J1939/J1708 protective cover counter clockwise, then pull to remove it.
- Page 3 Connect the small end of the cable Small end of the cable Plug the small end of the cable into the back or side of the connects to your ScanGauge. ScanGauge. Turn the vehicle on. Start your vehicle or turn the ignition to the ON position. Plug the ScanGauge Plug Into The Diagnostic Connector.
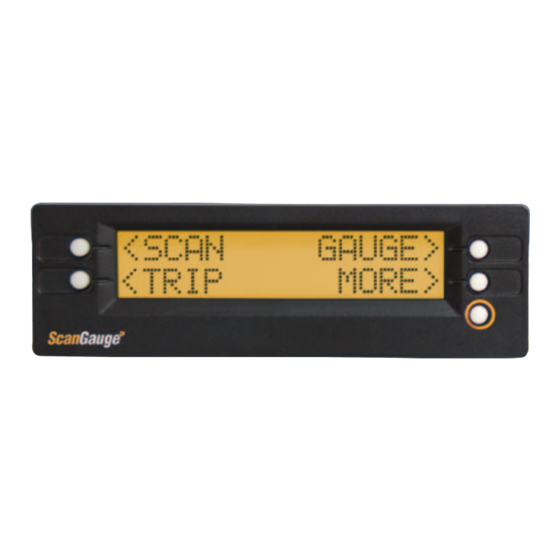
- Page 4 2) Set Up Your ScanGauge HOME Screen Your new ScanGauge must first be set up so <SCAN GAUGE> that it may report accurate information about your vehicle. <TRIP MORE> To access the Basic Setup Options, follow the sequence shown to the right. For more <DISPLAY FILLUP>...
- Page 5 ScanGauge Layout ScanGauge Layout Front Front Side Side Back Back Front Front Back Back A. Function/Selection Button A. Function/Selection Button G. J1939/J1708 Connection Plug G. J1939/J1708 Connection Plug B. Function/Selection Button B. Function/Selection Button C. Function/Selection Button C. Function/Selection Button Side Side D.
- Page 6 3) Fuel Level and Cost Adjustments The FILLUP function allows you adjust and <SCAN GAUGE> enter the fuel level and cost values to help <TRIP MORE> ScanGauge maintain accurate TO EMPTY and FUEL COST computations. Initial Setup <DISPLAY FILLUP> To set the tank level initially, access the <SETUP MORE>...
- Page 7 4) Using Your ScanGauge Your ScanGauge features an easy- <SCAN GAUGE> to-use menu-driven design. Pushing <TRIP MORE> the button next to each selection will display that information. Pushing the HOME button will take you back to the Push the HOME button to return to Home Screen at anytime.
- Page 8 5) Learn How to Save Fuel With ScanGauge The easiest way to learn to improve your fuel economy is to have real-time feedback about how your driving style effects overall fuel use. ScanGauge can provide both Miles Per Gallon (MPG) as well as Average Fuel Economy (AVG) in real-time to help you adjust your driving style to reach maximum fuel economy.
Need help?
Do you have a question about the ScangaugeD and is the answer not in the manual?
Questions and answers