Table of Contents
Advertisement
Available languages
Available languages
Quick Links
Preparation
You will need:
• 1/4" nut driver or socket, Phillips head screwdriver, fl at head screwdriver.
NOTE: Close the garage door BEFORE installing the travel module.
1
Disassemble the garage door opener
To prevent possible SERIOUS INJURY or
DEATH:
• Disconnect ALL electric and battery
power BEFORE performing ANY service
or maintenance.
The garage door MUST be in the fully
closed position during installation.
ALWAYS wear protective gloves and eye
protection when changing the battery or
working around the battery compartment.
WARNING: This product can expose you
to chemicals including lead, which are
known to the State of California to cause
cancer or birth defects or other reproductive
harm. For more information go to
www.P65Warnings.ca.gov
1.1 Disconnect electrical power to the
garage door opener.
Model 41D7742-7 (1/2 HP Only) and 41D7742-5 (3/4 HP Only)
NOTE: The images throughout this manual are for reference and your product may look different.
1.2 Disassemble the garage door opener by
removing the following:
A Light lens
B Cover
C Wire harness from the travel module
D Travel module retainer clip and set aside
E Travel module using the tip of the
screwdriver to gently pry the travel
module from the motor bracket
1.3 Discard the old travel module.
A
D
E
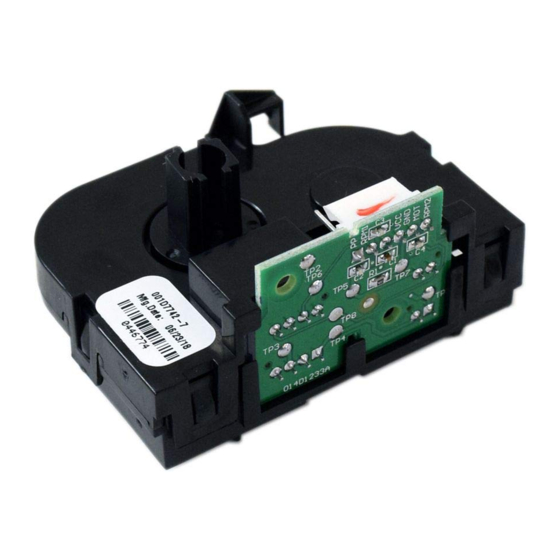
1
TRAVEL MODULE
C
A
B
Advertisement
Table of Contents

Related Manuals for Chamberlain 41D7742-7


Summary of Contents for Chamberlain 41D7742-7
- Page 1 TRAVEL MODULE Model 41D7742-7 (1/2 HP Only) and 41D7742-5 (3/4 HP Only) Preparation You will need: • 1/4" nut driver or socket, Phillips head screwdriver, fl at head screwdriver. NOTE: Close the garage door BEFORE installing the travel module. Disassemble the garage door opener NOTE: The images throughout this manual are for reference and your product may look different.
-
Page 2: Installation
Installation Install the new travel module 2.1 Install the new travel module by aligning all 4 tabs with the holes on the motor bracket and snapping the new travel module into place. 2.2 Align the opening of the travel module with the hole in the motor shaft and replace the retainer clip (A). -
Page 3: Program The Travel
Adjustment Program the travel 1.1 Press and hold the Adjustment Button 1.2 Press and hold the UP Button until the 1.3 Once the door is in the desired until the UP Button begins to fl ash door is in the desired UP position. UP position press and release the and/or a beep is heard. -
Page 4: Test The Safety Reversal System
Test the Safety Reversal System 2.1 With the door fully open, place a 1-1/2 2.2 Press the remote control push button to If the door stops and does not reverse on the inch (3.8 cm) board (or a 2x4 laid fl at) close the door. - Page 5 MODULE DE VOYAGE Modèle 41D7742-7 (1/2 HP uniquement) et 41D7742-5 (3/4 HP uniquement) Préparation Outils requis : • Un tourne-écrou ou manchon de 1/4 po, un tournevis à tête cruciforme, un tournevis à tête plate. REMARQUE : Fermez la porte de garage AVANT l’installation du module de voyage.
- Page 6 Installation Installation du nouveau module de voyage 2.1 Posez le module de course neuf en alignant les quatre onglets avec les trous du support du moteur et enclenchez-le en place. 2.2 Alignez l’ouverture du module de course avec le trou dans l’arbre du moteur et replacez l’agrafe de retenue (A).
- Page 7 Réglages Programme du voyage 1.1 Appuyer sur le bouton de réglage et 1.2 Appuyer sur le bouton UP et le maintenir 1.3 Une fois que la porte est dans la position le maintenir enfoncé jusqu'à ce que le enfoncé jusqu'à ce que la porte soit à la d'ouverture désirée, appuyer sur le bouton bouton UP commence à...
-
Page 8: Dépannage
Essai du système d'inversion de sécurité 2.2 Appuyer sur le bouton-poussoir de la Si la porte s'arrête et ne remonte pas en raison de 2.1 La porte étant entièrement ouverte, télécommande pour fermer la porte. La porte l'obstruction, augmenter la course de fermeture (voir placer une planche de 3,8 cm (1-1/2 po) DOIT remonter quand elle entre en contact l'étape de Réglage nº... - Page 9 MÓDULO DE VIAJE Modelos 41D7742-7 (1/2 HP únicamente) y 41D7742-5 (3/4 HP únicamente) Preparación Herramientas necesarias: • Llave para tuercas de 1/4 de pulgada; destornillador Phillips, destornillador de cabeza plana. NOTA: Cierre la puerta del garaje ANTES de instalar el módulo de viaje.
-
Page 10: Instalación
Instalación Instalar el módulo de viaje nuevo 2.1 Instale el nuevo módulo alineando las 4 pestañas con los agujeros de la ménsula del motor y encastrando el nuevo módulo. 2.2 Alinear la abertura del módulo con el orifi cio en el eje del motor y volver a colocar el retén (A). - Page 11 Ajustes Programma del viaje 1.1 Oprima y mantenga oprimido el botón 1.2 Oprima y mantenga oprimido el botón 1.3 Una vez que la puerta esté en la posición “Ajuste” hasta que el botón ARRIBA ARRIBA hasta que la puerta se encuentre en la deseada, oprima y suelte el Botón “Ajuste”.
-
Page 12: Diagnostico De Fallas
Si después de instalar el nuevo módulo la unidad no se mueve más de 6 - 8 pulgadas, verifi que que el retén esté instalado y que los cables del módulo estén correctamente conectados. © 2013, The Chamberlain Group, Inc.
Need help?
Do you have a question about the 41D7742-7 and is the answer not in the manual?
Questions and answers