
Subscribe to Our Youtube Channel
Related Manuals for Infoblox Trinzic TE-2205


Summary of Contents for Infoblox Trinzic TE-2205
- Page 1 Infoblox Installation Guide 2205 Series Appliances Trinzic TE-2205, TE-2215, and TE-2225 Advanced Appliance PT-2205 Network Insight ND-2205 Trinzic Reporting TR-2205 Page 1...
-
Page 2: Table Of Contents
1.1 Trinzic TE-2205, TE-2215, and TE-2225 Product Overview ....... . . -
Page 3: Introduction To The Infoblox 2205 Series
Introduction to the Infoblox 2205 Series This guide provides an overview of the Infoblox 2205 Series appliances, and explains how to install and configure the system. The Infoblox 2205 Series includes the Trinzic TE-2205, TE-2215, and TE-2225, the Infoblox Advanced Appliance PT-2205, the Network Insight ND-2205, and the Trinzic Reporting TR-2205. -
Page 4: Trinzic Te-2205, Te-2215, And Te-2225 Product Overview
Trinzic TE-2205, TE-2215, and TE-2225 Product Overview The Trinzic TE-2205, TE-2215 and TE-2225 are high performance network appliances that provide core network services, including DNS (Domain Name System), DHCP (Dynamic Host Configuration Protocol), IPAM (IP Address Management), and NTP (Network Time Protocol). They may operate as a Grid member or as a Grid Master, and can operate with a second Trinzic appliance of the same model in high availability (HA) mode. -
Page 5: Infoblox Advanced Appliance Pt-2205 Product Overview
DNS threats targeting DNS caching and authoritative applications. You configure and manage the Advanced Appliance PT-2205 through the Infoblox Grid Manager. The PT-2205 can operate with a second appliance of the same model in high availability (HA) mode. For... -
Page 6: Network Insight Nd-2205 Product Overview
Ethernet switches, routers, firewalls and other security devices, VoIP softswitches, load balancers, end host devices and more. You configure the ND-2205 appliance through Infoblox Grid Manager. For more... -
Page 7: Trinzic Reporting Tr-2205 Product Overview
IPAM, DNS, DHCP, and system activities and performance. You configure and manage the TR-2205 and view its reports through the Infoblox Grid Manager. For more information about Reporting features and licensing, refer to the Info... -
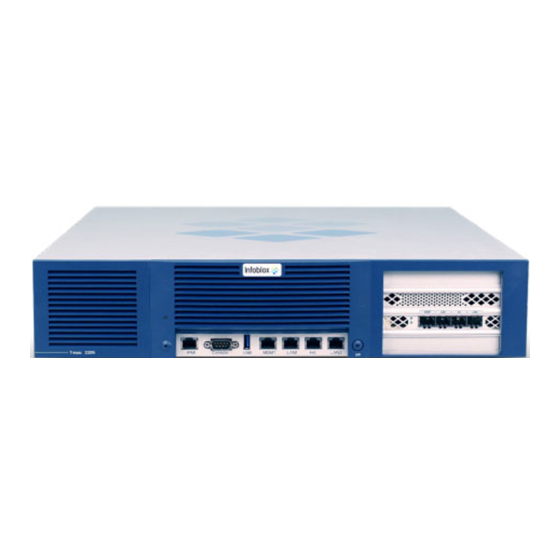
Page 8: Infoblox 2205 Series Hardware Components
Infoblox 2205 Series Hardware Components The Infoblox 2205 Series are 2-U appliances that you can efficiently mount in a standard equipment rack. For rack mounting information, see Rack Mounting Procedures Front Panel Infoblox 2205 Series front panel components include the LCD (liquid crystal display) panel and navigation buttons, communication ports, and hard disk... - Page 9 Infoblox NIOS Administrator Guide Infoblox provides tamper evident FIPS labels that you must affix on the HDD cover, all PSU and fan canisters, over the IPMI port of the appliance to make it FIPS compliant. You must install the FIPS tamper evident labels correctly onto the device for compliance with FIPS. This label is valid for Trinzic TE- 2225 appliances only.
- Page 10 Install stickers for each of the fans into the chassis as shown in this picture Install a sticker for each power supply module as shown in this picture Install a sticker covering the IPMI port as shown in this picture Page 10 Copyright ©2020, Infoblox, Inc. All rights reserved.
- Page 11 The Advanced Appliance PT-2205 supports accelerated 10GbE connectivity in a factory-only configuration, and supports HA. In optional configurations for the Infoblox 2205 Series (any appliance that does not use the internal Ethernet ports), the Infoblox 1GbE SFP or 10GbE SFP+ ports replace the functionality in the original system MGMT, LAN1, HA and LAN2 ports, thereby disabling the built-in MGMT, LAN1, HA and LAN2 ports.
- Page 12 RJ-45 rollover cable and two female RJ-45-to-female DB-9 adapters, or a female DB-9-to- female DB-9 null modem cable. The RJ-45 pin assignments follow IEEE 802.3 specifications. All Infoblox Ethernet ports are auto-sensing and automatically adjust to standard straight-through and cross-over Ethernet cables.
- Page 13 The Infoblox 2205 Series appliances ship with dual AC power supplies and six fan modules. The power supplies and fan modules are field replaceable. The power supplies are also hot-swappable so you can replace any one of them at a time without disrupting the operations of the appliance.
-
Page 14: System, Environmental, And Power Specifications
ND-2205-1GE-DC: 316W ND-2205-10GE-DC: 335W Fan FRU (Field-Replaceable Unit) SKU (Stock Keeping Unit) The Infoblox 2205 Series appliances ship with inbuilt fans that can be replaced. The following table lists the fans supported on an Infoblox 2205 series appliance: Page 14... - Page 15 FRU, Trinzic 1405, 2205, and 4005 Series AC Power Supply Unit, 600W FRU, Trinzic 1405, 2205, and 4005 Series DC Power Supply Unit, 600W T-PSU600-DC T-2205-FAN FRU, Infoblox 2205 and 4005 Series, Rear Accessible Fan, Spare Accessory Page 15 Copyright ©2020, Infoblox, Inc. All rights reserved.
-
Page 16: Dc Power Cable Color Codes
DC power cables ship with a label describing each lead. The label is located near the pigtail leads. Table 4 lists -48V DC power specifications. Table 4 -48V DC Power Connector Cable Pin Cable Color Description Black Positive Return Negative Input Voltage Green/Yellow Safety Ground Page 16 Copyright ©2020, Infoblox, Inc. All rights reserved. -
Page 17: Installing The Infoblox 2205 Series Appliance
Installing the Infoblox 2205 Series Appliance Refer to the sections below to rack mount Infoblox 2205 Series appliances, connect them to a power source, and cable them to a network. Before proceeding, review the Infoblox Safety Guide and follow the necessary precautions. -
Page 18: Rack Mounting Procedures
The Infoblox 2205 Series appliances mount into a standard 19" (48 cm) equipment rack. The appliances ship with accessory kits that contain the following: a pair of rack slide brackets and chassis slide rails, a pair of rack ears, eight (8) 10-32 screws, and eight (8) 8-32 screws. Infoblox also offers a four-post and an adjustable rail four-post rack mounting kits that you can order separately. - Page 19 9. Slide the appliance into the rack slide brackets. 10. Secure the rack ears to the front rack posts with two (2) 10-32 screws on each side of the rack. Adjustable Rail Four-Post Rack Mounting Page 19 Copyright ©2020, Infoblox, Inc. All rights reserved.
- Page 20 Infoblox provides an adjustable four-post rail kit with 600mm to 900mm depth adjustment, designed to allow one person to perform physical installation of the rail kit and the appliance. This kit is provided as a field-replaceable unit; for information, see...
- Page 21 7. Align the chassis slide rails on the appliance with the rack rail assemblies on the posts of the equipment rack. 8. Slide the appliance into the rack rail assembly. 9. Secure the rack ears to the rack with three (3) 10-32 screws on each side of the rack. Page 21 Copyright ©2020, Infoblox, Inc. All rights reserved.
-
Page 22: Powering The Appliance
The Infoblox 2205 Series appliances ship with two (2) hot-swappable AC power supply modules (PS1 and PS2) and matching AC power cables. Infoblox also offers optional DC power supply modules. Infoblox recommends using the power cables that ship with the appliances to connect each power supply to separate power circuits. -
Page 23: Cabling The Appliance To A Network
If this occurs, begin by determining whether there is a firmware upgrade available for the switch. If so, apply the firmware upgrade to the switch and test the connection. If that does not resolve the issue, manually set the ports on the Infoblox... -
Page 24: Accessing The Infoblox 2205 Series Appliance
Alternatively, start an SSHv2 connection and access the CLI through an SSHv2 client. You can also access the CLI by connecting a serial cable directly from the console port of a management system to the console port on the appliance, and then using a terminal emulation program. Infoblox recommends that the management system meet the following requirements to operate an Infoblox appliance. -
Page 25: Connecting To The Appliance
To change these settings to suit your network, use the console port. Console Port The Infoblox appliance has a male DB-9 console port on the front panel. You can log in to the appliance through this port and specify initial network settings using the NIOS CLI. -
Page 26: Auto Provisioning Nios Appliances
Auto Provisioning NIOS Appliances In addition to using the Grid Setup Wizard or accessing the Join Grid dialog box to join appliances to a Grid, you can set up an Infoblox appliance using the auto provision feature, which allows a DHCP server to automatically assign an IP address to the appliance. You can then join the auto-provisioned appliance to a Grid. -
Page 27: Specifying Appliance Settings
You can deploy an appliance individually or in an HA (high availability) pair, for hardware redundancy. A single appliance or an HA pair without a Grid license runs independently from a Grid. A Grid is a group of two or more Infoblox appliances that share sections of a common, distributed, built-in database and which you configure and monitor through a single, secure point of access—the Grid master. - Page 28 6 .On the last screen of the wizard, click Finish . The Grid Manager application restarts. If you configured an HA pair, use the VIP address when you make an HTTPS connection to the HA pair. Page 28 Copyright ©2020, Infoblox, Inc. All rights reserved.
-
Page 29: Infoblox Nios Cli
.) You can also enable remote console SSHv2 (Secure Shell version 2) access through the Infoblox Grid Manager or CLI, and then access the CLI from a remote location using an SSHv2 client. (For more information, refer to the Infoblox NIOS Administrator... -
Page 30: Field Replaceable Units
Field Replaceable Units The Infoblox 2205 series appliances provide several replaceable units in the system: Hard disk drives Fan modules AC power supplies DC power supplies (if applicable) SFP/SFP+ Transceivers All replaceable units must be replaced with parts of the same specifications as described in this section. You can also order some parts as local spares. -
Page 31: Managing The Disk Subsystem
The Grid Manager also displays detailed status of the RAID array. In the event of a disk failure, you must replace the failed disk with one that is qualified and shipped from Infoblox and has the same disk type as the rest of the disks in the array. The appliance displays information about mismatched disks in Detailed Status panel. -
Page 32: Hard Disk Drive Replacement
Grid Manager operation. When you replace a failed disk, you must replace it with an Infoblox supplied disk. To ensure that you receive the correct replacement disk, report the disk type or part number of the failed disk. The appliance also displays the disk type in the Detailed Status panel of the Grid Manager. - Page 33 Grid. In most cases, recovery within an HA pair and in the Grid takes only a few minutes after the hard disk is replaced. If the appliance runs in stand-alone mode without failover, a backup of the user data must be restored or the system configured from scratch. Infoblox...
-
Page 34: Replacing Fan Modules
Replacing Fan Modules The Infoblox 2205 series appliances ship with five hot-swappable fan modules, so you can replace a fan module without interrupting appliance operations. Each fan has an air vent that allows warm air to flow out of the appliance. -
Page 35: Changing Ac Power Supplies
Each power supply weighs about one pound (0.454 kg). The faceplate of each power supply contains a power LED and a dedicated power outlet. To replace an Infoblox 2205 series AC power supply, do the following: Disconnect the AC power cable from the power outlet. -
Page 36: Changing Dc Power Supplies
Notes on Changing AC Power to DC Power Infoblox offers the ability to change an AC-equipped Infoblox 2205 Series appliance to use DC power supply units (PSUs) by ordering field-replaceable unit DC PSUs. Should you choose to swap out an appliance's AC power supplies to use DC power supplies, follow these key points: Ensure that you have proper ground connections for each DC power supply that connect to the ground lug screws on each DC PSU. -
Page 37: International Ac Power Cords
International AC Power Cords Infoblox offers replacement AC power cords for international markets as listed in Table 8 . For availability, contact your Infoblox sales representative. Table 8 International AC Power Cords Infoblox Part Number International Item Description IB-POWER-CORD-14G-AUS Power Cord, 14 Gauge, Australia...
Need help?
Do you have a question about the Trinzic TE-2205 and is the answer not in the manual?
Questions and answers