Advertisement
Available languages
Available languages
Versie: 2.5
Datum: 15-09-2021
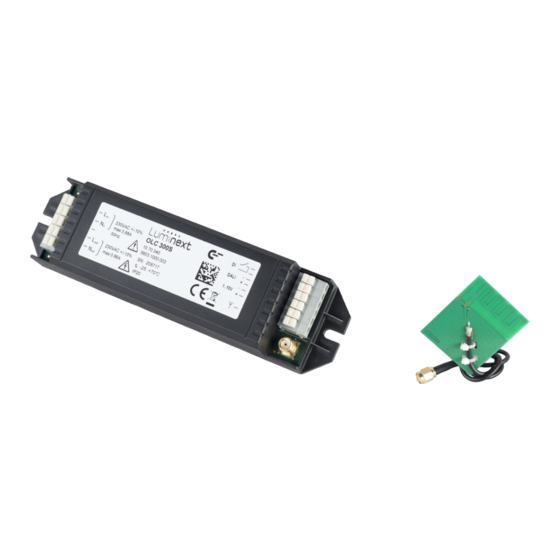
INSTALLATIE-INSTRUCTIE: Luminext Outdoor Lamp Controller OLC300S
De Luminext OLC300S is een onderdeel van het Luminext programma voor dynamisch dimbare
verlichting met beheer op afstand. De OLC300S is geschikt voor DALI en 1 - 10V toepassingen en
heeft een digitale ingang voor de aansluiting van externe potentiaalvrije contacten. De OLC300S kan
met de bijbehorende antenne in het armatuur geplaatst worden. De OLC300S controller vormt een
draadloos sensor/control netwerk.
Veiligheid
•
Installatie en onderhoud moet worden uitgevoerd door een gekwalificeerde medewerker.
•
Volg deze installatie-instructies strikt op om gevaar en schade aan de OLC300S te voorkomen.
•
Onderbreek de voedingsspanning voor installatie, inspectie of verwijderen van de OLC300S.
Spanning voerende delen (primaire en secundaire zijde) van de OLC300S zijn niet aanraakveilig.
•
Gebruik de OLC300S niet als deze is beschadigd.
•
Zet nooit spanning op de OLC300S zonder dat de bijbehorende antenne (Luminext artikel #
40.20.300) op de juiste wijze is aangesloten.
•
De elektrische installatie moet voldoen aan nationale normen & regelgeving.
•
De installatie waarop de OLC300S wordt aangesloten moet voorzien zijn van een mogelijkheid om
de spanning te onderbreken.
•
De netspanning aansluiting van de OLC300S dient te zijn voorzien van een 2A smeltzekering.
•
De OLC300S dient in een IP65 geclassificeerde ruimte geplaatst te worden.
Toepassing
Lees de OLC300S productsheet (zie luminext.eu) voor de maximum specificaties van het relais en de
gebruiksomstandigheden.
Meer informatie: neem contact op met de leverancier
Luminext BV | Schoudermantel 37 | 3981 AE Bunnik | Nederland | +31 (0)302 072 017 | support@luminext.eu |
www.luminext.eu
© Luminext BV 2021
1
Advertisement
Table of Contents

Related Manuals for Luminext OLC300S


Summary of Contents for Luminext OLC300S
- Page 1 Lees de OLC300S productsheet (zie luminext.eu) voor de maximum specificaties van het relais en de gebruiksomstandigheden. Meer informatie: neem contact op met de leverancier Luminext BV | Schoudermantel 37 | 3981 AE Bunnik | Nederland | +31 (0)302 072 017 | support@luminext.eu | www.luminext.eu © Luminext BV 2021...
- Page 2 13. Sluit het armatuur. Controleer hierbij of er geen kabels of objecten tussen pakkingen terecht komen (in verband met vocht). 14. Sluit het armatuur aan op 230V AC en test de correcte werking van het armatuur en de OLC300S. In geval van incorrecte werking, controleer de bedrading Bij aansluiting op netspanning zal de lamp gaan branden.
- Page 3 Sluit een 230V belasting aan op de geschakelde 230V uitgang van de OLC300S. Meer informatie: neem contact op met de leverancier Luminext BV | Schoudermantel 37 | 3981 AE Bunnik | Nederland | +31 (0)302 072 017 | support@luminext.eu | www.luminext.eu...
- Page 4 Gooi dit product niet weg bij het huisvuil, maar breng het naar een inzamelpunt voor hergebruik. Meer informatie: neem contact op met de leverancier Luminext BV | Schoudermantel 37 | 3981 AE Bunnik | Nederland | +31 (0)302 072 017 | support@luminext.eu | www.luminext.eu...
- Page 5 The electrical installation must be in conformance with the national legislation and relevant standards. • The mains connection of the OLC300S must be provided with a 2A fuse and a possibility to disconnect the mains. • The OLC300S must be mounted in an IP65 classified housing.
- Page 6 5. Fix the SMA antenna connector with a wrench so this won’t turn loose due to vibrations. 6. An extra barcode sticker is attached to the OLC300S. Remove the barcode sticker and stick it clearly visible to the outside of the luminaire. The installer will register this barcode information during the installation process.
- Page 7 Wiring diagrams OLC300S + DALI driver: Connect the power input of a DALI driver to the switched 230V output of the OLC300S. OLC300S + 1-10V driver: Connect the power input of a 1..10V driver to the switched 230V output of the OLC300S.
- Page 8 Version : 2.4 Date: 02-02-2021 OLC300S + external contact: Connect a voltage free contact to the digital input of the OLC300S. This can be combined with one of the previous three configurations. Configuration When the OLC300S is powered, the connected lamp should be on. Use Luminizer for configuration of the OLC300S.
Need help?
Do you have a question about the OLC300S and is the answer not in the manual?
Questions and answers