Advertisement
Quick Links
Language Titel
DE
Bedienungsanleitung; Modell: Uranus
ENG
Assembly Instructions; Model: Uranus
FR
Instructions de montage; Modèle: Uranus
IT
Istruzioni di montaggio; Modello: Uranus
ES
Instrucciones de montaje; Modelo: Uranus
PG
Instruções de montagem; Modelo: Uranus
Instrukcje składania; Model: Uranus
PO
NL
Montage-instructies; Model: Uranus
DK
Monteringsvejledning; Model: Uranus
1
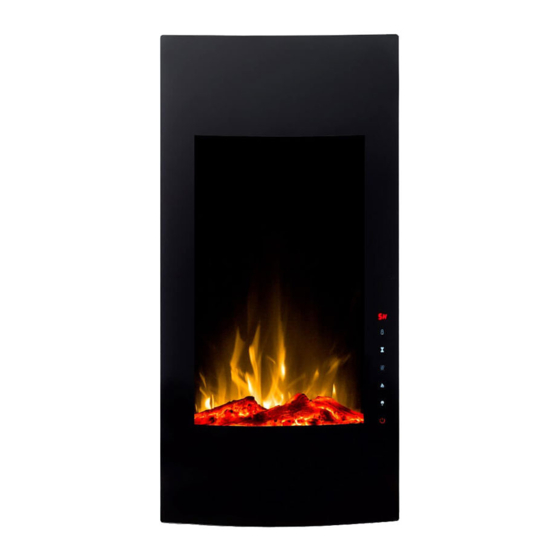
Uranus
Glow Fire Uranus
Page
2
12
21
31
41
51
61
71
81
Stand: 09/2020
Version: 1
Advertisement

Related Manuals for Glow Fire Uranus


Summary of Contents for Glow Fire Uranus
- Page 1 Glow Fire Uranus Uranus Language Titel Page Bedienungsanleitung; Modell: Uranus Assembly Instructions; Model: Uranus Instructions de montage; Modèle: Uranus Istruzioni di montaggio; Modello: Uranus Instrucciones de montaje; Modelo: Uranus Instruções de montagem; Modelo: Uranus Instrukcje składania; Model: Uranus Montage-instructies; Model: Uranus Monteringsvejledning;...
- Page 2 Glow Fire Uranus Instruction manual Modell: Uranus Stand: 09/2020 Version: 1...
- Page 3 Glow Fire Uranus Important safety instructions! Warning! When using electrical equipment, basic precautions should always be followed to reduce the risk of fire, electric shock and injury, including the following: • Read all instructions before operating this heater. • The heater is hot during operation. To avoid burns, do not touch the hot surface. When transporting this heater, use handles, if available.
- Page 4 Glow Fire Uranus You will need the following tools (not included): Phillips screwdriver, beam locator, spirit level, drill, 1/4" wood drill, hammer. Parts and Hardware C – Dry wall plugs B – Wood screws A- heating fireplace E – Wall bracket...
- Page 5 Glow Fire Uranus Side-View Mantelpiece Wall Floor Wall mounting Because many different materials are used on different walls, it is strongly recommended that you consult your local building contractor before mounting this unit on the wall. a) Choose a location that is not exposed to moisture and at least 36" (914 mm) away from flammable materials such as curtains, furniture, bedding, paper, etc.
- Page 6 Glow Fire Uranus NOTE: It is strongly recommended to screw the bracket (E) into the wall posts if possible. If the wall posts cannot be used, make sure that the supplied plastic dowels are used to fix the bracket to the wall and that the bracket is sufficiently secured.
- Page 7 Glow Fire Uranus Operating Read and understand the entire manual, including all safety instructions, before plugging in or using this product. Failure to do so may result in fire, electric shock, serious injury or death. Power supply Connect the power cord to 220~240 volts (see IMPORTANT SAFETY INSTRUCTIONS on pages 2 and 3).
- Page 8 Glow Fire Uranus OFF: Disables control panel 2. Press again. Flame effect functions and remote control. switched off. Machine in standby. Turns the flame effect off. All functions switched off. Timer TIMER button: Controls timer 1. Press once. Indicator light settings to turn off the heater switched on.
- Page 9 Glow Fire Uranus Note When the heater is put into operation for the first time, a slight odour may occur. This is normal and should not occur again unless the heater is not used for a longer period of time.
- Page 10 Glow Fire Uranus • NEVER use abrasive cleaners, spray mist or other cleaners that can scratch the surface. Ventilation openings: • Remove dust and dirt from the heater and ventilation areas with a vacuum cleaner. Plastic: • Wipe with a slightly damp cloth and a mild solution of detergent and warm water.
Need help?
Do you have a question about the Uranus and is the answer not in the manual?
Questions and answers