Table of Contents
Advertisement
Quick Links
Advertisement
Table of Contents

Related Manuals for Scott SLIMISSIMO & MILK 20210


Summary of Contents for Scott SLIMISSIMO & MILK 20210
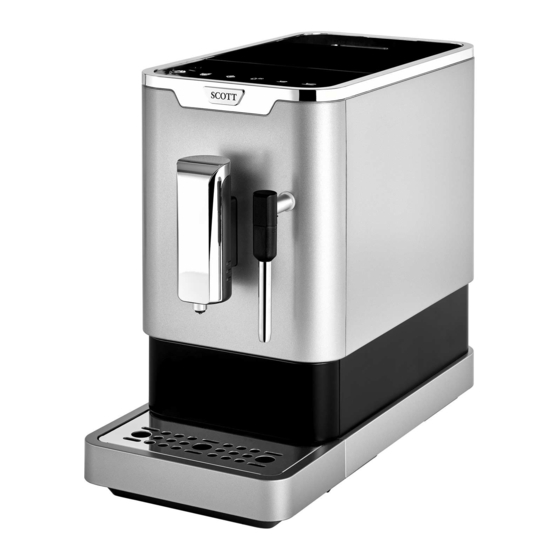
- Page 1 SLIMISSIMO & MILK Instruction Manual Model no.: 20210 Page 1 of 26...
- Page 2 IMPORTANT INFORMATION For safety purposes, you should read the instructions carefully before using the appliance for the first time. Save the instructions for future reference. The appliance is designed for domestic use and may only be operated in accordance with these instructions for use.
- Page 3 Do not use any accessories or attachments with this appliance other than those recommended by SCOTT. Do not insert fingers or other objects into the grinder. To disconnect from the mains supply outlet, do not drag the cord itself. Pull by the head of the plug.
-
Page 4: General Description
GET TO KNOW YOUR AUTOMATIC COFFEE MACHINE GENERAL DESCRIPTION External drip tray Coffee bean container Internal drip tray Coffee beans container cover Coffee grounds container Water tank Metal tube Power cord Nozzle cover Service door Steam nozzle Brewer Steam indicator light Cleaning brush Needle Adjustable coffee spout... -
Page 5: Control Panel
CONTROL PANEL Flashing: Low water level or water tank is missing Lack of coffee beans Lighting up stably: Coffee grounds container is full Flashing: Internal drip tray or coffee grounds container is missing Lighting up stably: Brewer is missing or installed improperly Flashing: Service door is opened or installed improperly Lighting up stably: Requires undergoing the descaling process Flashing: Descaling is under process... -
Page 6: Machine Installation
ACCESSORIES In the box, three packs of cleaning agents are included for the process of self cleaning. More packs of cleaning agent can be bought from our website www.scott-gear.co.uk . MACHINE INSTALLATION 1. Remove all protective films, stickers and other packaging materials from the appliance. - Page 7 Place the appliance on a safe and stable surface with an easily reachable power supply and allow minimum distance from the sides of the machine. 3. Insert the external drip tray. Make sure it is inserted properly. Fill the water tank with water. 5.
-
Page 8: First Time Use
6. Unwind and straighten the power cord and insert the plug into the socket located at the back of the machine. Insert the plug into a wall socket with suitable power voltage. FIRST TIME USE Press the hot water button to clean the inner parts of the coffee machine before use. -
Page 9: Filling The Water Tank
According to your preference, press Espresso button or Lungo button once. The button will flash after being pressed. It will then light up to indicate that the appliance is preparing the coffee. When the appliance resumes to standby condition, the coffee is ready to serve. FILLING THE WATER TANK When is flashing, the water level in the water tank is too low and filling is necessary. -
Page 10: Filling The Bean Container
Rinse the water tank with fresh water and fill the tank to the “MAX” level. Place it into the machine and make sure it is fully inserted. Important: Never fill the water tank with warm, hot, sparkling water or any other liquids which can damage the water tank and the machine. - Page 11 PREPARING EXTRA STRONG ICED COFFEE Before making extra strong iced coffee, prepare ice cubes and cold water. 1. Add ice cubes to a tall glass and place the glass under the coffee spout. 2. Press the Extra strong coffee button 3.
- Page 12 You can direct the steam nozzle to the right so that it always remains in contact with the milk. Care must be taken to ensure the clean air inlet hole remains aligned with the removable metal nozzle. The air inlet hole must be regularly unblocked with the needle provided. Care must be taken to leave this hole clean and to keep it out of the milk during use, as the air passage helps create the milk foam.
-
Page 13: Hot Water
HOT WATER Hot water can be dispensed by pressing the hot water button . The hot water button will light up and the appliance will start preparing the hot water. When the light turns off, the water is ready to serve. The hot water will come out of the steam nozzle. - Page 14 1. Remove the external drip tray. 2. Empty the water inside the drip tray into the sink and wash the drip tray with fresh water. Dry it afterwards. 3. Remove the internal drip tray and the coffee grounds container. 4. Empty the coffee grounds container and wash it with fresh water.
- Page 15 5. Push the recess area of service door. 6. Remove the service door. 7. Press the release buttons firmly. 8. Remove the brewer by pressing both release buttons simultaneously and pulling the brewer out. Page 15 of 26...
- Page 16 9. Wash the brewer with fresh water. Dry the brewer afterwards. 10. Insert back the brewer to its original position and fit the service door back to its original position. Note: When lights up stably, it indicates that the brewer is either missing or installed improperly. When is flashing, it indicates that the service door is either missing or installed improperly.
- Page 17 12. Place the external drip tray back to its original position. 13. Unlock the nozzle cover by turning it to left. Then pull it downward to remove it. 14. Pull the metal tube downward to disassemble the nozzle cover and the metal tube.
-
Page 18: Turning Off The Machine
16. Wash the metal tube with warm running water and use the needle or bristles of the cleaning brush provided to clean the hole. 17. Assemble the metal tube back to the nozzle cover. Then push upward to place the nozzle cover back. -
Page 19: Grinding Adjustment
II. GRINDING ADJUSTMENT You can adjust the grind size to suit your coffee taste by turning the knob in the coffee beans container: 1. Only turn the knob for adjustment when the grinder is in operation. Caution: Never adjust the grinding when the grinder is not operating. It can damage the grinder. 2. -
Page 20: Cleaning And Maintenance
Hot water button Espresso button Lungo button In ECO Mode Lights on Flashing Flashing In Speed Mode Flashing Lights on Flashing In Default Setting Flashing Flashing Lights on Press the hot water button for ECO mode, Espresso button for Speed mode and Lungo button for Default setting. - Page 21 will be flashing which indicates that the appliance is undergoing the descaling process. Note: A small amount of water will periodically dispense automatically during the descaling process. Caution: Hot water can burn or scald. Do stay away. When all water in the water tank is dispensed out, and Espresso button will be flashing.
-
Page 22: Cleaning The Appliance
III. MANUALRINSING VERY IMPORTANT: We recommend performing a daily or weekly manual rinsing cycle to clean the coffee nozzle after use. It is also recommended to perform a manual rinsing if the appliance has not been used for a long period of time. Switch on the appliance. - Page 23 Push the recess area of service door. 2. Remove the service door. 3. Press the release buttons firmly. Page 23 of 26...
- Page 24 4. Remove the brewer by pressing both release buttons simultaneously and pulling the brewer out. 5.Wash the brewer with fresh water. 6. Use the cleaning brush provided to clean the grounds outlet. 7. After completing all cleaning processes, replace all units to original position. Page 24 of 26...
-
Page 25: Troubleshooting
TROUBLESHOOTING The appliance does not work. Possible Cause Solution - The appliance is not connected to the - Plug in and press the Power ON/OFF mains supply. button. - Check the cord and the plug. No or delayed response in several trials of pressing the function keys on panel. Possible Cause Solution - The appliance is under electromagnetic... -
Page 26: Recycling Your Electricals
Please arrange to take this appliance to recycling points set up around the country. To find out more information about the recycling of electrical items and the recycling point, please visit www.recycle-more.co.uk SCOTT SMART PRODUCTS (UK) LTD The Lansdowne Building, 2 Lansdowne Road, Croydon, England, CR9 2ER Page 26 of 26...
Need help?
Do you have a question about the SLIMISSIMO & MILK 20210 and is the answer not in the manual?
Questions and answers