Advertisement
Quick Links
Advertisement

Related Manuals for Scott 20210


Summary of Contents for Scott 20210
- Page 1 Instruction Manual 使用說明書 Model no. 型號 : 20210 Instruction Manual 使用說明書...
- Page 2 IMPORTANT INFORMATION For safety purpose, you should read the instructions carefully before using the appliance for the first time. Save the instructions for future reference. The appliance is designed for domestic use and may only be operated in accordance with these instructions for use.
- Page 3 Always disconnect the appliance from the supply if it is left unattended and before assembling, disassembling or cleaning. Appliance can be used by persons with reduced physical, sensory or mental capabilities or lack of experience and knowledge if they have been given supervision or instruction by a person concerning use of the appliance in a safe way and understand the hazards involved.
- Page 4 Do not use an extension power cord set unless competent authority has approved it. Do not leave the appliance unattended, when it is connected to main supply. Do not use the appliance in outdoor environment. Do not use appliance for other than intended use. Do not let cord hang over the edge of table or counter or touch hot surface.
- Page 5 14. 不要試圖打開本機主體或拆卸任何零件,裡面有不能維修的部分。 15. 建議使用後清潔本機,但請勿將本機浸入水清洗。 16. 不建議使用包裝盒中以外的配件。它們可能造成危險,應該避免使用。 17. 請勿將此機放置在加熱爐、電爐或焗爐附近或表面上。 18.不要連續使用熱水功能多於一缸水箱的水。...
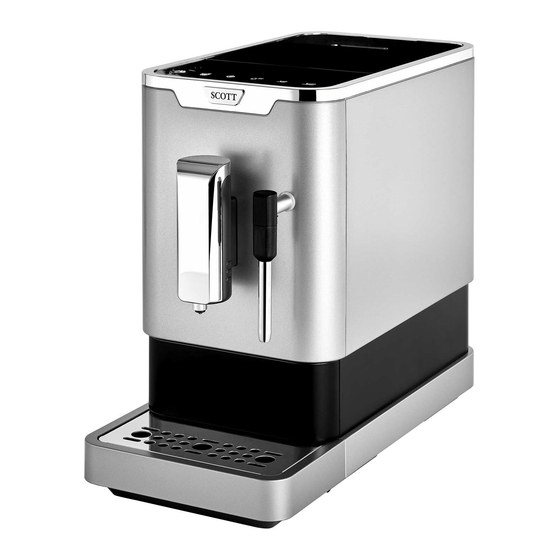
- Page 6 A. GET TO KNOW YOUR AUTOMATIC COFFEE MACHINE 了解您的全自動咖 啡機 GENERAL DESCRIPTION 咖啡機各部份及配件說明 External drip tray 外置回水盒 Internal drip tray 內部回水盒 Coffee grounds container 粉渣盒容器 Metal tube 金屬管 Nozzle cover 噴嘴蓋 Steam nozzle 蒸氣噴嘴 Steam indicator light 蒸氣指示燈 Adjustable coffee spout 可調節高度咖啡嘴 Control panel 控制面板...
- Page 7 CONTROL PANEL 控制面板 Flashing: low water level/ water tank missing 閃爍:低水位/欠裝水箱 Lack of bean 缺咖啡豆 Lights up stably: coffee grounds container is full 亮起:粉渣盒已滿 Flashing: Internal drip tray/coffee grounds container is missing 閃爍:欠裝內部回水盒/粉渣盒 Lights up stably: brewer is missing/ installed improperly 亮起:欠裝沖泡器/安裝不正確...
- Page 8 Hot water button 熱水按鈕 Espresso Button 特濃咖啡按鈕 Lungo button 長杯咖啡按鈕 Note: Touch-sensitive area is located at the lower part of icons. Press the touch-sensitive area firmly in front of the appliance. 注意: 按鈕觸摸範圍位於每個圖標的下方(紅框位置) 。 操作時請於機身前方準確及穩固地觸按所需按鈕 。 ACCESSORY 配件 In the box, three packs of cleaning agents are included for the process of self-cleaning. 包裝盒內附設...
- Page 9 Choose a safe and stable surface with an easily reachable power supply and allow minimum distance from the sides of the machines. 將此機放於一個容易接駁到電源, 安全及 穩定的枱面上。(需要的最小距離如右圖) Insert the external drip tray. Make sure it is inserted correctly. 將外置回水盒插入,並確保已正確插入。 Fill the water tank with water (see “FILLING THE WATER TANK”) 將水箱注滿水。(請參閱"水箱注水...
- Page 10 Unwind and straighten the power cord and insert the plug into the socket located on the back of the machine. Insert the other end of the power cord into a wall socket with suitable power voltage. 解開並伸直電源線及將插頭插入位於本機 背面的插槽中。將電源線的另一端插入適 當電壓的插座。 Daily Operation 日常操作 MAKING YOUR COFFEE 製作咖啡...
- Page 11 4. Depending on the taste of coffee you would like to have, press Espresso Button Lungo button 隨著個人咖啡喜好,可按一下特濃咖啡按鈕按鈕 或或長杯咖啡按鈕 。 5. The espresso button being pressed will light on and the illumination will lights up indicates that the appliance is preparing the cup of coffee. 按下特濃咖啡按鈕時,該按鈕會亮起表示咖啡正在準備中。...
- Page 12 Rinse the water tank with fresh water and then fill the tank to the “MAX” level and place it back into the machine. Make sure it is fully inserted. 以清水沖洗水箱,然後加水至"MAX"位置,並把它放回本機內。請確保已完全插入。 Note: To prevent overflow of water from the water tank, do not add water directly into the appliance with another container.
- Page 13 IMPORTANT: Fill the coffee bean container with coffee beans only. Grounded coffee, instant coffee, caramelized coffee and any other objects may damage the machine 重要提示:只可加入咖啡豆在豆槽。咖啡粉、即溶咖啡、焦糖咖啡豆及其他物件都可能會損壞機器。 Preparing Iced Coffee 製作冰咖啡 Before making iced coffee, prepare ice cubes and cold water. 製作冰咖啡前,請先準備冰塊及冷水。 Add ice cubes to a tall glass and place under the coffee spout.
- Page 14 After the steam indicator light stops flashing and stays on, place a container with milk under the steam nozzle and immerse the steam nozzle about 5cm deep into the container. 在蒸氣指示燈停止閃爍並保持亮起時,將裝有牛奶的容 器放在蒸氣噴嘴下,將蒸氣噴嘴浸入容器內約 5cm 深 處。 Press the steam button again. 再次按下蒸氣按鈕。...
- Page 15 1. Remove the external drip tray. 取出外置回水盒。 2. Empty the water inside the drip tray in the sink and wash it with fresh water. Dry it afterwards. 清空回水盒內的水,用清水沖洗。然後瀝乾。 3. Slides open the internal drip tray and the coffee grounds container. 拉開内部回水盒和粉渣盒容器。...
- Page 16 5. Pull down the service door. 按下機身門蓋。 6. Remove the service door. 取出機身門蓋。 7. Press the release knob. 按下沖泡器兩邊的按鈕。 8. Remove the brewer. 取出沖泡器。...
- Page 17 9. Wash the brewer with fresh water. Dry the brewer afterwards. 用清水沖洗沖泡器,然後瀝乾。 10. Insert back the brewer to its original position and install back the service door to its original position. 將沖泡器插入原位,並將機身門蓋蓋上。 Note: When lights up stably, it indicates that the brewer is missing / installed improperly.
- Page 18 12. Place the external drip tray at it original position. 將外置回水盒放回原來的位置。 13. Unlock the nozzle cover by turning it to left. Then pull it downward to remove. 左扭噴嘴蓋解鎖並向下拉出。 14. Pull the metal tube downward to disassemble the nozzle cover and metal tube. 向下拉金屬管,以便解開噴嘴蓋和金屬管。...
- Page 19 16. Wash the metal tube with warm running water and use needle or bristle of brush to clean the hole. 用清水沖洗金屬管,並用針或毛刷清潔金屬管 孔。 17. Assemble the metal tube back to the nozzle cover. Then push upward to place the nozzle cover back. And turn it to right to lock it. 將金屬管裝回入噴嘴蓋。然後將噴嘴蓋放回原...
- Page 20 1. When making your coffee (either Espresso or Lungo) or dispensing hot water, press and hold the button you selected. The appliance will continue to make the cup of coffee. 當選擇您的咖啡(特濃咖啡或長杯咖啡) 或熱水後,長按所屬按鈕,本機將繼續輸出飲料。 2. When the volume of coffee meets your desired volume, release the button. Two beep sounds will be heard indicates that the volume of coffee is being memorized.
- Page 21 本機有三種不同的設置,包括:默認模式、省電模式和加速模式。省電模式可幫助你節省更多的能源。 加速模式比原廠設定更能加快咖啡的製作時間。模式 ECO Mode Speed Mode Default Setting 省電模式 加速模式 默認模式 Illumination light No 沒有 Yes 有 Yes 有 照明燈 Pre-brewing Yes 有 No 沒有 Yes 有 沖前潤濕功能 Auto shut off time 10 mins 30 mins 20 mins 自動關機時間 十分鐘 三十分鐘...
- Page 22 In Speed Mode Flashing Lights ON Flashing 加速模式 閃爍中 燈亮著 閃爍中 In Default Setting Flashing Flashing Lights on 默認模式 閃爍中 閃爍中 燈亮著 3. Press the hot water button for ECO mode, Espresso button for speed mode and Lungo button for default setting. Two beep sound will be heard indicates that the mode is being selected. (Note: If you are pressing the relative lighted button for each mode, the machine will not respond).
- Page 23 3. Plug in the appliance. 插入電源。 4. Place a sufficient large container under the coffee spout. 放置一個足夠大的器皿在咖啡嘴下。 5. In standby condition, press and hold and Espresso button for 5 seconds. A beep sound will be heard with and Espresso button will be flashing.
- Page 24 Important: Please note this this self-cleaning procedure must be completed. Otherwise, will not go off. 重要: 請注意必須連貫完成這個自動清洗程序, 否則 燈號不會熄滅 EMPTY SYSTEM FUNCTION 清空功能 The empty system function is recommended to be used before long period of non-use, frost protection and before taking to repair agent. 長時間不使用及進行維修前,建議先進行清空功能。...
- Page 25 使用本機後,可執行手動沖洗以清洗咖啡嘴。如本機有一段長時間沒有被使用, 建議執行手動循環沖 洗。 1. In standby condition, press and hold the and hot water button together. 在備用狀態時,同時按住 和熱水按鈕 。 2. The hot water button , Espresso Button and Lungo button will then go off. The coffee spout will then dispense a small amount of water which is used for the rinsing. 熱水按鈕...
- Page 26 Push the service door recess area. 按下左邊機身門蓋。 Take out the service door. 取出機身門蓋。 Press the release knob of the brewer. 按下沖泡器兩邊的按鈕。 Take the brewer out. 取出沖泡器。 Use cleaning brush to clean the powder outlet. 使用本機的清潔刷子清理內部出咖啡口位置。...
- Page 27 F. TROUBLESHOOTING 疑難解答 PROBLEM 問題 CAUSE 原因 SOLUTION 解決方法 The appliance does not The appliance is not - Plug in and press the ON/OFF switch. work. connected to the mains 插上電源,然後按下開/關按鈕。 本機無法正常運作。 supply. 本機沒有連接到電源。 - Check the cable and the plug. 檢查電線和插頭。...
- Page 28 The touch buttons are Not pressing the touch Press the lower bottom part of the touch not sensitive. button from the front button icon from the front direction of the 輕觸式按鈕不靈敏。 direction of the appliance. appliance. 没有從本機正面按下輕觸式 從本機的正面方向按下輕觸式按鈕圖標的底 按鈕。 部。 The appliance takes too Excessive scale has built Descale the appliance.
Need help?
Do you have a question about the 20210 and is the answer not in the manual?
Questions and answers