Table of Contents
Advertisement
Quick Links
Mounting Plate
Lock Knob
R.A. Setting Circle
Polarscope Holder
(not shown)
Altitude Adjustment
T-bolts
Accessory Tray
Hand Control
Power Switch
EQ6 SkyScan
EQ-6
ESC
TOUR
1
M
4
PLANET
7
Battery Box
R.A. Lock Level
Latitude Scale
TM
SETUP
ENTER
EVENT
RATE
3
2
IC
NGC
5
6
USER
OBJECT
8
9
ID
0
Dec. Lock Level
Dec. Setting Circle
Counterweight
Rod Lock Knob
Counterweight
Thumb Screw
Counterweight Rod
Altitude Adjustment
T-bolts
Azimuth Adjustment
Knob
Tripod Leg
Height Adjustment
Clamp
291104V3W
Advertisement
Table of Contents

Related Manuals for SKY-WATCHER SkyScan EQ6


Summary of Contents for SKY-WATCHER SkyScan EQ6
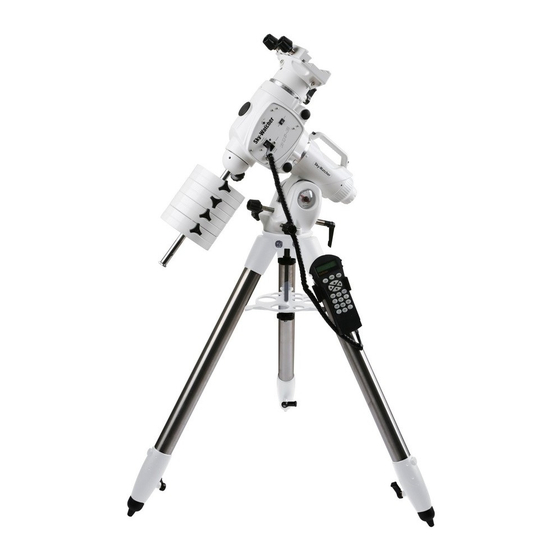
- Page 1 EQ6 SkyScan Dec. Lock Level Mounting Plate Dec. Setting Circle Lock Knob R.A. Setting Circle Counterweight Rod Lock Knob Counterweight Polarscope Holder EQ-6 Thumb Screw (not shown) Counterweight Rod Altitude Adjustment Altitude Adjustment T-bolts T-bolts Azimuth Adjustment Knob Accessory Tray SETUP ENTER TOUR...
-
Page 2: Table Of Contents
TABLE OF CONTENTS Assembling the EQ6 MOUNT Tripod Set Up Mount Assembly Hand Control Holder Installation Balancing the Telescope Operating the EQ6 Mount Manually Polar Aligning the EQ6 The EQ6 SkyScan Introduction to the EQ6 SkyScan Powering the EQ6 SkyScan SkyScan Hand Control Hand Control Operation... -
Page 3: Tripod Set Up
TRIPOD SET UP ASSEMBLING TRIPOD LEGS (Fig.1) Fig. 1 1) Slowly loosen the height adjustment clamp and Fig. 2. gently pull out the lower section of each tripod leg. Tighten the clamps to hold the legs in place. 2) Pull the tripod legs away from the tripod head to stand the tripod upright. -
Page 4: Hand Control Holder Installation
HAND CONTROL HOLDER INSTALLATION Fig. 6 INSTALLING THE HAND CONTROL HOLDER (Fig. 6) 1) Locate the hand control holder. Slide the holder onto the accessory tray as shown in Fig.6. A Telescope should be balanced before each observing session. Balancing reduces stress on the telescope mount and allows for precise control of micro-adjustment. -
Page 5: Skyscan Tm Hand Control
The EQ6 mount has controls for both conventional altitude (up-down) and azimuthal (left-right) directions of motion. Use the altitude adjustment T-bolts for altitude adjustments. These allow fine-adjustment for setting the Fig.b mount to your local latitude. The azimuthal axis Altitude is changed by the two azimuth adjustment adjustment knobs located near the tripod head. - Page 6 Fig.e The polarscope supplied with the EQ6 Mount can be used for simple or precise polar alignment. Simple method of polar alignment described here is sufficient for casual visual use of the telescope. See Appendix A-Enhancing the Precision for accurate polar alignment method. Remove the caps from the upper and lower ends of the Right Ascension (R.A.) axis (Fig.e) so you can look into the polarscope.
- Page 7 exactly twice the distance between the center of the reticule and the center of rotation. The center of rotation Fig.e-4 If Polaris drifted to here lies midway between the center of the reticule and the new position of Polaris. Do not turn any of the setscrews more than one-quarter turn at a time or the reticule will disengage from the setscrews.
- Page 8 power indicator power switch Fig.f Fig.g The EQ6 SkyScan is a precision-engineered Auto Guider instrument that will allow you to easily find and SETUP enjoy viewing night sky treasures, such as ENTER planets, nebulae, star clusters, galaxies and (to power TOUR RATE EVENT...
- Page 9 Mode keys The mode keys are located near the top, close to the LCD display. They include the ESC, ENTER, and SETUP keys: ESC key is used to escape from a certain command or to go back a level in the menu tree. ENTER key is used to select the functions and submenus in the menu tree, and to confirm certain functional operations.
-
Page 10: Hand Control Operation
This section provides a step-by-step procedure on how to operate your EQ6 SkyScan hand control. Perform the Polar alignment (Northern Hemisphere) using the polarscope. Point the telescope roughly to Zenith Fig.m the North Celestial Pole (or Polaris) if you are in the North Celestial Pole Northern Hemisphere. -
Page 11: Star Alignment
In order for the EQ6 SkyScan to correctly point to objects in the sky, it must first be aligned to one to three known positions (stars) in the sky. As the Earth rotates on its axis every 24 hours, astronomical objects appear to move through the sky following an arc. - Page 12 One-Star Alignment One-Star Alignment is the easiest and quickest alignment method. It requires only one alignment star. Below describes a step-by-step procedure on how to perform the One-Star Alignment: Make sure the telescope has been polar aligned. In the alignment screen, select 1-Star Align using the scroll keys. Press ENTER to confirm. The EQ6 SkyScan will provide a list of stars available in your current sky for alignment.
-
Page 13: Object Catalogue
OBJECT CATALOGUE The EQ6 SkyScan comes with a vast database with over 13,400 objects coordinates and information all available in the palm of your hand. The database contains the following catalogues: Solar System - The other 8 planets of our solar system, plus the Moon. Named Star - A list of 100 best known stars from the SkyScan database. -
Page 14: Utility Functions
Utility Functions are useful tools that provide simple, one-step processes to your EQ6 SkyScan Show Position - This displays the coordinates of the location where the telescope is currently pointing. Display Time - This displays the local time and local Sidereal time. Park Scope - This moves the telescope to the Home position. -
Page 15: Appendix C - Rs-232 Connection
Selecting an user defined object Press the USER key or select USER DEFINED under the object catalogue. Press ENTER. Choose RECALL OBJECT and press ENTER to confirm. Select the number representing the object you wish to view, using the scroll keys. Pressing ENTER will show its coordinate. - Page 16 MAIN MENU SETUP MODE UTILITY FUNC. TOUR IDENTIFY OBJECT CATALOGUE Date Show Position Solar System Time Display Time Observ. Site Park Scope Mercury Venus Daylight Saving RS-232 Mars Alignment PEC Training Jupiter 1-Star Align. Saturn 2-Star Align. Uranus 3-Star Align. Neptune Pluto Set Backlash...
- Page 17 EQ6 MOUNT SPECIFICATIONS Mount Type: German Equatorial Telescope mounting: Tube Rings Slow-motion Control: R.A. & Dec (motor controlled) Tripod: 2" Diameter Stainless Steel Pipe Tripod Height: 85cm-147cm Tripod Weight: 7.5Kgs Counterweight Shaft Diameter: 1.8cm Counterweight Shaft Material: Stainless Steel Mount Weight: 16Kgs Mount Height: 41cm...
- Page 18 Calculating the magnification (power) The magnification produced by a telescope is determined by the focal length of the eyepiece that is used with it. To determine a magnification for your telescope, divide its focal length by the focal length of the eyepieces you are going to use. For example, a 10mm focal length eyepiece will give 80X magnification with an 800mm focal length telescope.
- Page 19 Generally speaking the EQ6 SkyScan produces pointing and tracking accuracies edaquate for most visual applications. However, if higher precision is required, for example for astro-photography, accurate polarscope alignment and "cone" error calibration may be required. Fig.u Accurate polar alignment enhances both pointing and tracking precisions.
- Page 20 Fig.u-3 Loosen the setscrew on the index marker ring. Adjust the index marker ring so the Date circle reads 'zero' on the longitude indication (Fig.u-3). Secure the ring by tightening the setscrew. This sets the second of the two zero points. If the reticule has been re-aligned or the index ring has come loose, this procedure must be carried out again to ensure accurate polar...
- Page 21 "Cone" error is a common inaccuracy found on all German equatorial mount. It is a result from the optical axis not being aligned to the R.A. axis of the mount. This affects the pointing accuracy of the EQ6 SkyScan . Three-Star Alignment automatically compensates for the "Cone" error. If you choose One-Star or Two-Star Alignment method, you will need to perform manual mount calibration to eliminate the "cone"...
- Page 22 Point the telescope to North and set the latitude scale to your local latitude using the altitude adjustment T-bolts, or place Polaris on the crosshair of the polarscope if your polarscope is perfectly aligned with the rotation axis of the mount. Loosen the R.A.
- Page 23 Carefully nudge the telescope in horizontal motion using only one finger while observing Fig.v-6 the movement of Polaris through the eyepiece (Fig.v-6). This is to determine which direction (left or right) moves Polaris closer to the center of the eyepiece. Next step is to adjust the adjustment screws on the mounting plate according to your finding from step 12.
- Page 25 The SkyScan hand control must be set to RS-232 mode in order to establish a RS-232 connection with a PC. Under the UTILITIES menu in the SkyScan hand control, select RS232 and press ENTER will launch the RS-232 mode. Once in the RS-232 mode, the SkyScan hand control will communicate with the PC at 9600 bits/sec, no parity and stop bit.
- Page 26 Periodic Errors are found in almost all worm gears due to slight eccentricities and misalignments. The PEC (Periodic Error Correction) Training function provides a manual correcting method to reduce the amplitude of the worm errors. By recording a full cycle of guiding actions versus motor shaft angle, EQ6 SkyScan can work to compensate for the drifting in the RA sidereal tracking caused by the periodic errors.
- Page 27 For 8 minutes, the EQ6 SkyScan hand control records the manual guiding actions in order to characterize the periodic errors. Pressing ESC will stop the recording immediately and exit from the PEC training function. Guiding actions are recorded even when the PEC training is stopped midway. In this case, the PEC+Sidereal tracking will not be accurate until a full cycle of the PEC training is performed.
- Page 28 NEVER USE YOUR TELESCOPE TO LOOK DIRECTLY AT THE SUN. PERMANENT EYE DAMAGE WILL RESULT. USE A PROPER SOLAR FILTER FIRMLY MOUNTED ON THE FRONT OF THE TELESCOPE FOR VIEWING THE SUN. WHEN OBSERVING THE SUN, PLACE A DUST CAP OVER YOUR FINDERSCOPE OR REMOVE IT TO PROTECT YOU FROM ACCIDENTAL EXPOSURE.
Need help?
Do you have a question about the SkyScan EQ6 and is the answer not in the manual?
Questions and answers