Table of Contents
Advertisement
Advertisement
Table of Contents

Subscribe to Our Youtube Channel
Related Manuals for SKY-WATCHER EQ3-2


Summary of Contents for SKY-WATCHER EQ3-2
- Page 1 INSTRUCTION MANUAL Telescopes with NEQ3 & EQ5 Mount 031007V3...
- Page 2 REFRACTOR NEQ3 (150mm/1200mm) EQ3-2 Dust Cap/Mask Dust Cap/Mask (Remove before Viewing) (Remove before Viewing) Sun Shade Sun Shade Objective Lens Objective Lens Telescope Main Body Telescope Main Body Piggyback Bracket Piggyback Bracket Finderscope Finderscope Finderscope Bracket Finderscope Bracket Alignment Screw...
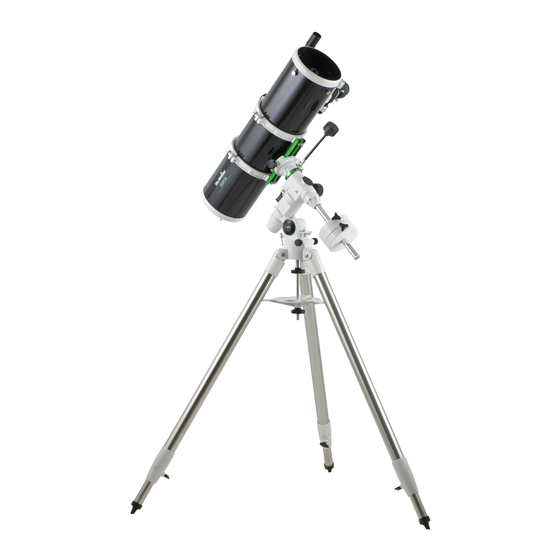
- Page 3 REFLECTOR NEQ3 (200mm/1000mm) EQ3-2 Dust Cap/Mask Dust Cap/Mask (Remove before Viewing) (Remove before Viewing) Focus Tube Focus Tube Finderscope Finderscope Finderscope Bracket Finderscope Bracket Finderscope Adjustment Finderscope Adjustment Screws Screws Eyepiece Eyepiece Focus Knob Focus Knob Piggyback Bracket Piggyback Bracket...
- Page 4 MAKSUTOV NEQ3 Dust Cap (not shown, remove before Viewing) Red Dot Finder Focus Locking Screw Eyepiece Diagonal Focusing Knob R.A Lock Knob Dec Flexible Control Cable Polarscope Holder/ Polarscope (not shown, optional) Altitude Adjustment T-bolt Azimuth Adjustment Knobs Counterweight Locking Thumb Screw Counterweight Rod Dec Lock Knob...
-
Page 5: Table Of Contents
Appendix C-Recommended Reading This instruction manual is applicable to all the models with the EQ3-2 or EQ5 mount. Take a moment to find the model closest to your telescope on p.2 p.3, and p4. Follow the instructions for your specific model in the manual. -
Page 6: Assembling Your Telescope
FOR NEQ3 MOUNT TRIPOD SET UP Fig. 2 ADJUSTING THE TRIPOD LEGS (Fig.18) Fig. 1 1) Slowly loosen the height adjustment clamp and gently pull out the lower section of each tripod leg. Tighten the clamps to hold the legs in place. 2) Spread the legs apart to stand the tripod upright. -
Page 7: Finderscope/Red Dot Finder Assembly
TELESCOPE ASSEMBLY ATTACHING THE TUBE RINGS TO THE MOUNT (Fig.9) 1) Remove the telescope tube assembly from Fig.9 its plastic packaging. 2) Remove the tube rings from the telescope by releasing their thumb nuts and opening their hinges. 3) Using the bolts provided, fasten the tube rings to the mount with the 10mm wrench provided. -
Page 8: For Eq5
FOR EQ5 MOUNT TRIPOD SET UP ADJUSTING THE TRIPOD LEGS (Fig.18) Fig.19 Fig.18 1) Slowly loosen the height adjustment clamp gently pull out the lower section of each tripod leg. Tighten the clamps to hold the legs in place. 2) Spread the legs apart to stand the tripod upright. 3) Adjust the height of each tripod leg until the tripod head is properly leveled. -
Page 9: Finderscope Assembly
TELESCOPE ASSEMBLY ATTACHING THE TUBE RINGS TO THE MOUNT(Fig.25) 1) Remove the telescope tube assembly Fig.25 from its plastic packaging. 2) Remove the tube rings from the telescope by releasing their thumb nuts and opening their hinges. 3) Using the bolts provided, fasten the tube rings to the mount with the 10mm wrench provided. -
Page 10: Operating Your Telescope
OPERATING YOUR TELESCOPE The finderscope (optical or red dot) is a very useful accessory that is included with your telescope. When the finderscope is correctly aligned with the telescope, objects can be quickly Fig.a located and brought to the centre of the field. Alignment is best done outdoors in day light when it's easier to locate objects. -
Page 11: Balancing The Telescope
A Telescope should be balanced before each observing session. Balancing reduces stress on the telescope mount and allows precise control of micro-adjustment. A balanced telescope is specially critical when using the optional clock drive for astrophotography. The telescope should be balanced after all accessories (eyepiece, camera, etc.) have been attached. -
Page 12: Operating The Neq3 Mount
Fig.e The NEQ3 mount has controls for both conventional altitude (up-down) and azimuth (left-right) directions of motion. These two adjustments are suggested for large direction changes and for terrestrial viewing. The two Azimuth azimuth adjustment knobs located near the tripod head adjustment Altitude allow fine-adjustment of azimuth for polar alignment. -
Page 13: Using The Barlow Lens
Fig.g Eyepiece Barlow A Barlow is a negative lens which increases the Diagonal magnifying power of an eyepiece, while reducing the field of view. It expands the cone of the focussed light before it reaches the focal point, so that the telescope's focal length appears longer to the eyepiece. - Page 15 Fig.m You aim your telescope by rotating it along the RA and Dec axes of your mount. In the upper image the telescope is in the HOME position, aimed due north. The side images show the telescope pointing NE (right side) and SW (left side).
-
Page 16: Using The Setting Circles
Now it is time to learn what those numbered dials are for! Fig.n The dials are called setting circles and they can be used to help you find objects in the sky simply by dialing in a set of coordinates. All objects in the sky have assigned coordinates labeled Right Ascension (RA for short) and Declination (Dec for short). - Page 17 Vega has the coordinates RA 18h 37m. With Vega centered in your eyepiece loosen the RA setting circle setscrew and rotate the scale until it reads 18h 36m. (If you are in the Northern hemisphere use the top row of numbers.
-
Page 18: Choosing The Appropriate Eyepiece
Calculating the magnification (power) The magnification produced by a telescope is determined by the focal length of the eyepiece that is used with it. To determine a magnification for your telescope, divide its focal length by the focal length of the eyepieces you are going to use. -
Page 19: Observing The Sky
OBSERVING THE SKY Sky conditions are usually defined by two atmospheric characteristics, seeing, or the steadiness of the air, and transparency, light scattering due to the amount of water vapour and particulate material in the air. When you observe the Moon and the planets, and they appear as though water is running over them, you probably have bad "seeing"... -
Page 20: Proper Care For Your Telescope
PROPER CARE FOR YOUR TELESCOPE Fig.q Collimation is the process of aligning the mirrors of your telescope so that they work in concert with each other to deliver properly focused light to your eyepiece. By observing out-of-focus star images, you can test Correctly aligned Needs collimation whether your telescope's optics are aligned. - Page 21 alternately loosen one and then compensate for the slack by tightening the other two. Stop when you see all three mirror clips (Fig.q-4). Make sure that all three small alignment screws are tightened to secure the secondary mirror in place. Aligning the Primary Mirror Find the three locking screws at the back of your telescope and loosen them by a few turns.
-
Page 22: Collimating A Refractor (With The Adjustable Objective-Lens Cell)
Collimation is the process of aligning the lenses of your telescope so that the light they collect will focus at the right spot Fig.r at the back of your telescope for your eyepieces to work. Collimation is a simple process and works like this: Pull off the dew cap at the front of your telescope and look into the scope. - Page 23 APPENDIX A - PRECISE POLAR ALIGNMENT FOR NORTHERN HEMISPHERE When your equatorial mount is polar-aligned it is able track the sky easily and hold targets in the eyepiece with just occasional adjustments to the RA control cable. If your mount is motorized it can hold objects in the eyepiece almost indefinitely.
- Page 24 SIMPLIFIED POLAR ALIGNMENT PROCEDURES The NEQ3 and EQ5 mounts have specially designed reticule patterns and simplified procedures to make polar aligning your mount very simple. In fact, if you purchased a SynScan equipped mount you can perform an extremely accurate polar alignment in less than two minutes! See the SynScan User manual for details. If you do not have a SynScan mount you can still get a very good alignment without much bother.
-
Page 25: Appendix B-Optional Accessories
APPENDIX B - OPTIONAL ACCESSORIES NEQ3 & EQ5 SYNSCAN Sky-Watcher offers simple solutions for users who would like to attach their smaller telescope to a convenient computer- ized system but do not wish to deal with the weight of the HEQ5 or EQ6 mount. -
Page 26: Appendix C-Recommended Reading
APPENDIX C - RECOMMENDED READING Beginner's Guide to Amateur Astronomy: An The Great Atlas of the Stars by Serge Brunier, Owner's Manual for the Night Sky by David J. Constellation photography by Akira Fujii (Firefly Eicher and, Michael Emmerich (Kalmbach Books;...
Need help?
Do you have a question about the EQ3-2 and is the answer not in the manual?
Questions and answers