Neptune Technology R900 Installation & Maintenance Manual
Cellular endpoint
Hide thumbs
Also See for R900:
- Installation supplement manual (21 pages) ,
- Installation and maintenance manual (160 pages) ,
- User manual (68 pages)
Table of Contents
Advertisement
Quick Links
Advertisement
Table of Contents

Related Manuals for Neptune Technology R900


Summary of Contents for Neptune Technology R900
- Page 1 R900 cellular endpoint Wall and Pit Installation and...
- Page 2 Maintenance Guide...
- Page 4 R900 cellular endpoint Wall and Pit Installation and Maintenance Guide...
- Page 5 This manual may not be reproduced in whole or part, in any form or by any means, electronic or mechanical, for any purpose, without the express written permission of Neptune Technology Group Inc. All rights to design or inventions disclosed herein, including the right to manufacture, are reserved to Neptune Technology Group Inc.
- Page 6 Professional Installation In accordance with section 15.203 of the FCC rules and regulations, the R900 cellular endpoint must be professionally installed by trained meter installers. Changes or modifications not expressly approved by the party responsible for compliance void the user's authority to operate the equipment.
- Page 7 R900 cellular endpoint Wall and Pit Neptune Technology Group Inc. Installation and Maintenance Guide 1600 Alabama Highway 229 Literature No. IM R900 cellular Tallassee, AL 36078 endpoint 07.20 Part No. Tel: (800) 633-8754 Fax: (334) 283-7293 Copyright © 2021 Firmware © 2021 Neptune Technology Group Inc.
-
Page 9: Table Of Contents
Chapter 4: Wall Installation Prior to Installation Storage Unpacking Tools and Materials Site Selection Installing the R900 cellular endpoint Removing the Main Housing Applying the Scotchlok™ Gel Caps Completing and Testing the Installation Testing the Installation Wall and Pit Installation... - Page 10 R900 cellular endpoint Pit Installation Installing the Antenna Begin the Installation Installing the Scotchlok™ Connectors Connecting the Splice Tube Tying the Cable and Activating the R900 cellular endpoint Testing the Installation Chapter 6: Maintenance and Troubleshooting Six Wheel Encoders Four Wheel Encoders...
- Page 11 Figure 1 – R900 cellular endpoint – Wall Figure 2 – R900 cellular endpoint – Pit Figure 3 – R900 cellular endpoint Pit – Dimensions Front and Side Figure 4 – R900 cellular endpoint Wall – Dimensions Front and Side Figure 5 –...
- Page 12 Figure 42 – Splice Tube Figure 43 – Gray Wires in Slots Figure 44 – Attaching the R900 cellular endpoint to the Antenna Shaft Figure 45 – Swiping the R900 cellular endpoint Figure 46 – R900 cellular endpoint Status Screen Figure 47 –...
- Page 13 Table 6 – Recommended Materials Table 7 – Maximum Cable Lengths Table 8 – Cable Length and Manufacturer Table 9 – Example Reading Values Table 10 – Leak Status Flag Descriptions Wall and Pit MIU R900 cellular endpoint Installation and Maintenance Guide...
- Page 14 Tables This page intentionally left blank Wall and Pit MIU R900 cellular endpoint Installation and Maintenance Guide...
-
Page 15: Chapter 1: Product Description
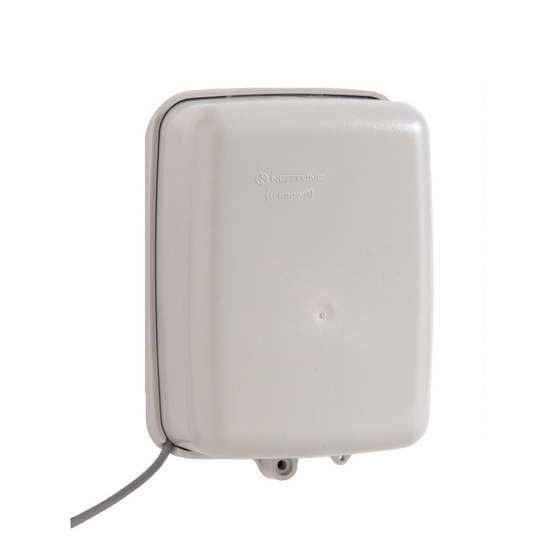
The collection data is stored and downloaded into the utility billing system for processing. The R900 cellular endpoint is easily installed in wall or pit applications. It operates on the AT&T and FirstNet LTE-M networks. The R900 cellular endpoint stops RF transmissions when the battery discharges below the normal operating voltage at the end of its lifespan. - Page 16 3 – R900 cellular endpoint – Pit w/external antenna Wall and Pit R900 cellular endpoint Installation and Maintenance Guide...
- Page 17 Chapter 1: Product Description This page intentionally left blank. Wall and Pit R900 cellular endpoint Installation and Maintenance Guide...
-
Page 18: Chapter 2: Specifications
Chapter 2: Specifications This chapter covers the specifications for the R900 cellular endpoint. Electrical Specifications The power is supplied by a lithium battery. Transmitter The following table defines the R900 cellular endpoint transmitter specifications. Table 1 – Transmitter Specifications Description Transmit Period Fifteen-minute readings delivered four times per day. -
Page 19: Environmental
Storage Temperature –40° to 158°F (–40° to 70°C). Operating Humidity 0 to 100% condensing. Functional The following table provides the functional specifications of the R900 cellular endpoint . Table 4 – Functional Specifications Register Reading Endpoint ID Nine digits. Dimensions This section provides the dimensions and weight of the R900 cellular endpoint. - Page 20 Chapter 2: Specifications Figure 3 – R900 cellular endpoint Pit w/external antenna – Dimensions Front and Side Wall and Pit MIU R900 cellular endpoint Installation and Maintenance Guide...
-
Page 21: Figure 4 - R900 Cellular Endpoint Wall - Dimensions Front And Side
Chapter 2: Specifications Figure 4 – R900 cellular endpoint Wall – Dimensions Front and Side Wall and Pit MIU R900 cellular endpoint Installation and Maintenance Guide... - Page 22 Chapter 2: Specifications This page intentionally left blank. Wall and Pit MIU R900 cellular endpoint Installation and Maintenance Guide...
-
Page 23: Chapter 3: General Installation Guidelines
Some items may not apply to your specific installation, or the list may not contain all required tools or materials. Recommended Tools The following table defines the tools recommended to install the R900 cellular endpoint. Table 5 – Recommended Tools Tool... -
Page 24: Recommended Materials
Notify the customer of your presence and tell the customer that you need access to the water meter. Write the ID numbers of the R900 cellular endpoint you are installing, if the site work order does not include the numbers. -
Page 25: Installing A Register (Non Pre-Wired Or Potted Only)
When using a ProRead encoder register, the non-AutoDetect ProRead register must be programmed for three-wire mode. If connecting the R900 cellular endpoint to a new ProRead encoder register, or if a three- conductor cable is already connected to a ProRead encoder register, ensure that the... -
Page 26: Figure 5 - Wiring A Neptune Encoder Register
Figure 5 – Wiring a Neptune Encoder Register 7. If required, connect the three conductor wires to the encoder register's terminal per the manufacturer's instructions. Figure 6 – Color Code for Wires Wall and Pit MIU R900 cellular endpoint Installation and Maintenance Guide... -
Page 27: Figure 7 - Cable Threaded Around Strain Relief Posts
9. Apply sealant liberally and ensure that it encapsulates the terminal screws and exposed wires. Neptune requires Novagard G661 sealant or Dow compound 4. ® ® Figure 8 – Application of the Sealant Wall and Pit MIU R900 cellular endpoint Installation and Maintenance Guide... -
Page 28: Figure 9 - Covering The Terminal Screws
10. Snap the cover onto the encoder register. Figure 9 – Covering the Terminal Screws 11. Run the cable to the R900 cellular endpoint and fasten it securely. Do not exceed maximum cable lengths as defined in "Encoder Register Interface" on page 3. -
Page 29: Chapter 4: Wall Installation
After completing the inspection, store the cartons in a clean, dry environment. The R900 cellular endpoint has an internal battery and storing it for more than one year can affect product life. Be sure to use a first-in, first-out inventory control system. For more information, see "Environmental"... -
Page 30: Tools And Materials
Install the R900 cellular endpoint approximately 5 feet above the ground. Install the R900 cellular endpoint in a vertical and upright position. Mount the R900 cellular endpoint on a flat surface like a wall, but it can also be mounted on a pipe. Wall and Pit MIU... -
Page 31: Installing The R900 Cellular Endpoint
Avoid installing the R900 cellular endpoint behind metal fences or walls. The maximum cable length between the encoder register and R900 cellular endpoint depends on the register's manufacturer and model. See the following table for the maximum cable lengths. -
Page 32: Applying The Scotchlok™ Gel Caps
The Hi-Lo fastener for securing the main R900 cellular endpoint housing to the adapter plate is shipped separately. 2. Study "Site Selection" on page 14 and then decide how to install the R900 cellular endpoint. You can insert the cable through any of the entry holes in the back of the mounting ... -
Page 33: Figure 15 - Color Code For Wires
5. Repeat this process until all connections are complete. 6. Store excess wire and Scotchloks in the hollow cavity in the back of the R900 cellular endpoint using the strain relief guides. Figure 16 – Cable in Back of Mounting Adapter... -
Page 34: Completing And Testing The Installation
Completing and Testing the Installation Follow this procedure to complete and test the installation. 1. Slide the tongue on the top of the R900 cellular endpoint into the groove on the top of the mounting adapter. 2. Secure the R900 cellular endpoint to the mounting adapter using the set screw. -
Page 35: Figure 19 - Swiping The R900 Cellular Endpoint
4. Move the magnet up and over the top left corner of the R900 cellular endpoint. Figure 19 – Swiping the R900 cellular endpoint 5. Install a seal wire or seal clip through the seal hole at the bottom of the R900 cellular endpoint main housing. -
Page 36: Testing The Installation
ID barcode using the SCAN BARCODE tool in the app. < Image Placeholder> Figure 21 – Entering the R900 cellular endpoint 10. To scan the barcode, hold the camera of the Android or iOS device over the R900 cellular endpoint ID label and click ‘Search’ < Image Placeholder>... -
Page 37: Figure 23 - Meter Readings
12. Verify that the meter reading is valid. If the meter reading is: • Valid, continue with the next step. • Invalid, verify all endpoint to register connections and test the installation again. < Image Placeholder> Figure 23 – Meter Readings Wall and Pit MIU R900 cellular endpoint Installation and Maintenance... - Page 38 Wall and Pit MIU R900 cellular endpoint Installation and Maintenance Guide...
- Page 39 Wall and Pit MIU R900 cellular endpoint Installation and Maintenance Guide...
- Page 40 This page intentionally left blank. Wall and Pit MIU R900 cellular endpoint Installation and Maintenance Guide...
-
Page 41: Chapter 5: Pit Installation
After completing the inspection, store the cartons in a clean, dry environment. Keep in mind that the R900 cellular endpoint has an internal battery. Storage for more than one year may affect product life. Be sure to use a first-in, first-out inventory control system. For more information, see "Environmental"... -
Page 42: Tools And Materials
Avoid installing the R900 cellular endpoint behind metal fences or walls. • Consider the following clearances for the R900 cellular endpoint – Pit w/internal antenna Table 10 – Required clearances for the R900 cellular endpoint – Pit w/internal antenna Requirement Minimum... - Page 43 Pits with metal lids require the pit endpoint with external antenna. • Make sure the pit location gives adequate room for installing both the R900 cellular endpoint and the flange or TTL pit antenna (if used). • Install the flange or pit antenna above the lid in low traffic areas, as illustrated below, for maximum performance.
-
Page 44: Table 8 - Cable Length And Manufacturer
Recessing the installation reduces the range of the pit antenna. Figure 27 – Flange or Antenna Placement for High Traffic Areas Although the R900 cellular endpoint has a cable already attached (2 feet or 6 feet), some installations can require additional cable. In these cases, the maximum cable length between the encoder register and the R900 cellular endpoint depends on the register's manufacturer and model. -
Page 45: R900 Cellular Endpoint Pit Installation
Chapter 5: Pit Installation R900 cellular endpoint Pit Installation The following section describes how to install a single R900 cellular endpoint in a pit location. The Pit endpoint can be purchased in two formfactors: R900 cellular endpoint pit w/internal antenna •... - Page 46 8. Rotate the endpoint horizontally as needed to fit into the meter pit and finish tightening the locking not to secure the endpoint in place. Wall and Pit MIU R900 cellular endpoint Installation and Maintenance Guide...
- Page 47 Pit endpoint w/External TTL Antenna Installation Complete these steps to install the endpoint w/external antenna in a pit. 1. Insert the antenna cable and housing through the 1-3/4 inch hole in the meter pit lid. Wall and Pit MIU R900 cellular endpoint Installation and Maintenance...
-
Page 48: Figure 28 - Inserting The Antenna Into The Pit Lid
5. Connect the antenna to the endpoint ensuring that the center conductor pin inside the connector is lined up with the hole in the center of the connector on the endpoint. Wall and Pit MIU R900 cellular endpoint Installation and Maintenance Guide... -
Page 49: Figure 32 - R900 Cellular Endpoint Conductor Pin
Chapter 5: Pit Installation Figure 32 – R900 cellular endpoint Conductor 6. When the pin is properly aligned, push the antenna connection down fully onto the connection of the endpoint, so that the latch plate is engaged on all three posts. - Page 50 Chapter 5: Pit Installation 9. Once the register and antenna are connected the R900 cellular endpoint can be activated. Using a magnet, swipe clockwise around the top left corner of the endpoint, starting halfway down the long side of the endpoint and finishing at the middle of the shorter side to activate the endpoint.
-
Page 51: Installing The Scotchlok™ Connectors
Complete the following steps to install the Scotchlok™ connectors. Make sure you complete the pit installation procedures before you install the Scotchloks. 1. Use the 3M Scotchlok-type connector to connect the R900 cellular endpoint wires to the encoder wires. 2. Hold the Scotchlok's connector between the index finger and thumb with the red cap facing down. -
Page 52: Figure 38 - Seating Connector Wires
3. Take a non-stripped black wire from the pigtail and a non-stripped black wire from the R900 cellular endpoint and insert the wires into the Scotchlok connector until fully seated. Figure 38 – Seating Connector Wires 4. Do not strip colored insulation from the wires, or strip and twist bare wires prior to inserting into a connector. -
Page 53: Connecting The Splice Tube
8. Repeat steps two through six for each color wire. 9. After connecting all three color wires, read the encoder register to ensure proper connections, and the R900 cellular endpoint is functioning properly. Figure 41 – Three Colored Wires Properly Connected... -
Page 54: Figure 43 - Gray Wires In Slots
3. Snap the cover closed to finish the installation. Securing the Endpoint to the Antenna Tube Follow this procedure in deep pits or vaults to secure the R900 cellular endpoint to the Antenna Tube 1. Place the R900 cellular endpoint in the pit location: In a shallow pit application, you can place the R900 cellular endpoint beside the meter. -
Page 55: Testing The Installation
Testing the Installation To test the installation, follow the steps in "Testing the Installation" on page 20. Wall and Pit MIU R900 cellular endpoint Installation and Maintenance Guide... - Page 56 This page intentionally left blank. Wall and Pit MIU R900 cellular endpoint Installation and Maintenance Guide...
-
Page 57: Chapter 6: Maintenance And Troubleshooting
The sixth digit displayed is a five, if the last digit on the odometer is five through nine. The sixth digit is a zero, if the last digit on the odometer is zero through four. The R900 cellular endpoint adds two zeros on the end to provide an eight-digit reading to the host software. -
Page 58: Contact Information
A description of what occurred and what you were doing at the time. A description of any actions taken to correct the issue. By Email To contact Neptune Support by email, send your message to support@neptunetg.com. Wall and Pit MIU R900 cellular endpoint Installation and Maintenance Guide... -
Page 59: Table 10 - Leak Status Flag Descriptions
Appendix A: Endpoint Modes There is a single mode of operation for the R900 cellular endpoint, which provides 15-minute register interrogations with readings delivered every six hours. Table 10 – Leak Status Flag Descriptions Leak Status Flag (Resets After 35 Days) Based on total amount of 15-minute periods recorded in the previous 24-hour period. - Page 60 Appendix A: endpoint Modes This page intentionally left blank. Wall and Pit MIU R900 cellular endpoint Installation and Maintenance Guide...
- Page 61 Register ID of the connected register Error Messaging Given a user is attempting to search for a R900 cellular endpoint, but cannot return their details, there are two possible error scenarios that can occur. 1. If the user’s mobile device does not have service at the time of searching, the user will see a message stating, “...
- Page 62 Screen Wall and Pit MIU R900 cellular endpoint Installation and Maintenance Guide...
-
Page 63: Appendix B: Cmiu Manager
Appendix B: CMIU Manager Wall and Pit MIU R900 cellular endpoint Installation and Maintenance... -
Page 64: Glossary
Endpoint antenna used for pit installations. American Wire Gauge. CMIU™ Cellular Meter Interface Unit. Federal Communications Commission. Liquid Crystal Display (LCD) Component where the meter-reading and value-added icons are displayed. Meter Interface Unit. Wall and Pit MIU R900 cellular endpoint Installation and Maintenance Guide... - Page 66 Unique identification number given to each endpoint at the factory. The default value is the last programmed, plus one. Custom serial numbers are not available. Transport Driver Interface format. transmission time The time between endpoint transmissions. Wall and Pit MIU R900 cellular endpoint Installation and Maintenance Guide...
-
Page 67: Index
19 prewired 12 conductor wire 10 procedures customer support 36 maintenance 35 troubleshooting 35 dimensions 4 ProRead™ 3 Dow® Corning 11 read E-CODER )R900i 13 ® E-CODER )R900i 8 ® Wall and Pit MIU R900 cellular endpoint Installation and Maintenance... - Page 68 Wall and Pit MIU R900 cellular endpoint Installation and Maintenance Guide...
- Page 70 13 strain relief posts 11 TDI 9 temperature operating 4 storage 4, 13 testing the installation 23 tool kit 7 tools 13 Transport Driver Interface format 9 weight 4 Wall and Pit MIU R900 cellular endpoint Installation and Maintenance Guide...
Need help?
Do you have a question about the R900 and is the answer not in the manual?
Questions and answers