Table of Contents

Related Manuals for real living CLEARLANE A304001800


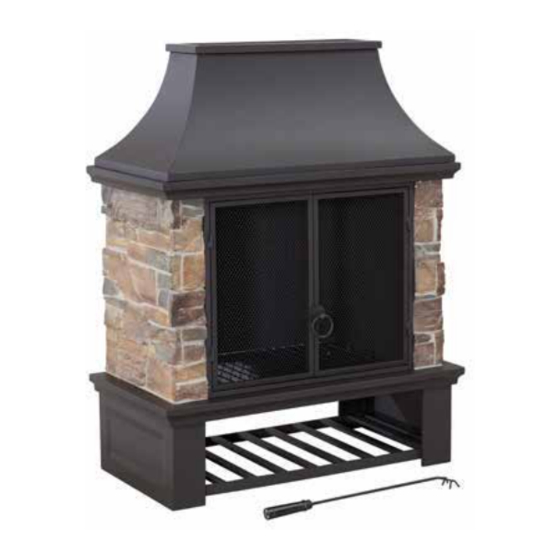
Summary of Contents for real living CLEARLANE A304001800
- Page 1 CLEARLANE WOOD BURNING FIREPLACE ASSEMBLY INSTRUCTIONS ITEM#: A304001800 SKU# 810494920 Importer of record info / quality testing standards / COO /choking warning Need help? We are here for you! 1(866)578 - 6569 24/7 • Toll Free...
-
Page 2: Warranty
GENERAL BEST PRACTICES FOR ASSEMBLY: Please read and understand this entire manual before attempting to assemble or install the product. Before beginning assembly of product, make sure all parts are present. Compare parts with package contents list and hardware contents list. If any part is missing or damaged, do not attempt to assemble the product. Do not place the product on a damp or conductive subsurface. -
Page 3: Exploded Drawing
EXPLODED DRAWING... -
Page 4: Parts List
PARTS LIST Label Description Part Image Part Number Chimney P000900148 Upper base P000300100 Back panel P004000298 Left stone panel P002400057 Right stone P002400058 panel Side panel P003800503 Door P004100147 Decorative P005600430 panel Catch P005100320 Fire bowl P002500128 Andiron P002900012 Base P000100296... -
Page 5: Hardware List
Base frame P000100411 Poker P002700039 HARDWARE LIST Label Part Number Description Part Image H010010003 Bolt M6*15 H010010087 Bolt M6*20 H010010006 Bolt M6*30 Flat washer H050030001 H040050016 Nut M6 H090010017 Wrench M6... -
Page 6: Helpful Hints
HELPFUL HINTS • Tools needed and not included • Separating parts before starting Provided in hardware pack How many people are needed for the installation? - Page 7 STEP 1 Assembled View: Attached the Base (M) to Base frame (N) with Bolt(BB) and Flat washer(DD), tighten Bolt(BB) to 100% depth with Wrench (FF).
- Page 8 STEP 2 Assembled View: Attached the Left stone panel (D), Right stone panel (E) and Back panel(C) with Bolt(AA) and Flat washer(DD), tighten the Bolt(AA) to 80% depth with Wrench(FF).
- Page 9 STEP 3 Assembled View: Attached the Left stone panel (D), Right stone panel (E) and Base (M) with Bolt(CC) and Flat washer(DD), tighten all the Bolt to 100% depth with Wrench(FF).
- Page 10 STEP 4 Assembled View: Attached the Left stone panel (D), Right stone panel (E) and Door (H) with Bolt(AA) and Flat washer(DD), tighten with Wrench(FF).
- Page 11 STEP 5 Assembled View: Insert the Side panel (F) to Base (M), attached the Left stone panel (D), Right stone panel (E) and Side panel (F) with Bolt(AA) and Flat washer(DD), tighten the Bolt(AA) to 100% depth with Wrench(FF).
- Page 12 STEP 6 Assembled View: Attached the Catch (J) and Decorative panel (I) with Flat washer(DD) and Nut M6(EE), tighten with Wrench(FF).
- Page 13 STEP 7 Assembled View: Attached the Left stone panel (D), Right stone panel (E) and Upper base (B) with Bolt(BB) and Flat washer(DD), tighten all the Bolt to 100% depth with Wrench(FF) at last.
- Page 14 STEP 8 Assembled View: Put the Chimney(A) on the Upper base (B).
- Page 15 STEP 9 Assembled View: Put the Fire bowl (K) on the Base (M), put the Andiron (L) on the Fire bowl (K).
- Page 16 STEP 10 Assembled View: Put the Poker (O) on the wall, the product group to complete.
Need help?
Do you have a question about the CLEARLANE A304001800 and is the answer not in the manual?
Questions and answers