
Related Manuals for Atlas Copco QLTS 4 ESF


Summary of Contents for Atlas Copco QLTS 4 ESF
- Page 1 Instruction Manual User and maintenance manual for solar light towers English QLTS 4-6-8 ESF...
- Page 3 QLTS 4-6-8 ESF User and maintenance manual for solar light towers User and maintenance manual .............. 5 Circuit diagrams ..................47 Original instructions Printed matter N° 2954 7570 00 ATLAS COPCO - PORTABLE ENERGY DIVISION www.atlascopco.com 03/2014...
- Page 4 While every effort has been made to ensure that the information in this manual is correct, Atlas Copco does not assume responsibility for possible errors. Copyright 2014, Grupos Electrógenos Europa, S.A., Zaragoza, Spain. Any unauthorized use or copying of the contents or any part thereof is prohibited.This applies in particular to trademarks, model denominations, part numbers and drawings.
-
Page 5: Table Of Contents
Please read the following instructions carefully before starting to use your machine. While every effort has been made to ensure that the information in this manual is correct, Atlas Copco does not assume responsibility for possible errors. Atlas Copco reserves the right to make changes without prior notice. - Page 6 3.4.2 Indoor installation ......30 Storage of the solar light tower ..........40 Operating instructions ....31 Storage..........40 Before starting ........ 31 Preparing for operation after Operating the solar light tower..31 storage ..........40 4.2.1 Adjusting the lights......31 Disposal ..........
-
Page 7: Safety Precautions
The policy of Atlas Copco is to provide the users of their Atlas Copco equipment. It is the responsibility of unsafe operating conditions. Take necessary steps to equipment with safe, reliable and efficient products. -
Page 8: General Safety Precautions
The manufacturer does not accept any liability for any 10 Mind the markings and information labels on the General safety precautions damage arising from the use of non-original parts and for unit. The owner is responsible for maintaining the unit in modifications, additions or conversions made without 11 In the event the safety labels are damaged or a safe operating condition. -
Page 9: Safety During Transport And Installation
Place the unit on level ground and apply the parking Safety during transport and Safety during use and brake before disconnecting the unit from the towing installation operation vehicle. Unclip the safety break-away cable or safety chain. If the unit has no parking brake or To lift a unit, all loose or pivoting parts, towbar, shall When operating in a dust-laden atmosphere, place jockey wheel, immobilize the unit by placing... -
Page 10: Safety During Solar Light Tower Operation
Whenever damaged wires or have been fully adjusted. Parts shall only be replaced by genuine Atlas Copco dangerous conditions are observed, switch the fuses - Make sure that nobody is standing too close to replacement parts. -
Page 11: Tool Applications Safety
13 Use only lubricating oils and greases recommended prevented. or approved by Atlas Copco or the machine Special service tools are available for specific jobs and manufacturer. Ascertain that the selected lubricants should be used when recommended. -
Page 12: Main Parts
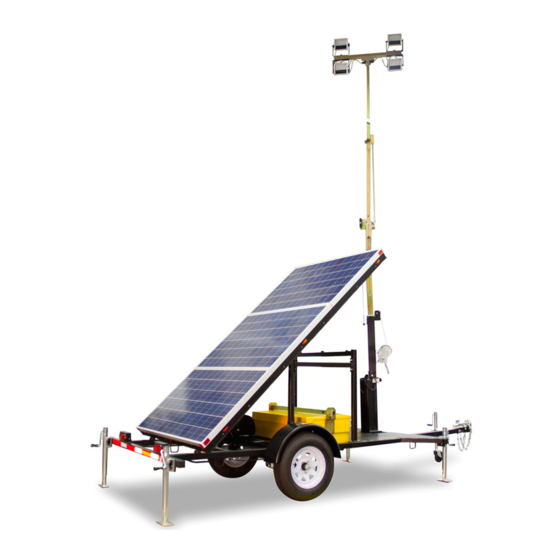
Main parts General description The QLTS 4/6/8 solar light tower provides an undercarriage (frame, axle and towbar), 2/3 solar panels and 4/6/8 spot lights of 208/312/416W each. The solar light tower is very useful for construction sites and event locations, particularly in emission sensitive environments (cities, nature reserves,...), where no lighting is available. Control panel Battery box HHSF... -
Page 13: Markings
Markings Markings provide instructions and information. They also warn of hazards. For convenience and safety, Indicates that before using Indicates that solar panels keep all markings in legible condition, replacing them the solar light tower, the could break. Before when damaged or missing. Replacement markings are rear frame should be raising the panels, use the available from the factory. -
Page 14: Mechanical Features
Mechanical features All standard models of QLTS solar light towers are 2.3.2 Mast and floodlights 2.3.5 Data plate operationally similar. Differences between models The solar light tower mast consists of 4 mast sections The solar light tower is furnished with a data plate are: and can be extended up to 6.1 m (20 ft). -
Page 15: Electrical Features
Electrical features Function selector The function selector switch allows you to configure the lights to turn on automatically at dusk. The system 2.4.1 Control and indicator panel uses input from a photocell to detect when the To operate the solar light tower a control panel is ambient light is low enough to activate the lights. - Page 16 To order more automatically at dusk, based voltage and the power system was automatically on input from the photocell, fixtures, contact the local Atlas Copco Customer shut down. and off automatically after the Service Center.
-
Page 17: Solar Panels
2.4.2 Power system 2.4.2.1 Solar panels For the light tower's solar charging system to function The light tower is powered by batteries. Solar panels properly, the solar panels must be exposed to full are used for charging the batteries. sunlight during daylight hours. The charging system runs continuously, keeping the If the location where the light tower will be used is not batteries charged. -
Page 18: Connection
Installation and 3.1.2 General guidelines 3.1.3 Unloading racked light towers from a container During the assembly process: connection – Ensure clear access to all four sides of the rack and 1. Before unloading the light towers from the the light towers. Deracking and assembly container, remove any items that might limit forklift access. -
Page 19: Dismantling The Rack
• Ensure the forks extend past the battery box 2. Use a forklift to raise the racked light towers off 3.1.4 Dismantling the rack and fully support the light tower frame. Use the ground. 1. Detach the two mast assemblies from the rack (1) fork extenders if necessary. -
Page 20: Preparing For Assembly
4. Use the hand-crank on each supporting foot to 7. Use the forklift to move the top light tower to the 3.1.5 Preparing for assembly extend the supporting foot downward until it rests location where it will be assembled. 1. Remove the T-bar assembly (1) from the battery firmly on the ground. -
Page 21: Installing The Tires
2. Remove the solar panel horizontal support In the following steps, you will detach, reposition, 3.1.6 Assembling the light towers brackets from behind the battery box by cutting and reattach the support legs to the brackets. Perform the following steps for each light tower. the strapping that holds them in place, then set the 2. -
Page 22: Installing The Mast
9. Install the horizontal brackets (5) as illustrated 5. Position one or two men on the light tower tread 3.1.6.3 Installing the mast below by installing first one bracket, then the tube, plate (3), next to the swivel base (4). 1. -
Page 23: Installing The T-Bar Assembly
5. Position two men on the light tower tread plate, 2. Retrieve the P-clamp and bolt that you removed 3.1.6.4 Installing the T-bar assembly next to the mast. from the mast when installing the T-bar (1), and 1. Retrieve and unwrap the T-bar assembly that you locate the marking on the cable that is closest to 6. -
Page 24: Installing The Towbar
3.1.6.6 Installing the towbar 3.1.6.7 Extending the rear frame 3.1.7 Prepare light towers for use Before using the light towers for the first time: 1. Retrieve the light tower towbar (1) that you 1. Raise the two rear supporting feet (1) off the unloaded from the container before beginning the ground. -
Page 25: Lifting
Lifting Parking and towing A fork lift can be used to lift the solar light tower. The operator is expected to apply all Position the forklift under the solar light tower as relevant safety precautions, described in “Unloading racked light towers from a including those mentioned on page 8 container”... -
Page 26: Positioning The Solar Light Tower For Use
3.3.2 Positioning the solar light tower for use – If the location in which the light tower will be 3.3.2.1 Location 3.3.2.2 Procedure used is not in a sunny location, the light tower may – When deployed, the light tower mast rises to a Prior to raising and extending the light tower mast, the be moved to a sunny location during the day so height of more than 18 feet (6 meters). -
Page 27: Positioning For Transportation
3. Determine which corner of the trailer is highest, 3.3.3 Positioning for transportation 3.3.4 Towing and extend the supporting foot on that corner 1. Lower the mast (see also “Lowering the mast” on downward until it rests firmly on the ground. 3.3.4.1 Before towing page 33). - Page 28 For battery information, see “Battery care”. With the mast properly oriented in the travel 8. Lower the towbar jack (10) into the down position position, holes in the frame and mast line up so by pulling the jack locking pin and rotating the 3.
-
Page 29: During Towing
14. Verify approved safety chains (15) are attached 3.3.4.2 During towing 3.3.5 Transportation and positioning properly to both the trailer (16) and tow vehicle of the solar light tower onto – Do not tow the trailer with any people, parts, (17), as illustrated below. -
Page 30: Installation
Installation • Angle the trailer so that its solar panels face 3.4.1 Outdoor installation the sun: to the south in the northern – Place the solar light tower on a horizontal, even hemisphere; to the north in the southern and solid floor. hemisphere (see “Positioning the solar light –... -
Page 31: Operating Instructions
Operating instructions Operating the solar light 4.2.2 Extending the mast tower When the tower is vertical, the mast can be extended In your own interest, always strictly to 20 feet (6,1 meters). The tower can be rotated 359 4.2.1 Adjusting the lights observe relevant safety... -
Page 32: Switching On/Off The Spotlights
• Remove the travel-lock pin (1) by removing 4.2.3 Switching on/off the spotlights 4.2.3.2 Switch off the lights manually the cotter pin that holds it in place, then pulling 1. To turn off all the lights, regardless wether their the pin sideways, out of the holes in the mast 4.2.3.1 Switch on the lights manually individual switches are ON (... -
Page 33: Lowering The Mast
2. Select the desired automatic operation mode: Operating the solar panels The lights will Dusk to To optimize solar charging, the solar panels may be automatically turn dawn tilted upward for greater sun exposure. ON at dusk and OFF 1. -
Page 34: Options
Options • The bolts go through the two holes at the end Additional lights 5.1.2 Uninstalling lights of the T-bar and the extension bar. To uninstall lights on an extension bar from the light Additional lights are available as a kit for a maximum •... -
Page 35: Periodic Maintenance
Periodic maintenance – Inspect all exposed wiring for damage, worn Precautions Ordering spare parts insulation and cuts. – Before proceeding with any type of maintenance, It is possible to order spare parts for the solar light – Inspect the winch cable for wear and damage. please read the instructions in “Safety during tower by making reference to the parts as mentioned maintenance and repair”... -
Page 36: Battery Care
Battery care The QLTS solar light tower is equipeed with AGM To activate the voltage meter, press and hold the 6.5.1.2 Checking the battery charge (Absorbed Glass Mat) batteries. AGM batteries are button (1) next to the meter (2). The voltage meter A voltage meter on the front of the battery box sealed, maintenance free batteries, that, unlike will light up when the button is pressed. - Page 37 6.5.1.3 Voltage testing procedure Battery charge requirements To check the battery charge directly, perform a Determine the battery charge level from the specific voltage test as described below, then use the “Battery voltage test readings. charge requirements” table to determine whether the –...
- Page 38 Overview table Charge level (%) Specific gravity at 80°F (27°C) Open-circuit voltage (V) Approx. required charge time (hrs) 6V battery 12V battery 1.277 6.37 12.73 1.268 6.34 12.68 1.258 6.31 12.62 1.248 6.28 12.56 1.238 6.25 12.50 1.227 6.22 12.44 1.217 6.19 12.37...
-
Page 39: Battery Cleaning
– The Atlas Copco battery charger will not overcharge the batteries, even if left unattended for an extended period. -
Page 40: Storage Of The Solar Light Tower
Storage of the solar light Idle battery self-discharging rate: tower Ambient temperature Discharge per day (°F(°C)) (SG) 100 (37.8) Storage 80 (26.7) – Before storing the light tower or batteries: 50 (10.0) • Clean the batteries as described in “Battery 30 (-1.1) cleaning”. -
Page 41: Disposal
Separate the machine into metal, electronics, wiring, hoses, insulation and plastic parts. Your Atlas Copco solar light tower consists for the most part of metallic materials, that can be remelted Dispose all components according to the applicable in steelworks and smelting works and that is therefore disposal regulations. -
Page 42: Technical Specifications Of The Solar Light Tower
Technical specifications of the solar light tower Technical specifications of the QLTS 4 STD units Relative air humidity Reference conditions Air inlet temperature 25°C Maximum ambient temperature 50°C Limitations Maximum relative air humidity Batteries (AGM) Performance data Battery rated power 800 Ah System Voltage 24 VDC... -
Page 43: Technical Specifications Of The Qlts 6
Technical specifications of the QLTS 6 STD units Relative air humidity Reference conditions 1) Air inlet temperature 25°C Maximum ambient temperature 50°C Limitations 2) Maximum relative air humidity Batteries (AGM) Performance data 2) 3) 5) Battery rated power 800 Ah System Voltage 24 VDC Power draw... -
Page 44: Technical Specifications Of The Qlts 8
Technical specifications of the QLTS 8 STD units Relative air humidity Reference conditions 1) Air inlet temperature 25°C Maximum ambient temperature 50°C Limitations 2) Maximum relative air humidity Batteries (AGM) Performance data 2) 3) 5) Battery rated power 800 Ah System Voltage 24 VDC Power draw... -
Page 45: Lighting Area
Lighting area Choose the brightness and light distribution pattern that suits your needs. Following recommended light levels, based on Illuminating Engineering Society (IES) documents except were noted: – Parking lots, Hauling: 5-10 Lux – Minimum OHSA construction: 30-50 Lux – Full continous construction, Mining, Industrial yards: > 50 Lux - 45 -... -
Page 46: Conversion List Of Si Units Into British Units
Conversion list of SI units Datap late Name of manufacturer into British units EEC or national type approved number Model number 1 bar 14.504 psi Apparant power - PRP 0.035 oz Nominal rated voltage 1 kg 2.205 lbs Manufacturing year 1 km/h 0.621 mile/h Machine type... - Page 47 Circuit diagrams - 47 -...
- Page 48 Comprehensive wiring schematic BACK LITE MOMENTARY SWITCH LT-5 LT-1 LT-2 LT-6 (-) BLK 8AWG SOLAR ARRAY LT-7 LT-3 LT-4 LT-8 INPUT 216-264 VAC (47-63Hz) (+) RED 8AWG OUTPUT VOLTAGE 27.0 VDC, 40 AMPS LED LIGHT ARRAY (-) BLK 8AWG FUSE INDIVIDUAL CABLES 8AWG...
Need help?
Do you have a question about the QLTS 4 ESF and is the answer not in the manual?
Questions and answers