LG M6100 User Manual
Hide thumbs
Also See for M6100:
- User manual (203 pages) ,
- Service manual (160 pages) ,
- Brochure (8 pages)
Table of Contents
Advertisement
Available languages
Available languages
Quick Links
Advertisement
Chapters
Table of Contents

Related Manuals for LG M6100


Summary of Contents for LG M6100
- Page 1 E N G L I S H M 6 1 0 0 MANUAL DO UTILIZADOR M 6 1 0 0 MANUAL DO UTILIZADOR LG Electronics Inc. Alguns conteúdos deste manual poderão diferir do seu telemóvel, dependendo do respectivo software ou do seu fornecedor de serviços.
- Page 2 M 6 1 0 0 MANUAL DO UTILIZADOR Alguns conteúdos deste manual poderão diferir do seu telemóvel, dependendo do respectivo software ou do seu fornecedor de serviços.
-
Page 3: Table Of Contents
ÍNDICE INTRODUÇÃO SELECÇÃO DE FUNÇÕES E OPÇÕES DIRECTRIZES PARA UMA UTILIZAÇÃO PERFIS SEGURA E EFICIENTE Activar Personalizar CARACTERÍSTICAS DO M6100 Renomear Sobre o telemóvel Informações do ecrã REG.DE CHAM. Cham. perdidas INTRODUÇÃO Cham. recebidas Instalar o cartão SIM e a bateria Cham. - Page 4 ORGANIZER DEFINIÇÕES Contactos Data & Hora Calendário Def. do telef. Notas Def. de cham. Def. segurança MENSAGENS Def. de rede Nova Msg Def. de GPRS Msg recebidas Repor definições Msg enviadas Estado da Mem. Rascunhos SERVIÇOS Ouvir Voice-mail Msg de difusão (Mensagem difusão) Internet Modelos Serviço SIM...
-
Page 5: Introdução
INTRODUÇÃO Parabéns pela compra do avançado e compacto telemóvel M6100, concebido para funcionar com a mais recente tecnologia de comunicações móveis digitais. Este manual do utilizador contém informações importantes sobre o uso e funcionamento deste telemóvel. Leia todas as informações cuidadosamente para o máximo de desempenho e para evitar... -
Page 6: Directrizes Para Uma Utilização Segura E Eficiente
Informações sobre a exposição a ondas de rádio e gramas de tecido. a Velocidade Específica de Absorção (VEA) Este modelo de telemóvel M6100 foi concebido para • O valor mais alto da VEA para este modelo de estar conforme os requisitos de segurança telemóvel, testado pela DASY4 para utilização no... - Page 7 DIRECTRIZES PARA UMA UTILIZAÇÃO SEGURA E EFICIENTE • Não desmonte esta unidade. Leve-a a um técnico • Não bata no ecrã com objectos pontiagudos, ou, qualificado da assistência quando necessitar de pode danificar o telemóvel. ser reparada. • Não exponha o telemóvel a líquidos ou humidade. •...
- Page 8 Segurança na estrada Área de explosão Verifique as leis e regulamentações quanto à Não use o telemóvel em locais onde estejam a utilização de telemóveis nas áreas onde conduz. decorrer explosões. Respeite as regulamentações e siga eventuais indicações ou regras. •...
- Page 9 DIRECTRIZES PARA UMA UTILIZAÇÃO SEGURA E EFICIENTE • Utilize apenas baterias e carregadores LG. Os Crianças carregadores LG foram concebidos para Mantenha o telemóvel num local seguro e fora do maximizar a vida da bateria. alcance de crianças. O telemóvel contém peças •...
-
Page 10: Características Do M6100
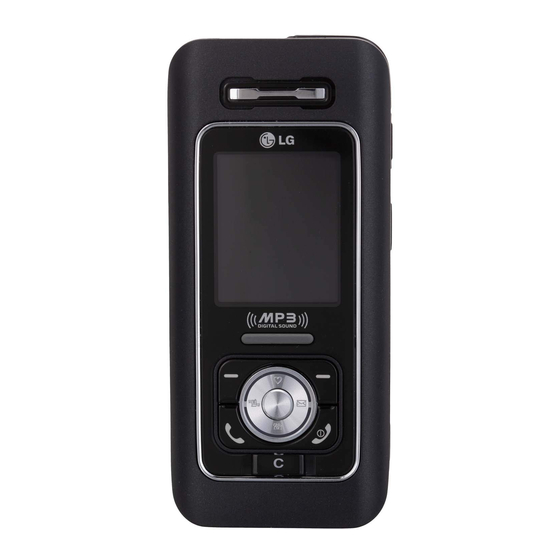
CARACTERÍSTICAS DO M6100 Sobre o telemóvel Parte anterior Vista lateral direita 1. Teclas laterais para cima/para baixo 3. Conector de auscultadores • Controla o volume do tom do teclado em modo • Ligue os auscultadores aqui. standby com o telemóvel aberto/fechado. - Page 11 CARACTERÍSTICAS DO M6100 Parte de trás 1. Objectiva da câmara A existência de sujidade na objectiva da câmara poderá afectar a qualidade da imagem. 2. Flash 3. Orifícios para uma correia de transporte 4. Fecho da bateria Prima este botão para retirar a tampa da bateria.
- Page 12 Vista do telemóvel aberto Nota Para evitar dificuldades de audição durante a chamada, utilize o telemóvel aberto. 1. Auscultador 2. Tecla de atalho esquerda Executa a função indicada pelo texto que é apresentado no ecrã imediatamente anterior. 3. Tecla de envio Marca um número de telemóvel e atende chamadas recebidas.
- Page 13 CARACTERÍSTICAS DO M6100 5. Microfone 9. Tecla de confirmação Pode ser silenciado durante uma chamada para Selecciona as opções do menu e confirma as proporcionar privacidade. acções. 6. Ecrã principal 10. Tecla Terminar/Alimentação Apresenta os ícones de estado do telemóvel, os Utilizada para terminar ou rejeitar uma chamada, itens do menu, informações da Web, imagens e...
-
Page 14: Informações Do Ecrã
Informações do ecrã Ícone Descrição A tabela seguinte descreve os vários indicadores Indica que está a utilizar outra rede. ou ícones do ecrã, que são apresentados no ecrã Indica que o serviço de GPRS está de apresentação do telemóvel. disponível. Ícones do ecrã... - Page 15 CARACTERÍSTICAS DO M6100 Ícone Descrição Indica que o telemóvel está a aceder ao serviço WAP. Indica que está a utilizar o serviço GPRS. Definida marcação na agenda. Serviço de desvio de chamadas activado. Bluetooth activado. Nota • Quando o estado da bateria for fraco, não poderá...
-
Page 16: Introdução
INTRODUÇÃO Instalar o cartão SIM e a bateria 2. Instale o cartão SIM. Introduza o cartão SIM no respectivo Certifique-se de que o telemóvel está desligado compartimento. Deslize o cartão SIM para o antes de retirar a bateria. respectivo compartimento. Certifique-se de que o cartão SIM está... -
Page 17: Carregar A Bateria
INTRODUÇÃO 1. Com a seta virada para si, tal como é indicado na 3. Instale a bateria. figura, introduza a ficha do carregador da bateria na entrada situada na parte inferior do telemóvel até ficar posicionado com um clique. 2. Ligue a outra extremidade do carregador de viagem à... -
Page 18: Desligar O Carregador
2. Retire o carregador da tomada eléctrica. Desligue Aviso! o carregador do telemóvel, premindo as patilhas • Desligue o fio de alimentação e o carregador cinzentas de ambos os lados do conector e durante a ocorrência de tempestades para puxando-o para fora. evitar choques eléctricos ou incêndios. -
Page 19: Ligar E Desligar O Telemóvel
INTRODUÇÃO Ligar e desligar o telemóvel Códigos de acesso Poderá utilizar os códigos de acesso descritos nesta Ligar o telemóvel secção para evitar a utilização não autorizada do 1. Coloque uma bateria no telemóvel e ligue-o a uma telemóvel. Os códigos de acesso (excepto os fonte de alimentação externa, tal como o códigos PUK e PUK2) podem ser alterados através carregador de viagem, o isqueiro do automóvel ou... - Page 20 Código PIN2 (4 a 8 dígitos) Código de segurança (4 a 8 dígitos) O código PIN2, fornecido com alguns cartões SIM, é O código de segurança protege o telemóvel contra necessário para aceder a funções, tais como Aviso utilização não autorizada. O código de segurança de custos de chamada e Número de marcação fixo.
-
Page 21: Funções Gerais
FUNÇÕES GERAIS Efectuar e atender chamadas Fazer chamadas internacionais 1. Prima e mantenha premida a tecla 0 para o Fazer uma chamada indicativo internacional. O caracter ‘+’ pode ser 1. Certifique-se de que o seu telemóvel está ligado. substituído pelo código de acesso internacional. 2. -
Page 22: Ajustar O Volume
1. Para atender uma chamada, abra o telemóvel. Ajustar o volume (Quando a opção Abertura tiver sido definida Se pretender ajustar o volume do auscultador como o modo de atendimento. [Menu 7.3.2]) durante uma chamada, utilize as teclas laterais ([) . Prima a tecla lateral para cima para aumentar e a Nota tecla para baixo para diminuir o volume. -
Page 23: Introdução De Texto
FUNÇÕES GERAIS Modo silencioso (Rápido) Modo T9 Pode activar o modo silencioso premindo sem soltar Este modo permite-lhe introduzir palavras apenas a tecla L depois de abrir o telemóvel. com um toque da tecla por letra. Cada tecla do teclado tem mais do que uma letra. O modo T9 Força do sinal compara automaticamente as pressões das teclas Pode verificar a intensidade do sinal através do... - Page 24 Modo 123 (modo numérico) Utilizar o Modo T9 Digite os números utilizando uma pressão de tecla O modo de introdução de texto previsivo T9 permite- por número. Para passar para o modo 123 num lhe introduzir facilmente palavras com um número campo de introdução de texto, prima a tecla # mínimo de pressões de teclas.
- Page 25 FUNÇÕES GERAIS • Se a palavra ainda estiver incorrecta depois de 3. Complete cada palavra com um espaço premindo a tecla 0. Para apagar letras, prima C. Prima a digitar completamente, prima a tecla de sem soltar C para apagar palavras inteiras. navegação para baixo uma ou mais vezes para navegar pelas outras opções de palavras.
-
Page 26: Menu De Chamada
Utilizar o Modo 123 (numérico) Nota O Modo 123 permite-lhe introduzir números numa Consulte a tabela seguinte para mais mensagem de texto (um número de telefone, por informações sobre os caracteres disponíveis exemplo). utilizando as teclas. Prima as teclas correspondentes aos algarismos necessários antes de voltar manualmente ao modo Caracteres pela ordem de apresentação Tecla... - Page 27 FUNÇÕES GERAIS Durante uma chamada Atender uma chamada O menu apresentado no ecrã do telemóvel durante Para atender uma chamada quando o telemóvel tocar, basta premir a tecla S O telemóvel também uma chamada é diferente do menu principal predefinido quando está em standby, e as opções pode avisá-lo da recepção de uma chamada encontram-se descritas a seguir.
- Page 28 Rejeitar uma chamada Activar toques DTMF durante uma chamada Pode rejeitar uma chamada sem a atender, Para activar os toques DTMF durante uma chamada, bastando premir a tecla E. prima a tecla de atalho esquerda e seleccione DTMF activado. Os toques DTMF podem ser desligados da Durante uma chamada, pode rejeitar uma chamada mesma forma.
- Page 29 FUNÇÕES GERAIS Estas opções estão tudo disponíveis no Menu de Colocar uma chamada em conferência em chamada. O número máximo de chamadas em espera conferência é de cinco. Depois de começar, tem o Prima a tecla de atalho esquerda e seleccione controlo sobre a chamada em conferência e apenas Conferência/Reter todas as chamadas.
- Page 30 Efectuar uma chamada privada durante uma chamada em conferência Para fazer uma chamada privada com um emissor da chamada em conferência, mostre o número do emissor com quem pretende falar, depois prima a tecla de atalho esquerda. Seleccione Conferência/Privado para colocar todas as outras chamadas em espera.
-
Page 31: Árvore Do Menu
ÁRVORE DO MENU 1 PERFIS 3 FERRAMENTAS 5 MENSAGENS 1 Apenas vibrar 1 Despertador 1 Nova Msg 2 Silencioso 2 Bluetooth 2 Msg recebidas 3 Geral 3 Calculadora 3 Msg enviadas 4 Alto 4 Conversor 4 Rascunhos 5 Auriculares 5 Fuso horário 5 Ouvir Voice-mail 6 Modem 6 Msg de difusão... - Page 32 6 MULTIMÉDIA 7 DEFINIÇÕES 8 SERVIÇOS 1 MP3 1 Data & Hora 1 Internet 2 Câmara 2 Def. do telef. 2 Serviço SIM 3 Câmara vídeo 3 Def. de cham. 4 Minhas fotos 4 Def. segurança 5 Meus vídeos 5 Def. de rede 6 Grav.
-
Page 33: Selecção De Funções E Opções
SELECÇÃO DE FUNÇÕES E OPÇÕES O seu telemóvel oferece um conjunto de funções que lhe permitem personalizar o telemóvel. Estas Menu Contactos funções estão organizadas por menus e submenus, acessíveis através das duas teclas de atalho assinaladas como [<] e [>]. Cada menu e submenu permitem-lhe visualizar e alterar as definições de uma determinada função. -
Page 34: Perfis
PERFIS Em Perfis, pode ajustar e personalizar os toques do • Tipo aviso cham.: defina o tipo de aviso para as telemóvel para diferentes eventos, ambientes ou chamadas recebidas. grupos de contactos. • Toque de cham.: seleccione o toque pretendido a Existem cinco perfis predefinidos: Apenas vibrar, partir da lista. -
Page 35: Renomear
PERFIS 1. Para alterar o nome de um perfil, navegue até ao • Vol. tom de On/Off: defina o volume do toque ao ligar/desligar o telemóvel. perfil na lista de perfis e, depois de premir a tecla de atalho esquerda < ou a tecla OK, seleccione •... -
Page 36: Reg.de Cham
REG.DE CHAM. Pode verificar o registo de chamadas perdidas, Cham. recebidas Menu 2.2 chamadas recebidas e chamadas efectuadas, Esta opção permite-lhe ver as 10 últimas chamadas apenas se a rede suportar a identificação de recebidas. Também pode: chamadas (CLI) na área de serviço. •... -
Page 37: Repor Reg. Cham
REG.DE CHAM. Repor reg. cham. • Repor tudo: permite limpar a duração de todas as Menu 2.4 chamadas premindo a tecla de atalho esquerda < Permite eliminar listas de Chamadas perdidas, de [OK]. Chamadas recebidas e efectuadas. Pode eliminar Custos cham. de uma só... -
Page 38: Info. Gprs
• Exibição autom.: este serviço de rede permite visualizar automaticamente o custo das últimas chamadas. Se estiver definido como On, pode visualizar o último custo quando a chamada for terminada. Info. GPRS Menu 2.6 Pode verificar a quantidade de dados transferidos na rede através da opção de informações GPRS. -
Page 39: Ferramentas
FERRAMENTAS Ao receber dados de outro dispositivo Bluetooth, o Despertador Menu 3.1 telemóvel solicita uma confirmação. Após confirmar Pode definir a activação a uma hora específica de a transferência , o ficheiro é copiado para o seu até 5 alarmes. telemóvel. -
Page 40: Calculadora
2. Utilize uma tecla de navegação para seleccionar um Disp. emparelhados Menu 3.2.1 sinal para cálculo. Pode ver todos os dispositivos que são compatíveis 3. De seguida, introduza os números. com o seu telemóvel Bluetooth. 4. Pressione a tecla O para visualizar o resultado. Disp. -
Page 41: Fuso Horário
FERRAMENTAS 1. Pode seleccionar um dos sete tipos de unidades premindo a tecla [OK]. 2. Seleccione a unidade que pretende converter premindo 3. Seleccione a unidade através das teclas de navegação Fuso horário Menu 3.5 Pode visualizar fusos horários das principais cidades do mundo. -
Page 42: Organizer
ORGANIZER Contactos • Editar: pode editar o nome, número, grupo, Menu 4.1 carácter e imagem utilizando a tecla de navegação. Nota • Escrever SMS/MMS: após encontrar o número No modo standby, prima a tecla de atalho direita pretendido, pode enviar uma mensagem de >... - Page 43 ORGANIZER Adic. novo Grupos cham. Menu 4.1.2 Menu 4.1.3 Pode adicionar uma entrada à lista telefónica Pode adicionar até 20 membros por grupo, até um utilizando esta função. A memória do telemóvel tem máximo de 7 grupos no total. uma capacidade de 1000 entradas. A capacidade da •...
- Page 44 1. Primeiro, abra a lista telefónica premindo a tecla - Se seleccionar Variável, ao adicionar a entrada, de atalho direita > [Contactos] no modo ser-lhe-á perguntado se pretende armazená-la no cartão SIM ou no telefone. standby. - Se seleccionar SIM ou Telefone, o telemóvel 2.
- Page 45 ORGANIZER 2. Seleccione a memória que pretende apagar e 2. Desloque-se para Copiar tudo e prima a tecla de prima a tecla de atalho esquerda < [OK]. atalho esquerda < [OK] para aceder a este menu. 3. Introduza o código de segurança e prima a tecla de atalho esquerda <...
-
Page 46: Calendário
A data actual estará destacada a azul e as marcações • Estado da Mem. ou notas estarão indicados com um triângulo vermelho Esta característica permite visualizar quantos no canto superior esquerdo do quadrado campos estão livres e em utilização na lista de correspondente. -
Page 47: Notas
ORGANIZER Ver compromissos diários Notas Menu 4.2.2 Menu 4.3 Pode consultar os detalhes, com o conteúdo 1. Seleccione Notas premindo a tecla de atalho completo do compromisso configurado por si. esquerda < [OK]. 2. Se a entrada estiver vazia, adicione informações Eliminar último Menu 4.2.3 premindo a tecla de atalho esquerda <... -
Page 48: Mensagens
MENSAGENS Assim que existir espaço na memória de Prima a tecla Menu (<) e seleccione Mensagens mensagens, serão recebidas todas as mensagens utilizando as teclas de navegação. SMS que não tenham sido recebidas (desde que exista espaço suficiente disponível). Nova Msg Menu 5.1 1. - Page 49 MENSAGENS 3. Poderá também enviar anexos com a mensagem, • Guard. em rascunhos: Permite guardar a mensagem de forma a poder enviá-la mais premindo a tecla de atalho direita [Inserir], tarde. enquanto escreve a mensagem. • Tipo de letra: Define o tamanho e o estilo do tipo •...
- Page 50 4. Prima a tecla de atalho esquerda [Opções]. Estão Escrever MMS Menu 5.1.2 disponíveis as seguintes opções: Uma mensagem MMS pode conter texto, imagens • Enviar: Suporta vários números e endereços de e/ou clips de áudio. Esta função apenas pode ser correio electrónico.
-
Page 51: Msg Recebidas
MENSAGENS Na Caixa de entrada, pode identificar cada • Adic. dicionário T9: pode adicionar as suas próprias palavras. Este menu será apenas mensagem pelos ícones. Para mais detalhes, apresentado quando o modo de edição estiver consulte as instruções dos ícones. definido como T9ABC/T9Abc/T9abc. - Page 52 • Eliminar tudo: pode eliminar todas as mensagens. Mensagem SIM Opções específicas de MMS Mensagem SIM significa que a mensagem está, • Repetir: Permite repetir a reprodução da MMS excepcionalmente, guardada no cartão SIM. Pode mover esta mensagem para o telemóvel. seleccionada.
-
Page 53: Msg Enviadas
MENSAGENS Msg enviadas • Eliminar: pode eliminar a mensagem actual. Menu 5.3 • Informação: pode visualizar informações sobre Pode visualizar as mensagens enviadas e por enviar mensagens na caixa de saída, Endereço do aqui. Pode visualizar o estado de entrega das destinatário, Assunto (apenas para MMS), Data e mensagens enviadas. -
Page 54: Rascunhos
Rascunhos O símbolo é apresentado no seu ecrã quando Menu 5.4 receber uma nova mensagem de voz. Consulte o Com este menu, pode predefinir até cinco seu fornecedor de rede para saber os detalhes do mensagens que utilize com maior frequência. Este serviço de forma a configurar correctamente o menu apresenta a lista de mensagens predefinidas. -
Page 55: Modelos
MENSAGENS Modelos SMS Menu 5.6.1 Menu 5.7.1 Quando recebe uma mensagem de serviço • Por favor, ligue-me de volta. informativo e selecciona Ler para ver a mensagem, • Estou atrasado(a) estarei aí às a mensagem é apresentada no ecrã. • Onde estás agora? Tópicos Menu 5.6.2 •... -
Page 56: Definições
Modelos MMS Definições Menu 5.7.2 Menu 5.8 Pode utilizar as opções seguintes. Menu 5.8.1 • Ver: Apresenta mensagem seleccionada. • Tipos de Msg: Texto, Voz, Fax, Paging nacional, • Eliminar: Elimina o modelo. X.400, E-mail, ERMES • Adicionar novo: Utilize esta opção para criar um Normalmente, o tipo de mensagem está... - Page 57 MENSAGENS • Centro Msg SMS: se pretender enviar a • Def. de rede: se seleccionar servidor de MMS, mensagem de texto, pode receber o endereço do pode definir o URL para o servidor de MMS. centro de SMS através deste menu. •...
- Page 58 Msg de difusão Menu 5.8.4 • Recepção Sim: se seleccionar este menu, o seu telemóvel recebe Mensagens de serviço informativo. Não: se seleccionar este menu, o seu telemóvel não volta a receber Mensagens de serviço informativo. • Alerta Sim: o telemóvel emite um bip quando recebe números de Mensagens de serviço informativo.
-
Page 59: Multimédia
MULTIMÉDIA • AAC+: V1 : (Velocidade de transmissão Menu 6.1 de16~128Kbps) O M6100 possui um leitor de MP3 integrado. Pode V2 : (Velocidade de transmissão de ouvir ficheiros de música MP3 na memória do 16~48Kbps) telefone, utilizando auscultadores compatíveis ou (Frequência de amostragem de 8KHz a... - Page 60 Pode transferir ficheiros MP3 de um PC compatível • Ver lista: Pode ver a lista de música enquanto ouve música. para a memória do telefone, utilizando o Armazenamento em massa. Ao ligar o telemóvel a • Repetir área: A área particular da música actual um computador através do cabo USB (fornecido no é...
-
Page 61: Câmara
MULTIMÉDIA Lista de reprodução Câmara Menu 6.1.2 Menu 6.2 Este menu permite ver a lista de reprodução Esta aplicação permite tirar uma fotografia. Pode completa. Pode mudar a faixa premindo a tecla de tirar uma fotografia com o tamanho pretendido e navegação Além disso, se seleccionar o menu de utilizá-la como fotografia dos contactos, ecrã... -
Page 62: Câmara Vídeo
• Efeito: Determina o efeito especial a aplicar na • Qualidade: Determina a qualidade do clip de fotografia. vídeo. • Flash: Determina o funcionamento do flash. • Equilíbrio dos brancos: Permite alterar as definições de acordo com o ambiente. • Zoom: Determina a taxa de zoom. •... -
Page 63: Meus Vídeos
MULTIMÉDIA • Enviar por Bluetooth: Pode enviar uma imagem • Renomear: Pode editar o título do vídeo. por Bluetooth. • Eliminar: Pode eliminar o vídeo. • Escrever MMS: Pode enviar uma imagem por • Eliminar tudo: Pode eliminar todos os vídeos. MMS. -
Page 64: Definições
Ver lista Menu 6.6.2 O telemóvel apresenta a lista de notas de voz. Pode Reproduzir, Enviar por MMS e Eliminar a nota de voz gravada. Definições Menu 6.7 Câmara Menu 6.7.1 • Grav. Autom.: Se definir como Sim, as imagens serão guardadas automaticamente sem apresentar a barra de menus para guardar. -
Page 65: Definições
DEFINIÇÕES Pode definir os menus seguintes em função das Def. do telef. Menu 7.2 suas preferências e conveniência. Pode definir funções relativas ao telemóvel. 1. Prima < [Menu] no modo standby. Def. do visor 2. Prima 7 para aceder directamente às Menu 7.2.1 Definições. -
Page 66: Def. De Cham
Config. do tema • Se ocupado Menu 7.2.2 Desvia as chamadas de voz quando o telemóvel Permite seleccionar um dos temas predefinidos. está ocupado. Idioma Menu 7.2.3 • Se não atender Pode alterar o idioma para os textos no ecrã no seu Desvia as chamadas de voz que não atende. - Page 67 DEFINIÇÕES • Activar • Qualquer tecla Activa o serviço correspondente. Se seleccionar este menu, pode receber uma chamada premindo qualquer tecla, excepto a P/ Voice-mail tecla E [Terminar]. Reencaminha para centro de mensagens. Esta • Tecla de envio função não é apresentada nos menus Todas as Se seleccionar este menu, pode receber uma chamadas de dados e Todas as chamadas de fax.
-
Page 68: Def. Segurança
Cham. em espera • Off Menu 7.3.4 (depende da rede) O seu telemóvel não efectua quaisquer tentativas de remarcação quando a chamada original não é • Activar estabelecida. Se seleccionar Activar, pode aceitar uma chamada em espera (a receber). Def. segurança Menu 7.4 •... - Page 69 DEFINIÇÕES 5. Pode introduzir o código PUK até 10 vezes. Se • Tds efectuadas introduzir o código PUK errado mais do que 10 O serviço de barramento para todas as chamadas vezes, não conseguirá desbloquear o seu telemóvel. efectuadas. Terá de contactar o seu fornecedor de serviços. •...
-
Page 70: Def. De Rede
Os submenus: • Lista de núms. Pode visualizar a lista de números guardados • Activar como Número de marcação fixo. Permite pedir à rede para activar a restrição de chamadas. Alterar códigos Menu 7.4.6 • Cancelar PIN é a abreviatura do Número de Identificação Desactivar a restrição de chamadas Pessoal (Personal Identification Number) para seleccionada. -
Page 71: Def. De Gprs
DEFINIÇÕES Selec. de rede Selec. de banda Menu 7.5.1 Menu 7.5.2 Utilize esta opção para seleccionar a banda de • Automático rede entre duas opções, EGSM/DCS (900/1800) ou Se seleccionar o modo Automático, o telemóvel Só PCS. procura e selecciona automaticamente uma rede por si. -
Page 72: Serviços
SERVIÇOS Pode aceder a vários serviços WAP (Protocolo de Utilizar as teclas do telemóvel Aplicações sem Fios – Wireless Application Quando navega na Internet, as teclas do telemóvel Protocol) tais como, por exemplo, bancos, notícias, têm um funcionamento diferente do modo de boletins meteorológicos, e informações de voos. -
Page 73: Internet
SERVIÇOS Internet Menu 8.1 Sugestão: utilize a tecla “1” e a tecla * para introduzir Home page Menu 8.1.1 símbolos. Para introduzir “.”, prima“1”. Liga a uma página inicial. A página inicial é o site que está definido no perfil activado. Será definida Depois de seleccionar um favorito pretendido, estão pelo fornecedor de serviços, caso não a tenha disponíveis as seguintes opções:... - Page 74 Definições - Portador: pode definir o serviço de dados do Menu 8.1.4 portador. Perfis 1 Dados Um perfil é constituído pelas informações de rede 2 GPRS utilizadas para estabelecer a ligação à Internet. - Def. de dados: só é visualizado se seleccionar Cada perfil tem os seguintes submenus: as Definições de Dados como um Portador/serviço.
- Page 75 SERVIÇOS - Def. de GPRS: as definições do serviço só estão • Adic. novo: pode adicionar um novo perfil. disponíveis quando o GPRS é escolhido como • Eliminar: elimina o perfil seleccionado da lista. um serviço de portador. Cache APN: introduza o APN do GPRS. Defina um valor para determinar se uma tentativa ID do utilizador: a identificação do utilizador para o de ligação é...
-
Page 76: Serviço Sim
Serviço SIM Menu 8.2 (depende do SIM) O seu fornecedor de serviços pode oferecer aplicações especiais através do cartão SIM, tais como home banking, bolsa de valores, etc. Se estiver registado num destes serviços, será apresentado o nome do serviço no fundo do Menu principal. -
Page 77: Downloads
DOWNLOADS Jogos & Aplicações - Sempre: a ligação é criada imediatamente sem Menu 9.1 uma notificação. Jogos & Aplicações Menu 9.1.1 - Perguntar: é-lhe feita a pergunta antes de a aplicação estabelecer a ligação. Neste menu pode gerir as aplicações Java instaladas no seu telemóvel. -
Page 78: Imagens
Cuidado • O ficheiro JAR é um formato comprimido do programa Java e o ficheiro JAD é um ficheiro Apenas programas desenvolvidos com base em de descrição que inclui todas as informações J2ME (Micro Edição Java 2- Java 2 Micro em detalhe. -
Page 79: Sons
DOWNLOADS Sons Conectividade USB Menu 9.3 O M6100 pode ser ligado a um computador através A tecla de atalho esquerda < [Opções] apresenta de um cabo USB, de forma a transferir ficheiros, as seguintes opções. conteúdos e utilizar o modem incorporado. Pode •... - Page 80 1. Com o telemóvel no ecrã de standby, ligue o cabo - Photos: Esta pasta é reservada para as fotografias tiradas com a câmara digital do USB ao telemóvel e ao computador. O telemóvel. Pode transferir as fotografias do computador irá identificar o periférico após telemóvel para o computador utilizando os alguns segundos.
- Page 81 DOWNLOADS - Vídeos: Pode transferir para esta pasta do Programas de computador e Internet computador os vídeos gravados com a câmara Pode ligar o telemóvel ao seu computador para digital do telemóvel e carregar novos vídeos no gerir os seus contactos da lista telefónica, carregar telemóvel.
-
Page 82: Acessórios
PC para trocar os dados entre os dois. Nota • Utilize sempre acessórios LG autênticos. • Caso não o faça pode invalidar a garantia. • Os acessórios podem diferir de região para região; contacte a nossa empresa ou agente de serviços na... -
Page 83: Dados Técnicos
DADOS TÉCNICOS Geral Nome do produto : M6100 Sistema : GSM 900 / DCS 1800 / PCS 1900 Temperaturas ambiente Máx : +55°C (a descarregar) +45°C (a carregar) Mín : -10°C... - Page 85 Nota...
- Page 86 M 6 1 0 0 USER GUIDE Some of contents in this manual may differ from your phone depending on the software of the phone or your service provider.
- Page 87 TABLE OF CONTENTS INTRODUCTION SELECTING FUNCTIONS AND OPTIONS GUIDELINES FOR SAFE AND EFFICIENT USE PROFILES Activate M6100 FEATURES Personalise Parts of the phone Rename Display Information CALL REGISTER GETTING STARTED Missed calls Installing the SIM card and battery Received calls...
- Page 88 ORGANISER SETTINGS Contacts Date & Time Calendar Phone settings Memo Call settings Security settings MESSAGES Network settings New message GPRS setting Inbox Reset settings Outbox Memory status Drafts SERVICE Listen to voice mail Info message Internet Templates SIM service Settings DOWNLOADS MULTIMEDIA Games &...
-
Page 89: Introduction
INTRODUCTION Congratulations on your purchase of the advanced and compact M6100 mobile phone, designed to operate with the latest digital mobile communication technology. This user guide contains important information on the use and operation of this phone. Please read all the information carefully for optimal performance and to prevent any damage to or misuse of the phone. -
Page 90: Guidelines For Safe And Efficient Use
• While there may be differences between the SAR these guidelines may be dangerous or illegal. levels of various LG phone models, they are all Further detailed information is given in this manual. designed to meet the relevant guidelines for exposure to radio waves. - Page 91 GUIDELINES FOR SAFE AND EFFICIENT USE • The unit should be kept away from heat sources Electronics devices such as radiators or cookers. All mobile phones may get interference, which • Do not drop. could affect performance. • Do not subject this unit to mechanical vibration or •...
- Page 92 • RF energy may affect some electronic systems in In aircraft your motor vehicle such as car stereo or safety Wireless devices can cause interference in aircraft. equipment. • Turn off your mobile phone before boarding any • When your vehicle is equipped with an air bag, do aircraft.
- Page 93 Unlike other battery systems, there is no memory effect that could compromise the battery’s performance. • Use only LG batteries and chargers. LG chargers are designed to maximize the battery life. • Do not disassemble or short-circuit the battery pack.
-
Page 94: M6100 Features
M6100 FEATURES Parts of the phone Front view Right side view 1. Up/down side keys 3. Headset jack • Controls the volume of keypad tone in standby • Connect a headset here. mode with the phone open. 4. Camera/MP3 key •... - Page 95 M6100 FEATURES Rear view 1. Camera lens Dirt on the camera lens could affect the image quality. 2. Flash 3. Holes for a carrying strap 4. Battery latch Press this button to remove the battery cover. 5. Battery pack 6. SIM card socket 7.
- Page 96 Open view Note To prevent the difficulty in hearing of the other side, slide open while using phone. 1. Earpiece 2. Left soft key Performs the function indicated by the text on the screen immediately above it. 3. Send key Dials a phone number and answers incoming calls.
- Page 97 M6100 FEATURES 5. Microphone 9. Confirm key Can be muted during a call for privacy. Selects menu options and confirms actions. 6. Main screen 10. End/Power key Displays phone status icons, menu items, Web Used to end a call or reject a call and also to go information, pictures and more in full colour.
-
Page 98: Display Information
Display Information Icon Description The table below describes various display Indicates that you are roaming on indicators or icons that appear on the phone’s another network. display screen. Indicates that GPRS service is available. On-Screen Icons Indicates the alarm has been set and Icon Description is on. - Page 99 M6100 FEATURES Icon Description Indicates the General profile is activated. Indicates that the phones is accessing WAP. Indicates that you are using GPRS. Agenda event set Call divert service active Bluetooth enabled Note • When the status of the battery indicates low, you may not use Camera or Multimedia function.
-
Page 100: Getting Started
GETTING STARTED Installing the SIM card and 2. Install the SIM card. Insert the SIM card into the holder. Slide the SIM battery card into the SIM card holder. Make sure that the SIM card is inserted properly and that the gold Make sure the power is off before you remove the contact area on the card is facing downwards. -
Page 101: Charging The Battery
GETTING STARTED 1. With the arrow facing you as shown in the 3. Install the battery. diagram push the plug on the battery adapter into the socket on the bottom of the phone until it clicks into place. 2. Connect the other end of the mains adapter to the mains socket. -
Page 102: Disconnecting The Adapter
Warning • Unplug the power cord and charger during lightning storms to avoid electric shock or fire. • Make sure that no sharp-edged items such as animal teeth or nails come into contact with the battery. There is a risk of this causing a fire. -
Page 103: Turning Your Phone On And Off
GETTING STARTED Turning your phone on and off Access codes You can use the access codes described in this Turning your phone ON section to avoid unauthorised use of your phone. 1. Install a battery to the handset and connect the The access codes (except PUK and PUK2 codes) phone to an external power source such as the can be changed by using the Change codes feature... - Page 104 PIN2 code (4 to 8 digits) Security code (4 to 8 digits) The PIN2 code, supplied with some SIM cards, is The security code protects the unauthorised use of required to access functions such as Advice of Call your phone. The default security code is set to ‘0000’ Charge and Fixed dial number.
-
Page 105: General Functions
GENERAL FUNCTIONS Making and answering calls Making an international call 1. Press and hold the 0 key for the international Making a call prefix. The ‘+’ character automatically selects the 1. Make sure your phone is switched on. international access code. 2. -
Page 106: Adjusting The Volume
Adjusting the volume Note If you want to adjust the earpiece volume during a If Press any key has been set as the answer mode any key press will answer a call except call, use the side keys ([) . Press the up side key to for the E or the right soft key. -
Page 107: Entering Text
GENERAL FUNCTIONS Entering text 123 mode (Number mode) Type numbers using one keystroke per number. You can enter alphanumeric characters by using To change to 123 mode in a text entry field, press the phone’s keypad. For example, storing names in the # key until 123 mode is displayed. - Page 108 You can also add new words in the dictionary. As mode. You can also turn off the T9 mode by selecting T9 off. The default setting on the phone new words are added, the word changes to reflect is T9 enabled mode. the most likely candidate from the dictionary.
-
Page 109: In-Call Menu
GENERAL FUNCTIONS 2. To insert a space, press the 0 key once. To Using the 123 (Number) mode delete letters, press the C key. Press and hold The 123 mode enables you to enter numbers in a down the C key to clear the whole display. text message (a telephone number, for example). - Page 110 Making a second call If Call waiting is activated, you can put the first call on hold and answer the second, by pressing S or You can get a number you wish to dial from the by selecting the left soft key, then Hold & Answer. phonebook to make a second call.
- Page 111 GENERAL FUNCTIONS Switching DTMF tones on during a call Making a second call To turn DTMF tones on during a call, press the left You can make a second call while currently on a call. Enter the second number and press the S key. soft key, and then select DTMF on.
- Page 112 Adding calls to the conference call Ending a conference call To add a call to an existing conference call, press The currently displayed caller from a conference call can be disconnected by pressing the E key. the left soft key, then select the Conference/Join all. To end a conference call, press the left soft key, Displaying callers in a conference call then select the Conference/End multiparty.
-
Page 113: Menu Tree
MENU TREE 1 PROFILES 3 TOOLS 5 MESSAGES 1 Vibrate only 1 Alarm clock 1 New message 2 Silent 2 Bluetooth 2 Inbox 3 General 3 Calculator 3 Outbox 4 Loud 4 Unit converter 4 Drafts 5 Headset 5 World time 5 Listen to voice mail 6 Modem 6 Info message... - Page 114 6 MULTIMEDIA 7 SETTINGS 8 SERVICE 1 MP3 1 Date &Time 1 Internet 2 Camera 2 Phone settings 2 SIM service 3 Video camera 3 Call settings 4 My photos 4 Security settings 5 My videos 5 Network settings 6 Voice Recorder 6 GPRS setting 7 Settings 7 Reset settings...
-
Page 115: Selecting Functions And Options
SELECTING FUNCTIONS AND OPTIONS Your phone offers a set of functions that allow you to customise the phone. These functions are Menu Names arranged in the menus and sub-menus, accessed via the two soft keys marked [<] and [>]. Each menu and sub-menu lets you view and alter the settings of a particular function. -
Page 116: Profiles
PROFILES In Profiles, you can adjust and customise the phone • Call alert type: Set the alert type for incoming tones for different events, environments, or caller calls. groups. • Ring tone: Select the desired ring tone from the There are five preset profiles: Vibrate only, Silent, list. -
Page 117: Rename
PROFILES • Power on/off volume: Set the volume of the ringing tone when switching the phone on/off. • Auto answer: This function will be activated only when your phone is connected to the headset. - Off: The phone will not answer automatically. - After 5 secs: After 5 seconds, the phone will answer automatically. -
Page 118: Call Register
CALL REGISTER You can check the record of missed, received, and Received calls Menu 2.2 dialled calls only if the network supports the Calling This option lets you view the last 10 incoming calls. Line Identification (CLI) within the service area. You can also: The number and name (if available) are displayed •... -
Page 119: Delete Recent Calls
CALL REGISTER • Send a message to this number • Dialled calls: Length of the outgoing calls. • Delete the call from the list • Reset all: Allows you to reset the timers of all calls by pressing the left soft key < [Yes ]. Delete recent calls Menu 2.4 Call costs... -
Page 120: Gprs Information
GPRS information Menu 2.6 You can check the amount of data transferred over the network through the GPRS information option. In addition, you can also view how much time you are online. Call duration Menu 2.6.1 You can check the duration of Last call and All calls. You can also reset the call timers. -
Page 121: Tools
TOOLS When you receive data from another Bluetooth Alarm clock Menu 3.1 device, the phone requests for a confirmation. After You can set up to 5 alarm clocks to go off at a confirming the transfer, the file will be copied in your specified time. -
Page 122: Calculator
3. Then input the numbers. My Devices Menu 3.2.1 4. Press O key to view the result. You can view all devices which are compatible with your Bluetooth phone. 5. To end Calculator, press the right soft key > [Back]. Handsfree devices Menu 3.2.2 Note... -
Page 123: World Time
TOOLS World time Menu 3.5 You can view clocks of the world’s major cities. 1. Select the city belonged to the time zone by pressing L , R key. 2. You can set the current time to the city time you select by pressing the left soft key <... -
Page 124: Organiser
ORGANISER Contacts • Write text/multimedia message: After you have Menu 4.1 found the number you want, you can send a text/multimedia message to the selected Note number. Press down on keypad [>] to access names • Send via Bluetooth: You can send the data of directly. - Page 125 ORGANISER 1. Select Add new by pressing the left soft key < • Group icon: Allows you to select the icon dependent on Group. [Select] or [OK]. • Add member: You can add group members. Each 2. Select the memory you want to save to: SIM or group should not exceed 20 members.
- Page 126 Settings Copy all Menu 4.1.5 Menu 4.1.6 1. Press the right soft > [Names] in standby mode. You can copy/move entries from SIM card memory to Phone memory and vice versa. 2. Scroll to Settings, then press the left soft key <...
-
Page 127: Calendar
ORGANISER 1. Press the right soft key > [Names] in standby • Memory status mode and select Delete all, press < [OK]. This feature allows you to see how many entries are in use, or free in your phonebook. 2. Highlight the memory you wish to erase, and then press the left soft key <... -
Page 128: Memo
To change the day, month, and year. Delete all Menu 4.2.4 You can delete all notes. Description Go to date Menu 4.2.5 Yearly * # 7 9 You can go to the chosen date directly. Monthly Weekly Set alarm tone Menu 4.2.6 Daily You can set the alarm tone. -
Page 129: Messages
MESSAGES 1. Key in your message. For details on how to enter text, Press the Menu key (<) and select Messages refer to page 24 through 26 (Entering Text). using navigation keys. 2. After you complete the message, to select the New message required option, press the left soft key [Options]. - Page 130 • Alignment: You can set the position of the • Sound: If available, you can attach a sound message – Right, Centre or Left. available for a short message. • Add T9 dictionary: You can add your own • Text templates: You can use text templates words.
- Page 131 MESSAGES 2. Add an image and/or sound. You can move to the • Set slide format next section using the up/down navigation. - Set timer: You can set the timer for slide, text, picture and sound. 3. You can add a slide by option menu using the left soft key.
-
Page 132: Inbox
Inbox Menu 5.2 SIM message You will be alerted when you have received SIM message means that the message is exceptionally stored in the SIM card. You can messages. They will be stored in the Inbox. move this message to the phone. In the Inbox, you can identify each message by icons. -
Page 133: Outbox
MESSAGES Specific MMS options Outbox Menu 5.3 • Repeat: Allows you to repeat reproduction of the You can see the sent and unsent messages here. selected multimedia message. For sent messages, you can see the delivery status. • Receive: (for multimedia message notification The browsing is same as that for the inbox message. -
Page 134: Drafts
This menu shows the preset multimedia message list. • Information: You can view information about outbox messages; Recipient’s address, Subject The following options are available. (only for Multimedia message), Message date & • View: You can see the multimedia messages. time, Message type, Message size. -
Page 135: Info Message
MESSAGES Info message Templates Menu 5.6 Menu 5.7 (Dependant to network and subscription) There are pre-defined messages in the list. You can view and edit the template messages or create new Info service messages are text messages sent by messages. Two types of templates are available: the network to mobile phone users. -
Page 136: Settings
• Write messages: To send via Text message or Settings Menu 5.8 Multimedia message. Text message Menu 5.8.1 • Edit: Use this to edit the selected template. • Message types: Text, Voice, Fax, Natl. paging, • Delete all: Deletes all templates. X.400, Email, ERMES Multimedia templates Menu 5.7.2... - Page 137 MESSAGES Multimedia message • Permitted message types Menu 5.8.2 Personal: Personal message. • Priority: You can set the priority of the message you choose. Advertisements: Commercial message. • Validity period: This network service allows you to Information: Necessary information. set how long your multimedia messages will be Voice mail centre Menu 5.8.3 stored at the message centre.
- Page 138 Info message Menu 5.8.4 • Receive Yes: If you select this menu, your phone will receive Info service messages. No: If you select this menu, your phone will not receive Info service messages any more. • Alert Yes: Your phone will beep when you have received Info service message numbers.
-
Page 139: Multimedia
• AAC+: V1 : (Bit rate 16~128Kbps) Menu 6.1 V2 : (Bit rate 16~48Kbps) The M6100 has an integrated MP3 player built-in. (Sampling frequency from 8KHz to 48KHz) You can enjoy listening to MP3 music files on your • MP4, M4A: Sampling frequency up from 8KHz to phone memory using a compatible headset or via 48KHz, Bit rate up to 320Kbps, stereo. - Page 140 • Set as ring tone: This menu allows to set the Note MP3 file as a ring tone. You can also set it as a • You should copy MP3 to my media\Music ring tone in Profile. folder. If you copy another folder, you cannot •...
-
Page 141: Camera
MULTIMEDIA Playlist Camera Menu 6.1.2 Menu 6.2 This menu allows to view the whole play list. You This application enables you to take a still picture. can move the track by pressing the navigation key. You can take a picture in your desired size, and use In addition, if you select option menu, you can delete it for the contacts photo, home screen and other more general purposes. -
Page 142: Video Camera
• Effect: Determines the special effect to the • Timer: Determines the delay time. picture. • Quality: Determines the quality of a video clip. • Flash: Determines the flash operation. • White Balance: Allows you to change the settings • Zoom: Determines the zoom rate. according to the environment. -
Page 143: My Videos
MULTIMEDIA • Send via Bluetooth: You can send a picture via • Rename: You can edit the title of video. Bluetooth. • Delete: You can delete the video. • Write multimedia messages: You can send a • Delete All: You can delete all the videos. picture via MMS. -
Page 144: Settings
View list Menu 6.6.2 The phone shows voice memo list. You can Playback, Send via multimedia and Delete the recorded voice memo. Settings Menu 6.7 Camera Menu 6.7.1 • Auto save: If you set On, the images will be saved automatically without displaying menu bar to save. -
Page 145: Settings
SETTINGS You can set the following menus for your Phone settings Menu 7.2 convenience and preferences. You can set functions relating to the phone. 1. Press < [Menu] in standby mode. Display settings 2. Press 7 for direct access to enter Settings. Menu 7.2.1 •... -
Page 146: Call Settings
Handset scheme • If busy Menu 7.2.2 Diverts voice calls when the phone is in use. Allows you to choose from one of the preset themes. • If no reply Diverts voice calls which you do not answer. Language Menu 7.2.3 •... - Page 147 SETTINGS • Activate • Press any key Activate the corresponding service. If you select this menu, you can receive a call by pressing any key except E [End] key. To voice mail centre • Send only Forwards to message centre. This function is not If you select this menu, you can receive a call by shown at All data calls and All fax calls menus.
-
Page 148: Security Settings
Call waiting • Off Menu 7.3.4 (network dependent) Your phone will not make any attempts to redial when the original call has not connected. • Activate If you select Activate, you can accept a waiting Security settings (receiving) call. Menu 7.4 •... - Page 149 SETTINGS 5. You can enter your PUK code up to 10 times. If you • All outgoing calls put wrong PUK code more than 10 times, you can The barring service for all outgoing calls. not unlock your phone. You will need to contact •...
-
Page 150: Network Settings
The submenus: • Number list You can view the number list saved as Fixed dial • Activate number. Allows to request the network to set call restriction on. Change codes Menu 7.4.6 • Cancel PIN is an abbreviation of Personal Identification Set the selected call restriction off. -
Page 151: Gprs Setting
SETTINGS Network selection Band selection Menu 7.5.1 Menu 7.5.2 Use this to set the network band between two • Automatic choices, GSM 900/1800 or GSM1900. If you select Automatic mode, the phone will automatically search for and select a network for you. -
Page 152: Service
SERVICE You can access various WAP (Wireless Application Using the phone keys Protocol) services such as banking, news, weather When surfing the Internet, the phone keys function reports and flight information. These services are differently to phone mode. specially designed for mobile phones and they are maintained by WAP service providers. -
Page 153: Internet
SERVICE Internet Menu 8.1 Tip: Use the “1” key and * key to enter Home Menu 8.1.1 symbols. To enter “.”, press “1”. Connects to a homepage. The homepage will be the site which is defined in the activated profile. It will After selecting a desired bookmark, the following be defined by the service provider if you have not options are available. - Page 154 Settings - Bearer: You can set the bearer data service. Menu 8.1.4 1 Data Profiles 2 GPRS A profile is the network information used to connect - Data settings: Appears only if you select Data to the Internet. Settings as a Bearer/service. Each profile has submenus as follows: Dial number: Enter the telephone number to dial to Note...
- Page 155 SERVICE - GPRS settings: The service settings are only • Delete: Deletes the selected profile from the list. available when GPRS is chosen as a bearer • Add new: You can add a new profile. service. Cache APN: Input the APN of the GPRS. Set a value whether a connection attempt is made User ID: The users identify for your APN server.
-
Page 156: Sim Service
SIM service Menu 8.2 (SIM dependent) Your service provider can offer special applications through the SIM card, such as home banking, stock market, etc. If you are registered for one of these services, the service name will appear at the end of the Main Menu. -
Page 157: Downloads
DOWNLOADS Games & Apps - Always: The connection is created immediately Menu 9.1 without a notification. Games & Apps Menu 9.1.1 - Prompt: You will be asked before the application makes the connection. In this menu, you can manage the Java applications installed in your phone. -
Page 158: Images
Profiles Menu 9.1.2 • The JAR file is a compressed format of the This menu contains the same settings of the Internet Java program and the JAD file is a description file that includes all detailed information. From menu. In fact, in order to download new the network, prior to download, you can view applications, a WAP connection is needed. -
Page 159: File Storage
USB connectivity 3. On the PC, the phone will be identified as M6100 can be connected to a PC through a USB “Removable disk” in My Computer folder. Also, a cable in order to transfer files, contents and to use system disk letter will be assigned, such as “E:\”. - Page 160 - Music: In this folder you can copy music files. - Videos: In this folder you can download on PC The supported formats are: MP3, AAC, AAC+, the videos taken with the phones’ digital camera AAC++, WMA, MP4 (audio) and WAV. The files and upload new videos on the phone.
- Page 161 DOWNLOADS PC programs and Internet You can connect the phone to your PC to manage your phonebook contacts, upload new contents such as wallpapers and ringtones or use the built in modem. 1. Install the programs included in the CD-ROM. 2.
-
Page 162: Accessories
Note • Always use genuine LG accessories. • Failure to do this may invalidate your warranty. • Accessories may be different in different regions; please check with our regional service company or agent for further enquires. -
Page 163: Technical Data
TECHNICAL DATA General Product name : M6100 System : GSM 900 / DCS 1800 / PCS 1900 Ambient Temperatures Max : +55°C (discharging) +45°C (charging) Min : -10°C... - Page 165 MEMO...
Need help?
Do you have a question about the M6100 and is the answer not in the manual?
Questions and answers