LG KE600 User Manual
Hide thumbs
Also See for KE600:
- Brochure (8 pages) ,
- Service manual (168 pages) ,
- User manual (87 pages)
Table of Contents
Advertisement
Available languages
Available languages
Quick Links
Advertisement
Chapters
Table of Contents

Related Manuals for LG KE600


Summary of Contents for LG KE600
- Page 1 คู ม ื อ การใช ข อ มู ล บางอย า งในคู ม ื อ นี ้ อาจแตกต า งจากเครื ่ อ งโทรศั พ ท ข องคุ ณ LG Electronics Inc. 0168 ขึ ้ น อยู ก ั บ ซอร ฟ แวร ข องโทรศั พ ท ห รื อ ผู ใ ห บ ริ ก าร...
- Page 2 KE600 คู ม ื อ การใช ข อ มู ล บางอย า งในคู ม ื อ นี ้ อาจแตกต า งจากเครื ่ อ ง โทรศั พ ท ข องคุ ณ ขึ ้ น อยู ก ั บ ซอร ฟ แวร ข องโทรศั พ ท...
-
Page 3: Table Of Contents
การประชุ ม หลายสาย ............29 ใช ง านอย า งมี ป ระสิ ท ธิ ภ าพ ........ 7 เ แผนผั ง เมนู ............31 คุ ณ สมบั ต ิ ข อง KE600 ........12 บ เ ส ว นประกอบของโทรศั พ ท ..........12 เบราว เ ซอร ............33 น... - Page 4 เครื ่ อ งมื อ ............38 ข อ ความ ............51 เมนู โ ปรด [เมนู 3-1] ............38 ข อ ความใหม [เมนู 5-1] ..........51 นาฬิ ก าปลุ ก [เมนู 3-2] ............38 ถาดเข า [เมนู 5-2] ............54 ปฏิ ท ิ น [เมนู 3-3] .............38 อี...
- Page 5 สารบั ญ ข รู ป แบบเสี ย ง ............ 66 อุ ป กรณ เ สริ ม ...........83 ท เป ด ทำงาน [เมนู 7-X-1] ..........66 ข อ มู ล ทางเทคนิ ค ..........84 เ เปลี ่ ย นแปลง [เมนู 7-X-2] ..........66 รายชื ่ อ ............68 ค...
-
Page 6: บทนำ
บทนำ ขอแสดงความยิ น ดี ท ี ่ ค ุ ณ ซื ้ อ โทรศั พ ท เ คลื ่ อ นที ่ ร ุ น KE600 ที ่ ท ั น สมั ย มี ร ู ป ร า งบาง ออกแบบให ท ำงาน ด ว ยการใช... -
Page 7: เพื ่ อ ความปลอดภั ย
เพื ่ อ ความปลอดภั ย คำเตื อ น ข อ ควรระวั ง โ ค • ควรป ด โทรศั พ ท เ คลื ่ อ นที ่ ท ุ ก ครั ้ ง ที ่ อ ยู บ นเครื ่ อ งบิ น •... -
Page 8: คํ า แนะนํ า เพื ่ อ ความปลอดภั ย และการใช ง านอย า งมี ป ระสิ ท ธิ ภ าพ
วั ต ต / กก (10 กรั ม ) และเมื ่ อ พกพาไว ก ั บ ตั ว คื อ 0.45 โทรศั พ ท เ คลื ่ อ นที ่ ร ุ น KE600 นี ้ ไ ด ร ั บ การออกแบบตรง... - Page 9 คํ า แนะนํ า เพื ่ อ ความปลอดภั ย และการใช ง านอย า งมี ป ระสิ ท ธิ ภ าพ • ควรวางให ห า งจากอุ ป กรณ เ ครื ่ อ งใช ไ ฟฟ า เช น • อย า วางโทรศั พ ท ใ กล บ ั ต รเครดิ ต หรื อ บั ต รโดยสาร โทรทั...
- Page 10 ความปลอดภั ย บนท อ งถนน หลี ก เลี ่ ย งอั น ตรายที ่ อ าจเกิ ด ขึ ้ น กั บ การได ย ิ น ของคุ ณ ตรวจสอบกฏหมายและระเบี ย บข อ บั ง คั บ ว า ด ว ยเรื ่ อ ง การใช...
- Page 11 ความจํ า ประสิ ท ธิ ภ าพของ แบตเตอรี ่ จ ึ ง ไม ด อ ยลง ได ร ั บ อนุ ญ าตจากพนั ก งานประจํ า เครื ่ อ งเสี ย ก อ น • ใช เ ฉพาะแบตเตอรี ่ และ ที ่ ช าร จ ของ LG เท า นั ้ น เด็ ก...
- Page 12 • ชาร จ แบตเตอรี ่ ใ หม่ อ ี ก ครั ้ ง หากไม ไ ด ใ ช เ ป น เวลา นานเพื ่ อ เพิ ่ ม เวลาการใช ง าน • อย า ให เ ครื ่ อ งชาร จ แบตเตอรี ่ โ ดนแสงแดดโดยตรง หรื...
-
Page 13: คุ ณ สมบั ต ิ ข อง Ke600
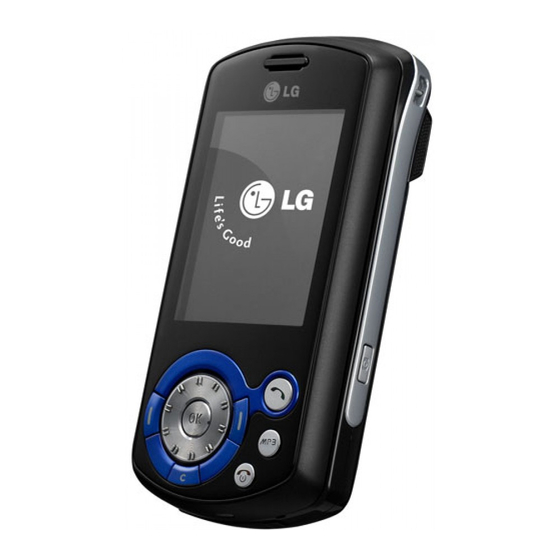
คุ ณ สมบั ต ิ ข อง KE600 ส ว นประกอบของโทรศั พ ท 1. ลำโพง 2. หน า จอ LCD หลั ก • ส ว นบน: ความแรงของสั ญ ญาณระดั บ ประจุ ไ ฟของ แบตเตอรี ่ และฟ ง ก ช ั ่ น อื ่ น ๆ... - Page 14 4. ปุ ่ ม กล อ งถ า ยรู ป กดค า งไว – ใช ง านกล อ งถ า ยรู ป 5. ช อ งเสี ย บแฮนด ฟ รี 6. ปุ ม ด า นข า ง • ในโหมดสแตนด บ าย (เลื ่ อ นสไลด ข ึ ้ น ): ระดั บ เสี ย ง ของปุ...
- Page 15 คุ ณ สมบั ต ิ ข อง KE600 ภ 2. ปุ ม เลื อ ก ปุ ม ทั ้ ง 2 นี ้ จ ะทำงานตามฟ ง ก ช ั ่ น ที ่ ป รากฏที ่ ด า น...
-
Page 16: ภาพแสดงตั ว เครื ่ อ งด า นหลั ง
ภาพแสดงตั ว เครื ่ อ งด า นหลั ง 1. แบตเตอรี ่ 2. ตั ว ล็ อ คฝาปิ ด แบตเตอรี ่ กดปุ ่ ม นี ้ เ พื ่ อ ถอดฝาปิ ด แบตเตอรี ่ 3. แฟลช 4. เลนส ก ล อ งถ า ยรู ป 5. -
Page 17: ข อ มู ล บนหน า จอ
คุ ณ สมบั ต ิ ข อง KE600 ข อ มู ล บนหน า จอ หน า จอจะแสดงไอคอนต า งๆ ตามที ่ แ สดงในตารางดั ง ต อ ไปนี ้ พื ้ น ที ่ ไ อคอน ไอคอนบนหน า จอ ไอคอน... - Page 18 ไอคอน คำอธิ บ าย ไอคอน คำอธิ บ าย คุ ณ สามารถใช บ ริ ก าร GPRS ได แสดงว า โทรศั พ ท ก ำลั ง เข า ใช WAP แสดงว า คุ ณ กำลั ง ใช บ ริ ก ารข า มเครื อ แสดงว...
-
Page 19: การติ ด ตั ้ ง
การติ ด ตั ้ ง การติ ด ตั ้ ง ซิ ม การ ด และแบตเตอรี ่ 2. ใส ซ ิ ม การ ด ใส ซ ิ ม การ ด ในช อ งเลื ่ อ นซิ ม การ ด เข า ไปในช อ งใส ซ ิ ม ในเครื... -
Page 20: การชาร จ แบตเตอร
3. ใส แ บตเตอรี ่ 2. หั น ด า นที ่ ม ี ล ู ก ศรบนตั ว ปลั ๊ ก ขึ ้ น ข า งบนตามที ่ แ สดง ในรู ป แล ว เสี ย บปลั ๊ ก อะแดปเตอร สำหรั บ ชาร จ แบต เลื... -
Page 21: การถอดเครื ่ อ งชาร จ แบตเตอร
การติ ด ตั ้ ง การใส ก าร ด หน ว ยความจำ ! คำเตื อ น • ถอดปลั ๊ ก ไฟและเครื ่ อ งชาร จ แบตเตอรี ่ อ อกจากเต า ใส ก าร ด หน ว ยความจำในช อ งใส ก าร ด ด า นข า งของตั ว เสี... -
Page 22: การถอดการ ด หน ว ยความจำ
3. เลื ่ อ นช อ งเสี ย บการ ด หน ว ยความจำขึ ้ น ด ว ยปลายนิ ้ ว ! หมายเหตุ ให ส ุ ด จนได ย ิ น เสี ย งคลิ ก ใช เ ฉพาะการ ด หน ว ยความจำที ่ ผ า นการรั บ รองจากผู ผลิ... -
Page 23: ฟ ง ก ช ั ่ น ทั ่ ว ไป
ฟ ง ก ช ั ่ น ทั ่ ว ไป การโทรออก 2. ป อ นรหั ส ประเทศรหั ส พื ้ น ที ่ และหมายเลขโทรศั พ ท 3. กดปุ ม S 1. ตรวจดู ใ ห แ น ใ จว า โทรศั พ ท ข องคุ ณ เป ด อยู การวางสาย... -
Page 24: การรั บ สาย
การรั บ สาย โหมดสั ่ น (แบบรวดเร็ ว ) คุ ณ สามารถใช ง านโหมดสั ่ น ได โ ดยกดปุ ม ซ า ยค า งไว เมื ่ อ มี ส ายเรี ย กเข า เสี ย งโทรศั พ ท จ ะดั ง ขึ ้ น และไอคอน โทรศั... - Page 25 ฟ ง ก ช ั ่ น ทั ่ ว ไป โหมด T9 การเปลี ่ ย นโหมดป อ นข อ ความ โหมดนี ้ ใ ห ค ุ ณ ป อ นคำได โ ดยการกดเพี ย งครั ้ ง เดี ย วต อ หนึ ่ ง 1.
- Page 26 1. เมื ่ อ คุ ณ อยู ใ นโหมดป อ นข อ ความโดยใช ร ะบบช ว ย ในการลบตั ว อั ก ษรให ก ด C และกดค า งไว เ พื ่ อ ลบตั ว อั ก สะกดคำ T9 ให เ ริ ่ ม ต น ป อ นคำโดยกดปุ ม 2 ถึ ง ษร...
- Page 27 ฟ ง ก ช ั ่ น ทั ่ ว ไป วิ ธ ี ก ารใช โ หมด 123 (ตั ว เลข) ! หมายเหตุ โหมด 123ช ว ยให ค ุ ณ สามารถป อ นตั ว เลขในข อ ความ โปรดดู ข อ มู ล เพิ ่ ม เติ ม เกี ่ ย วกั บ ตั ว อั ก ษรที ่ ใ ช ไ ด โ ดยใช ป ุ ม จากตาราง...
-
Page 28: การเลื อ กฟ ง ก ช ั ่ น และตั ว เลื อ กต า งๆ
การเลื อ กฟ ง ก ช ั ่ น และตั ว เลื อ กต า งๆ โทรศั พ ท ข องคุ ณ มี ช ุ ด ฟ ง ก ช ั ่ น ที ่ ช ว ยให คุ ณ ปรั บ แต ง โทรศั... -
Page 29: เมนู ร ะหว า งการใช ส าย
เมนู ร ะหว า งการใช ส าย การรั บ สายเรี ย กเข า ก โทรศั พ ท ข องคุ ณ มี ฟ ง ก ช ั ่ น ควบคุ ม มากมาย ให ค ุ ณ เลื อ กใช ร ะหว า งการใช ส ายในการเข า ใช ฟ ง ก ช ั ่ น ดั ง ในการรั... -
Page 30: การประชุ ม หลายสาย
การป ด ไมโครโฟน แล ว เมื ่ อ กำหนดให ม ี ก ารประชุ ม หลายสายแล ว ผู จ ั ด ให ม ี ก ารประชุ ม หลายสายอาจเพิ ่ ม , วางสาย หรื อ แยก คุ ณ สามารถป ด ไมโครโฟนระหว า งใช ส ายโดยการกดปุ ม สาย... - Page 31 เมนู ร ะหว า งการใช ส าย การเรี ย กใช ก ารประชุ ม หลายสายที ่ พ ั ก ไว การวางสายการประชุ ม หลายสาย การเรี ย กใช ก ารประชุ ม สายที ่ พ ั ก ไว ให ก ดปุ ม S กด ปุ ม คุ...
-
Page 32: แผนผั ง เมน
แผนผั ง เมนู (คู ม ื อ แสดงเป น แบบกริ ด ) 1 เบราว เ ซอร 3 เครื ่ อ งมื อ 5 ข อ ความ 1 โฮม 1 เมนู โ ปรด 1 ข อ ความใหม 2 บุ ค มาร ค 2 นาฬิ... - Page 33 แผนผั ง เมนู ค ! หมายเหตุ 7 รู ป แบบเสี ย ง 9 การตั ้ ง ค า ก จั ด เรี ย งเมนู ใ นแต ล ะสไตล ต ามลำดั บ ความสำคั ญ ดั ง ต อ 1 ปกติ 1 วั น ที ่ & เวลา น...
-
Page 34: เบราว เ ซอร
เบราว เ ซอร คุ ณ สามารถเข า ใช บ ริ ก าร WAP (Wireless Application ปุ ม คํ า อธิ บ าย Protocol) ต า งๆ เช น ข อ มู ล การเงิ น , ข า ว, รายงานการพยา เลื... -
Page 35: บุ ค มาร ค [เมนู 1-2]
เบราว เ ซอร บุ ค มาร ค ไปที ่ URL [เมนู 1-2] [เมนู 1-3] เมนู น ี ้ ช ว ยให ค ุ ณ จั ด เก็ บ URL ของเว็ บ เพจที ่ ค ุ ณ ชื ่ น ชอบได คุ... - Page 36 - โฮมเพจ: ในตั ว เลื อ กนี ้ จะให ค ุ ณ ป อ นแอดเดรส แคช [เมนู 1-4-2] (URL) ของไซด ท ี ่ ค ุ ณ จะใช เ ป น โฮมเพจ คุ ณ ไม จ ำ ข อ มู ล หรื อ บริ ก ารที ่ ค ุ ณ เข า ใช จ ะถู ก บั น ทึ ก ไว ใ นหน ว ย เป...
-
Page 37: ข อ มู ล การโทร
ข อ มู ล การโทร คุ ณ สามารถดู บ ั น ทึ ก ของสายที ่ ไ ม ไ ด ร ั บ สายที ่ ร ั บ และสาย • ส ง ข อ ความให ก ั บ หมายเลขนี ้ • โทรออกได... -
Page 38: เวลาโทร [เมนู 2-5]
ค า โทร • ป อ นชื ่ อ ใหม ส ำหรั บ หมายเลข และบั น ทึ ก ไว ใ นสมุ ด [เมนู 2-6] โทรศั พ ท ์ ช ว ยให ค ุ ณ สามารถตรวจสอบค า โทรครั ้ ง ล า สุ ด ค า •... -
Page 39: เครื ่ อ งมื อ
เครื ่ อ งมื อ เมนู โ ปรด ปฏิ ท ิ น ด [เมนู 3-1] [เมนู 3-3] ด ตั ว เลื อ กนี ้ ใ ห ค ุ ณ เพิ ่ ม สิ ่ ง ที ่ ค ุ ณ ชื ่ น ชอบไว ใ นรายการที ่ จ ั ด เมื... - Page 40 ดู ดู ต ารางนั ด หมายทั ้ ง หมด [เมนู 3-3-1] [เมนู 3-3-4] ดู ต ารางนั ด หมายและบั น ทึ ก ทั ้ ง หมดของวั น ที ่ เ ลื อ ก ดู ต ารางนั ด หมาย และบั น ทึ ก ทั ้ ง หมดของวั น ที ่ เ ลื อ ก ใช...
-
Page 41: เครื ่ อ งคิ ด เลข [เมนู 3-4]
เครื ่ อ งมื อ เครื ่ อ งคิ ด เลข น 2. หากไม ม ี บ ั น ทึ ก สามารถเพิ ่ ม ใหม ไ ด โ ดยกดปุ ม เลื อ กซ า ย [เมนู 3-4] < [สร า ง]. เมนู... -
Page 42: นาฬิ ก าจั บ เวลา [เมนู 3-7]
นาฬิ ก าจั บ เวลา เวลาทั ่ ว โลก [เมนู 3-7] [เมนู 3-9] 1. กดปุ ม [เริ ่ ม ] เพื ่ อ จั บ เวลาและกดปุ ม [รอบ]เพื ่ อ บั น ทึ ก คุ ณ สามารถดู เ วลาของเมื อ งสำคั ญ ๆ ได ท ั ่ ว โลก รอบเวลา... -
Page 43: มั ล ติ ม ี เ ดี ย
มั ล ติ ม ี เ ดี ย - ภาพนิ ่ ง : 320x240, 640x480, 1280x960, คุ ณ สามารถสนุ ก สนานกั บ ฟ ง ก ช ั ่ น มั ล ติ ม ี เ ดี ย ต า งๆ เช น •... -
Page 44: กล อ งวิ ด ี โ อ [เมนู 4-2]
[เมนู 4-3] ของชั ต เตอร์ ไ ด้ KE600 มี ก ารเพิ ่ ม เครื ่ อ งเล น MP3ลงในเครื ่ อ งซึ ่ ง คุ ณ สามารถ • บั น ทึ ก ลงใน [ ]: คุ ณ สามารถตั ้ ง ค า พื ้ น ที ่ เ ก็ บ... - Page 45 สั บ เปลี ่ ย น/ โหมดการเล น / ระดั บ เสี ย ง KE600 ไม ร องรั บ ไฟล ท ี ่ ก ล า วถึ ง ทั ้ ง หมดทุ ก ประเภทที ่ ม ี สเตอริ โ อ ตั ว เลื อ ก...
- Page 46 • การตั ้ ง ค า ซ้ ำ – อี ค วอไลเซอร : เมนู น ี ้ ช ว ยให ค ุ ณ ปรั บ รู ป แบบของ เล น ทั ้ ง หมด การฟ ง เพลงได ห ลากหลายแนวเพลง เล...
-
Page 47: วิ ท ยุ [เมนู 4-4]
มั ล ติ ม ี เ ดี ย วิ ท ยุ แ 3. คุ ณ สามารถเข า สู เ มนู ต ั ว เลื อ กต อ ไปนี ้ ไ ด โ ดยการกดปุ ม [เมนู 4-4] เลื อ กซ า ย [ตั ว เลื อ ก] คุ... -
Page 48: แต ง เพลง [เมนู 4-5]
แต ง เพลง • โหมด Keyboard: [เมนู 4-5] โหมด keyboard คุ ณ สามารถแต ง ทำนองโดย คุ ณ สามารถแต ง เสี ย งเรี ย กเข า ได ต ามที ่ ค ุ ณ ต อ งการเมื ่ อ คุ ณ การใช เ สี ย งของปุ ม กดด ว ยการ เข... - Page 49 มั ล ติ ม ี เ ดี ย • โหมด Score: • โหมด Keyboard: คุ ณ สามารถแต ง ทำนองโดยการ ก โหมด Score คุ ณ สามารถแต ง ทำนองโดย ใช เ สี ย งของปุ ม กดด ว ยการกดปุ ม ตั ว เลข •...
-
Page 50: Djing [เมนู 4-6]
การตั ้ ง ค า • บั น ทึ ก : ใช บ ั น ทึ ก เพลงพร อ มเสี ย งเอฟเฟกต [เมนู 4-5-3] • เสี ย งเอฟเฟกต : คุ ณ สามารถเพิ ่ ม เสี ย งเอฟเฟกต ส ั ้ น ๆ •... -
Page 51: บั น ทึ ก เสี ย ง [เมนู 4-7]
มั ล ติ ม ี เ ดี ย บั น ทึ ก เสี ย ง ข อั ล บั ้ ม [เมนู 4-7] คุ ณ สามารถแสดงเสี ย งที ่ บ ั น ทึ ก ไว ใ นหน ว ยความจำได คุ ณ สามารถบั น ทึ ก เสี ย งเตื อ นได เ... -
Page 52: ข อ ความ
ข อ ความ ข อ ความใหม 4. กดปุ ม < [ตั ว เลื อ ก] แล ว กดปุ ม ส ง หลั ง จากป้ อ น [เมนู 5-1] หมายเลขเสร็ จ ข อ ความทั ้ ง หมดจะถู ก จั ด เก็ บ ใน เมนู... - Page 53 ข อ ความ • บั น ทึ ก ลงร า ง: บั น ทึ ก ข อ ความในร า ง • 1. เข า สู เ มนู ข อ ความใหม โ ดยกดปุ ม เลื อ กซ า ย < [OK]. •...
- Page 54 • บั น ทึ ก : คุ ณ สามารถบั น ทึ ก ข อ ความมั ล ติ ม ี เ ดี ย ลง 1. คุ ณ สามารถป อ นอี เ มล แ อดเดรสได ส ู ง สุ ด 20 ใน กล อ งข อ ความออก หรื อ บั น ทึ ก เป น ข อ ความสำ รายการในฟ...
-
Page 55: ถาดเข า [เมนู 5-2]
ข อ ความ ถาดเข า • ออก: หากคุ ณ เลื อ กเมนู น ี ้ ข ณะเขี ย นข อ ความ คุ ณ จะออก • [เมนู 5-2] จากหน า จอเขี ย นข อ ความและกลั บ ไปยั ง หน า จอก อ นหน า •... -
Page 56: อี เ มล บ อกซ [เมนู 5-3]
อี เ มล บ อกซ • แสดง: คุ ณ สามารถดู ข อ ความที ่ ไ ด ร ั บ ได [เมนู 5-3] • ลบ: คุ ณ สามารถลบข อ ความนั ้ น ได เมื ่ อ คุ ณ เข า สู เ มนู น ี ้ คุ ณ สามารถเชื ่ อ มต อ เพื ่ อ เรี ย กดู ข อ •... -
Page 57: ถาดออก [เมนู 5-5]
ข อ ความ ส ง บ • ลบ: ลบข อ ความที ่ ค ุ ณ เลื อ ก [เมนู 5-6] • ข อ มู ล : เพื ่ อ ดู ข อ มู ล ของข อ ความนั ้ น เมนู... -
Page 58: บริ ก ารข อ มู ล [เมนู 5-8]
บริ ก ารข อ มู ล เรื ่ อ ง [เมนู 5-8-2] [เมนู 5-8] (ขึ ้ น อยู ก ั บ เครื อ ข า ยและการสมั ค รขอรั บ บริ ก าร) (ขึ ้ น อยู ก ั บ เครื อ ข า ยและการสมั ค รขอรั บ บริ ก าร) •... -
Page 59: การตั ้ ง ค า [เมนู 5-0]
ข อ ความ การตั ้ ง ค า ข อ ความมั ล ติ ม ี เ ดี ย • [เมนู 5-9-2] [เมนู 5-0] หลั ง จากบั น ทึ ก เทมเพลทใหม คุ ณ สามารถใช ต ั ว เลื อ ก ข อ ความตั ว อั ก ษร [เมนู... - Page 60 • การตั ้ ง ค า บริ ก ารเสริ ม : คุ ณ สามารถตั ้ ง ค า บริ ก ารเสริ ม • เรี ย กข อ มู ล อั ต โนมั ต ิ : หากตั ้ ง ค า ที ่ เ ป ด คุ ณ สามารถ ได...
- Page 61 ข อ ความ – แก ไ ข แทรกลายเซ็ น : เลื อ ก ใช เพื ่ อ แนบลายเซ็ น ของคุ ณ • ในข อ ความอี เ มล ข องคุ ณ ชื ่ อ แอคเคาท : ชื ่ อ แอคเคาท – ตั ้ ง ค า ขั ้ น สู ง อี...
- Page 62 • โปรไฟล เ ครื อ ข า ย บริ ก ารข อ มู ล [เมนู 5-0-6] โปรไฟล ค ื อ ข อ มู ล เครื อ ข า ยที ่ ใ ช เ พื ่ อ เชื ่ อ มต อ อิ น เตอร เ น็ ต •...
-
Page 63: แฟ ม ข อ มู ล
แฟ ม ข อ มู ล วิ ด ี โ อ • ! คำเตื อ น [เมนู 6-1] หากคุ ณ ลบหน ว ยความจำภายนอกระหว า งการย า ย แสดงรายชื ่ อ ไฟล 3GP, 3G2 ที ่ My media\Videos • ไฟล จะทำให โ ทรศั พ ท ช ำรุ ด เสี ย หายได ในหน... -
Page 64: เสี ย ง [เมนู 6-3]
• ตั ้ ง ค า เป น ภาพพื ้ น หลั ง : คุ ณ สามารถกํ า หนดภาพ • ภาพสไลด : ดู ภ าพในโฟลเดอร ใ นแบบภาพสไลด เป น วอลล เ ปเปอร ไ ด • ส ง ผ า นบลู ท ู ธ : คั ด ลอกไฟล ท ี ่ เ ลื อ กไว ไ ปไว ใ น •... -
Page 65: อื ่ น ๆ [เมนู 6-4]
แฟ ม ส ว นตั ว แฟ ม ข อ มู ล อื ่ น ๆ เ • เล น : คุ ณ สามารถเล น ไฟล MP3 ได โ ดยกดปุ ม OK [เมนู 6-4] หรื อ เลื อ กเมนู เล น จากเมนู ต ั ว เลื อ ก แสดงรายชื... -
Page 66: เกมส & อื ่ น ฯ [เมนู 6-5]
ในเมนู น ี ้ ค ุ ณ สามารถจั ด การแอปพลิ เ คช่ ั น Java ที ่ ต ิ ด ใน KE600 นี ้ ม ี ฟ ง ก ช ั ่ น ที ่ เ ก็ บ ข อ มู ล หากคุ ณ เชื ่ อ มต อ สาย... -
Page 67: รู ป แบบเสี ย ง
รู ป แบบเสี ย ง • แบบเตื อ นสายเข า : ตั ้ ง ชนิ ด การเตื อ นเมื ่ อ มี ส าย ในรู ป แบบเสี ย ง คุ ณ สามารถปรั บ เปลี ่ ย น และ ปรั บ แต ง เสี ย ง สั... - Page 68 – ป ด : โทรศั พ ท จ ะไม ใ ช ก ารรั บ สายอั ต โนมั ต ิ – หลั ง จาก 5 วิ น าที : เครื ่ อ งจะรั บ สายโดยอั ต โนมั ต ิ หลั ง จากดั ง 5 วิ น าที –...
-
Page 69: รายชื ่ อ
รายชื ่ อ ค น หา • คั ด ลอกไปยั ง เครื ่ อ ง: คุ ณ สามารถคั ด ลอกราย [เมนู 8-1] การจากซิ ม การ ด ไปยั ง เครื ่ อ ง หรื อ จากเครื ่ อ งไปยั ง 1. เลื อ ก ค น หา โดยกดปุ ม เลื อ กซ า ย < [ตกลง] ซิ... -
Page 70: กลุ ม ผู โ ทรเข า [เมนู 8-3]
• แก ไ ขชื ่ อ : คุ ณ สามารถเปลี ่ ย นชื ่ อ กลุ ม ได a. ป อ นชื ่ อ • ลบทั ้ ง หมด: ใช ล บสมาชิ ก ทั ้ ง หมดในกลุ ม b. -
Page 71: หมายเลขเครื ่ อ ง [เมนู 8-5]
รายชื ่ อ หมายเลขเครื ่ อ ง การตั ้ ง ค า • [เมนู 8-5] [เมนู 8-7] (ขึ ้ น อยู ก ั บ ซิ ม การ ด ) 1. กดปุ ม > [รายชื ่ อ ] ในโหมดสแตนด บ าย 2. - Page 72 • คั ด ลอก/ลบทั ้ ง หมด 2. เลื อ กหน ว ยความจำที ่ ต อ งการลบ คุ ณ สามารถบั น ทึ ก /ย า ยรายการจากหน ว ยความจํ า ของ 3. ป อ นรหั ส รั ก ษาความปลอดภั ย แล ว กดปุ ม < [ตกลง] ซิ...
-
Page 73: การตั ้ ง ค า
การตั ้ ง ค า วั น ที ่ & เวลา ประหยั ด พลั ง งาน ข [เมนู 9-1] [เมนู 9-2] ห คุ ณ สามารถตั ้ ง ค า ฟ ง ก ช ั ่ น เกี ่ ย วกั บ วั น ที ่ แ ละเวลาได หากคุ... -
Page 74: ภาษา [เมนู 9-4]
การเชื ่ อ มต อ ข อ ความทั ก ทาย [เมนู 9-3-3] [เมนู 9-5] หากคุ ณ เลื อ กเป ด คุ ณ สามารถแก ไ ขข อ ความที ่ แ สดง บลู ท ู ธ [เมนู 9-5-1] ในโหมดสแตนด บ ายได ฟ ง ก ช ั ่ น บลู ท ู ธ จะช ว ยให โ ทรศั พ ท เ คลื ่ อ นที ่ ท ี ่ ใ ช ง าน ร ว มกั น ไฟหน... - Page 75 ระหว า งอุ ป กรณ บ ลู ท ู ธ สอง เครื ่ อ ง เช น หากคุ ณ คุ ณ สามารถดู อ ุ ป กรณ ท ั ้ ง หมดที ่ KE600 ของคุ ณ ได้ ใช ช ุ ด หู ฟ ั ง บลู ท ู ธ กั บ โทรศั พ ท ข องคุ ณ การตั ้ ง ค า การ...
- Page 76 • บริ ก ารที ่ ส นั บ สนุ น • อั ต โนมั ต ิ แสดงรายชื ่ อ บริ ก ารบลู ท ู ธ ที ่ เ ครื ่ อ งรองรั บ หากคุ ณ เลื อ กโหมดอั ต โนมั ต ิ เ ครื ่ อ งจะค น หาและเลื อ ก เครื...
- Page 77 การตั ้ ง ค า ก ตั ้ ง ค า GPRS โหมดการเชื ่ อ มต อ USB [เมนู 9-5-3] [เมนู 9-5-5] คุ ณ สามารถตั ้ ง ค า การใช บ ริ ก าร GPRS ได อ ย า งหลากหลาย คุ...
-
Page 78: การโทร [เมนู 9-6]
การโทร • สายแฟกซ ท ั ้ ง หมด [เมนู 9-6] โอนสายแฟกซ ท ุ ก สายไปยั ง หมายเลขที ่ ม ี ก ารเชื ่ อ ม คุ ณ สามารถตั ้ ง เมนู ท ี ่ เ กี ่ ย วข อ งกั บ การโทรด ว ยการกด ต... - Page 79 การตั ้ ง ค า - ยกเลิ ก ส ง หมายเลขส่ ว นตั ว • [เมนู 9-6-3] (ขึ ้ น อยู ก ั บ เครื อ ข า ยและการสมั ค รขอรั บ บริ ก าร) เลิ ก ใช ง านบริ ก ารที ่ เ กี ่ ย วข อ ง •...
-
Page 80: ระบบป้ อ งกั น [เมนู 9-7]
• ยกเลิ ก ส ง DTMF [เมนู 9-6-7] หากคุ ณ เลื อ ก ยกเลิ ก คุ ณ จะไม ส ามารถทราบ คุ ณ สามารถส ง ทั ช โทนในระหว า งการโทรเพื ่ อ ควบคุ ม ข อ ได ว า มี ส าย (เรี ย กเข า ) ซ อ นที ่ กำลั ง รออย ความเสี... - Page 81 การตั ้ ง ค า ป อ งกั น การโทร 4. หากคุ ณ ป อ นรหั ส PIN ผิ ด เกิ น 3 ครั ้ ง เครื ่ อ งจะล็ อ คหาก [เมนู 9-7-4] • PIN ถู ก ล็ อ ค แล ว คุ ณ จะต อ งใช ร หั ส PUK ปลดล็ อ ค คุ...
- Page 82 • ไม ร ั บ เมื ่ อ อยู ต า งประเทศ เบอร โ ทรที ่ ก ำหนด [เมนู 9-7-5] (ขึ ้ น อยู ก ั บ ซิ ม ) บริ ก ารจำกั ด การโทรของสายโทรเข า ทั ้ ง หมด เมื...
-
Page 83: สถานะหน ว ยความจำ [เมนู 9-8]
การตั ้ ง ค า 1. หากคุ ณ ต อ งการเปลี ่ ย นรหั ส รั ก ษาความปลอดภั ย / รหั ส PIN/PIN2 ให ป อ นรหั ส เดิ ม ที ่ ใ ห ม าของคุ ณ แล ว กดปุ ม < [ตกลง] 2. - Page 84 สำหรั บ ใช เ ชื ่ อ มต อ เพื ่ อ การ • ใช อ ุ ป กรณ เ สริ ม ของแท ข อง LG เท า นั ้ น แลก เปลี ่ ย นข อ มู ล ระหว า งเครื ่ อ ง...
- Page 85 ต ำ าสุ ด : -10°C ศู น ย บ ริ ก าร LG โดย บริ ษ ั ท แอลจี อี เ ลคทรอนิ ค ส (ประเทศไทย) จำกั ด ศู น ย ซ อ มสำนั ก งานใหญ ต ากสิ น...
- Page 87 บั น ทึ ก...
- Page 88 KE60 0 USER GUIDE WE SHOULD INFORM USER THAT THIS MANUAL CAN HAVE SOME DIFFERENCES FROM PHONE DEPENDING ON PHONE S/W AND SERVICE PROVIDER.
- Page 89 FOR YOUR SAFETY ............6 IN-CALL MENU ............28 During a Call ................28 GUIDELINES FOR SAFE AND EFFICIENT USE ..7 Conference Calls ..............29 KE600 FEATURES ............12 MENU TREE ...............31 Part of the phone ..............12 BROWSER ..............33 Rear view ................. 15 Display Information ..............
- Page 90 TOOLS ................38 MESSAGING ..............51 Favourites [Menu 3-1] ............. 38 New message [Menu 5-1] ............51 Alarm clock [Menu 3-2] ............38 Inbox [Menu 5-2] ..............54 Calendar [Menu 3-3] ............... 38 Email box [Menu 5-3] .............. 55 Calculator [Menu 3-4] ............. 39 Drafts [Menu 5-4] ..............
- Page 91 CONTENTS PROFILES ..............66 ACCESSORIES ............84 Activate [Menu 7-X-1] ............. 66 TECHNICAL DATA .............85 Personalise [Menu 7-X-2] ............66 CONTACTS ..............68 Search [Menu 8-1] ..............68 Add new [Menu 8-2] ............... 68 Caller groups [Menu 8-3] ............69 Speed dial [Menu 8-4] ............. 69 Own number [Menu 8-5] ............
-
Page 92: Introduction
INTRODUCTION Congratulations on your purchase of the advanced and compact KE600 cellular phone, designed to operate with the latest digital mobile communication technology. This user’s guide contains important information on the use and operation of this phone. Please read all the information carefully for optimal performance and to prevent any damage to or misuse of the phone. -
Page 93: For Your Safety
FOR YOUR SAFETY Warning Caution • Mobile Phones must be switched off at all times in • Switch off the phone in any area where required by aircrafts. special regulations. For example, do not use your phone in hospitals or it may affect sensitive medical •... -
Page 94: Guidelines For Safe And Efficient Use
• While there may be differences between the these guidelines may be dangerous or illegal. Further SAR levels of various LG phone models, they are detailed information is given in this manual. all designed to meet the relevant guidelines for exposure to radio waves. - Page 95 GUIDELINES FOR SAFE AND EFFICIENT USE Product care and maintenance • Do not subject this unit to mechanical vibration or shock. WARNING! Only use batteries, chargers and • The coating of the phone may be damaged if accessories approved for use with this particular phone covered with wrap or vinyl wrapper.
- Page 96 Electronic devices • Use a hands-free kit, if available. • Pull off the road and park before making or All mobile phones may get interference, which could answering a call if driving conditions so require. affect performance. • RF energy may affect some electronic systems in •...
- Page 97 GUIDELINES FOR SAFE AND EFFICIENT USE Avoid damage to your hearing In aircraft Damage to your hearing can occur if you are exposed Wireless devices can cause interference in aircraft. • to loud sound for long periods of time. We therefore •...
- Page 98 Unlike other battery systems, there is no memory effect that could compromise the battery’s performance. • Use only LG batteries and chargers. LG chargers are designed to maximize the battery life. • Do not disassemble or short-circuit the battery pack.
-
Page 99: Ke600 Features
KE600 FEATURES Part of the phone 1. Earpiece 2. Main LCD • Top: Signal strength, battery level and various function • Bottom: Soft key indications 3. Alpha numeric keys • In standby mode: Input numbers to dial Hold down: 0 – International calls 1 –... - Page 100 4. Side camera key Long press – Photo camera activation 5. Handsfree slot and charger slot 6. Side keys • In standby mode (opened): Volume of key tone • In standby mode (closed): Short press – The sub LCD light on. •...
- Page 101 KE600 FEATURES 2. Soft keys These keys perform the function Indicated in the bottom of the display. 3. Send key • Dial a phone number and answer a call. • In standby mode: shows recently dialled, received 1. Navigation key and missed call.
-
Page 102: Rear View
Rear view 1. Battery 2. Battery latch Press this button to remove the battery cover. 3. Flash 4. Camera lens 5. Battery Terminals 6. SIM Card Socket 7. Side camera key 8. Cable Connector/ Battery Charging Connector 9. Memory card slot ! Note To connect USB, several minutes after power on phone and in the idle window. -
Page 103: Display Information
KE600 FEATURES Display Information The screen displays several icons. These are described below. Icon area On-Screen Icons Icon Description Text and graphic area Tells you the strength of the network signal. ❈ Soft key indications Menu Contacts ❈ The quality of the conversation may change depending on network coverage. - Page 104 Icon Description Icon Description Call is connected. You can divert a call. You can use GPRS service. Indicates that the phone is accessing the WAP. Shows that you are using a roaming service. Indicates that you are using GPRS. The alarm has been set and is on. You have activated Bluetooth menu.
-
Page 105: Installation
INSTALLATION Installing the SIM card and the 2. Install the SIM card. Insert the SIM card into the holder. Slide the SIM handset battery card into the SIM card holder. Make sure that the Make sure the power is off before you remove the SIM card is inserted properly and that the gold battery. -
Page 106: Charging The Battery
3. Install the battery. 2. With the arrow facing you as shown in the diagram push the plug on the battery adapter into the socket Slide the battery upwards on the side of the phone until it clicks into place. until it snaps back into place. -
Page 107: Disconnecting The Charger
INSTALLATION Inserting the memory card ! Warning • Unplug the power cord and charger during lightning Insert the memory card into the slot until the memory storms to avoid electric shock or fire. card is fully inserted into the slot, as shown in the •... -
Page 108: Removing The Memory Card
3. Slide the memory card soket up into position until ! Note it clicks. Only use memory cards that have been approved by the manufacturer. Some memory cards might not be compliant with the handset. ! Notice The gold connectors must be face down and inserted first into the memory card slot. -
Page 109: General Functions
GENERAL FUNCTIONS Making a Call Making International Calls 1. Press and hold the 0 key for the international 1. Make sure your phone is powered on. prefix. The ‘+’ character can be replaced with the 2. Enter a phone number including the area code. international access code. -
Page 110: Answering A Call
Adjusting the Volume 2. End the call by closing the phone or pressing the E key. During a call, if you want to adjust the earpiece volume, use the side keys of the phone. ! Note In idle mode, you can adjust the key volume using the side You can answer a call while using the Address Book keys. -
Page 111: Entering Text
GENERAL FUNCTIONS Entering Text ABC Mode This mode allows you to enter letters by pressing the You can enter alphanumeric characters by using the key labeled with the required letter once, twice, three phone’s keypad. For example, storing names in the or four times until the letter is displayed. - Page 112 Using the T9 Mode Example: Press 4 6 6 3 to type Good. The T9 predictive text input mode allows you to enter words easily with a minimum number of key presses. • If the desired word is missing from the word As you press each key, the phone begins to display choices list, add it by using the ABC mode.
- Page 113 GENERAL FUNCTIONS Using the 123 (Numbers) Mode 2. To insert a space, press the 0 key once. To delete letters, press the C key. Press and hold The 123 Mode enables you to enter numbers in a text down the C key to erase the letters continuously. message (a telephone number, for example).
-
Page 114: Selecting Functions And Options
SELECTING FUNCTIONS AND OPTIONS Your phone offers a set of functions that allow you to customize the phone. Thesefunctions are arranged Menu Contacts in menus and sub-menus, accessed via the two soft keysmarked < and >. Each menu and sub-menu allows you to view and alter thesettings of a particular function. -
Page 115: In-Call Menu
IN-CALL MENU Answering an Incoming Call Your phone provides a number of control functions that you can use during a call. To access these functions To answer an incoming call when the handset is during a call, press the left soft key < [Options]. ringing, simply press the S key. -
Page 116: Conference Calls
Muting the Microphone Once a conference call is set up, calls may be added, disconnected or separated (that is, removed from You can mute the microphone during a call by pressing the conference call but still connected to you) by the the [Mute] key. - Page 117 IN-CALL MENU Activate the Conference Call on Hold Ending a Conference Call To activate a conference call on hold, press the S key. Currently displayed caller from a conference call can be disconnected by pressing the E key. Alternatively press the left soft key [Options] and select Join all/Hold all calls.
-
Page 118: Menu Tree
MENU TREE (The manual is set in grid type.) 1 BROWSER 3 TOOLS 5 MESSAGING 1 Home 1 Favourites 1 New message 2 Bookmarks 2 Alarm clock 2 Inbox 3 Go to URL 3 Calendar 3 Email box 4 Settings 4 Calculator 4 Drafts 5 Memo... - Page 119 MENU TREE ! Note 7 PROFILES 9 SETTINGS Menus are arranged per style in accordance with 1 General 1 Date & Time priority as follows: 2 Silent 2 Power saving 3 Vibrate only 3 Display 9 Menu 4 Outdoor 4 Language Messaging 5 Headset 5 Connectivity...
-
Page 120: Browser
BROWSER You can access various WAP (Wireless Application Description Protocol) services such as banking, news, weather Scrolls each line of the content area reports and flight information. These services are specially designed for mobile phones and they are Returns to the previous page maintained by WAP service providers. -
Page 121: Bookmarks [Menu 1-2]
BROWSER Bookmarks Go to URL [Menu 1-2] [Menu 1-3] This menu allows you to store the URL of favourite web You can connect directly to the site you want. After pages for easy access at a later time. entering a specific URL, press the OK key. To create a bookmark Settings 1. - Page 122 Clear cache - Homepage: This setting allows you to enter [Menu 1-4-3] the address (URL) of a site you want to use as Removes all context saved in cache. homepage. You do not need to type http:// at the front of each URL as the WAP Browser will ! Note automatically add it.
-
Page 123: Call History
CALL HISTORY You can check the record of missed, received, and • View the number if available and call it, or save it in dialled calls only if the network supports the Calling the Address Book Line Identification (CLI) within the service area. •... -
Page 124: Received Calls [Menu 2-4]
Received calls Call costs [Menu 2-4] [Menu 2-6] This option lets you view the last 50 incoming calls. Allows you to check the cost of your last call, all calls, You can also: remaining and reset the cost. To reset the cost, you need to PIN2 code. -
Page 125: Tools
TOOLS Favourites Calendar [Menu 3-1] [Menu 3-3] This option allows you to add your own favourites to When you enter this menu a calendar will show up. On the list already provided. Once you create your own top of the screen there are sections for date. Whenever menu, you can access the desired function quickly in you change the date, the calendar will be updated the idle screen by pressing the right navigation key. -
Page 126: Calculator [Menu 3-4]
View View all schedules [Menu 3-3-1] [Menu 3-3-4] View all schedules and memo for the chosen day. View all schedules and memo for the chosen day. Use U , D to browse through the note lists. Use U , D to browse through the note lists. If you set alarm for the note, the alarm icon is displayed. -
Page 127: Memo [Menu 3-5]
TOOLS Furthermore, you can use the various function of ! Note calculator such as +/–, sin, cos, tan, log, ln, exp, If you want to change the text input mode, press the sqrt, deg,Rad. # in order. 1. Input the numbers by pressing numeric keys. •... -
Page 128: Unit Converter [Menu 3-8]
Unit converter SIM services [Menu 3-8] [Menu 3-0] This converts any measurement into a unit you want. This menu depends on SIM and the network services. There are 4 types that can be converted into units: Area, Length, Weight and Volume. 1. -
Page 129: Multimedia
MULTIMEDIA You can enjoy your multimedia function such as camera, - Single shot: 320x240, 640x480, 1280x960, • voice recorder, MP3, Radio, music composer for your fun 1600x1200 and convenience. - Multishot: 320x240, 640x480 • • Metering [ ]: determines the lighting based ! Note on a little part of the subject. -
Page 130: Video Camera [Menu 4-2]
]: You can set the sound when [Menu 4-3] taking a picture. The KE600 has an integrated MP3 player built-in. You • Save to [ ]: You can set the space after taking a can enjoy listening to MP3 music files on a memory picture. - Page 131 Stereo/ 22KHz and 44.1KHz) Playmode/ Volume level Shuffle Option Back ! Note Status of the music controller KE600 doesn’t support the variable bit rate of all mentioned file types. Therefore, you can’t change the file from MP3 format to AAC.
- Page 132 • Settings Repeat – Equalizer: This menu helps you to adjust various Play all of environment on listening to the music. Repeat all – Play mode: This menu allows to set the play mode: Repeat one, Repeat all,Play all. Repeat one –...
-
Page 133: Radio [Menu 4-4]
MULTIMEDIA Radio 3. You can access the following option menus by [Menu 4-4] pressing the left soft key [Options]. You can search radio stations and enjoy listening to the • Edit : You can adjust frequency and change the radio. Connect the FM Radio headset into headset jack radio station in the selected channel. -
Page 134: Music Composer [Menu 4-5]
Music Composer • Keyboard mode: [Menu 4-5] Keyboard mode You can compose the melody You can compose a ring tone melody which you want. with a keyboard tone by When you enter this function, the tones that you pressing numeric keys. composed before are played. - Page 135 MULTIMEDIA • Score mode: • Keyboard mode: You can compose the melody with Score mode You can compose the melody a keyboard tone by pressing numeric keys. • with entering the desired • Score mode: You can compose the melody with notes.
-
Page 136: Djing [Menu 4-6]
Settings • Save: Allows you to save the music with sound [Menu 4-5-3] effect. • Arrange:To arrange a sound, you can choose a • Sound effect: You can add short sound effects Style, Instrument, Rhythm and Tempo. to the playing music. When you press the •... -
Page 137: Voice Recorder [Menu 4-7]
MULTIMEDIA Voice recorder Album [Menu 4-7] You can display Sounds which have been saved in You can record voice memo. the memory. Sound files are stored each folder of The following [Options] menus are available. My melody, Default Sounds, Voice records, MP3 •... -
Page 138: Messaging
MESSAGING New message 3. You can add phone numbers in the address book. [Menu 5-1] 4. Press the < [Option] and then press send This menu includes functions related to SMS (Short after entering numbers. All messages will be Message Service), MMS (Multimedia Message automatically saved in the outbox folder, even Service), Email, voice mail, as well as the network’s after a sending failure. - Page 139 MESSAGING • Save to drafts: Stores messages in Drafts. 2. If you want to write a new message, select • Multimedia. • T9 languages: Select the language for T9 input mode. You can also deactivate T9 input mode by 3. You can create a new message or choose one of the •...
- Page 140 • Edit subject: Allows you to modify the multimedia ! Tip message you have chosen. To input “@”, press the * and select “@”. • Slide duration: You can set the duration of slide of 2. Key in the subject of the mail and press OK. multimedia message.
-
Page 141: Inbox [Menu 5-2]
MESSAGING Inbox • Exit: If you select this while writing the message, • [Menu 5-2] you can exit from writing message and go back to • You will be alerted when you have received messages. the previous screen. The message you have written •... -
Page 142: Email Box [Menu 5-3]
Email box • View: You can view the received messages. [Menu 5-3] • Delete: You can delete the current message. When you access this menu, you can either connect • Reply: You can reply to the sender. to your remote mailbox to retrieve your new email messages, or you can view the previously retrieved •... -
Page 143: Outbox [Menu 5-5]
MESSAGING • Delete: Deletes the message you choose. • Multi delete: Select and delete the selected messages. • Information: You can view information about the message you choose. • Delete all: You can delete all messages in outbox. • Multi delete: After selecting the messages you Sent want to remove, press OK and you can delete the [Menu 5-6]... -
Page 144: Info Message [Menu 5-8]
Info message 2. The message will be shown until another message [Menu 5-8] is reached. (Dependent to network and subscription) Topics [Menu 5-8-2] Info service messages are text messages delivered by (Dependent to network and subscription) the network to GSM. They provide general information •... -
Page 145: Settings [Menu 5-0]
MESSAGING • I am on the way. • T9 languages: Select the desired language for T9 • input mode. You can also deactivate T9 input mode • Urgent! Please contact. by selecting ‘T9 off’. • I love you. • Exit: Will take you back to the Message menu. •... - Page 146 • Reply charging: When a message is sent, it allows • Delivery report: If it is set to Yes in this menu, the recipients to reply and charge the cost of the you can check whether your message is delivered reply to your telephone bill.
- Page 147 MESSAGING Email Maximum receive size: View the Maximum size [Menu 5-0-3] that you can receive mails. • Email account Save to server: Select Yes to leave the This menu allows you to edit, delete or add an email messages on the server. account.
- Page 148 Info message – Delete: Deletes the selected account from [Menu 5-0-6] the list. • Receive – Delete all: You can delete all account lists. Yes: If you select this menu, your phone will receive • Network profile Info service messages. A profile is the network information used to connect No: If you select this menu, your phone will not to the Internet.
-
Page 149: My Stuff
MY STUFF Videos • ! Warning [Menu 6-1] If you remove a external memory during moving a file, Show the list of 3GP, 3G2 files at Videos in Multimedia • it makes a serious damage at phone. memory. Supported only .3gp files, that are encoded with MPEG4 and h.263 video-codecs and AMR audio- •... -
Page 150: Sounds [Menu 6-3]
• Set as wallpaper: You can set a picture as a • Copy to external memory: Copy the selected file wallpaper. to the same folder at Multimedia memory/External memory. • Send via: Send the selected file to another device via Multimedia, Email or Bluetooth. •... -
Page 151: Others [Menu 6-4]
MY STUFF Others • Set as ringtone: Currently selected sound can be [Menu 6-4] set as a ringtone. Show the list of MP3, MP4, AAC, M4A files at Music in • Send via: Send the selected file to another device Multimedia memory. -
Page 152: Games & Apps [Menu 6-5]
New Fantastic LG In this menu, you can manage the Java applications There is mass storage function in KE600. if you installed in your phone. You can play or delete connect the USB cable, you can use the phone as a downloaded applications, or set the connect option. -
Page 153: Profiles
PROFILES In Profiles, you can adjust and customise the phone The profile setting option opens. Set the option as • tones for different events, environments, or caller required. groups. • Call alert type: Set the alert type for incoming calls. There are six preset profiles: General, Silent, Vibrate •... - Page 154 • Auto answer: This function will be activated only when your phone is connected to the handsfree kit. – Off: The phone will not answer automatically. – After 5 secs: After 5 seconds, the phone will answer automatically. – After 10 secs: After 10 seconds, the phone will answer automatically.
-
Page 155: Contacts
CONTACTS Search • Copy to handset/SIM: You can copy an entry [Menu 8-1] from SIM to phone or from phone to SIM. 1. Select Search by press the left soft key < [OK]. • Delete: You can delete an entry. 2. -
Page 156: Caller Groups [Menu 8-3]
• Remove member: You can remove the member a. Input a name. from the Group member list. But the name and the b. Press D, then you can input a number. number will be remained in phonebook. c. You can set a group for the entry by pressing •... -
Page 157: Own Number [Menu 8-5]
CONTACTS Own number Settings • [Menu 8-5] [Menu 8-7] (Sim dependent) 1. Press the right soft > [Contacts] in standby mode. 2. Scroll to Settings, then press the left soft key < You can save and check your own number in SIM card. [OK]. - Page 158 • Copy/Move all • Service dial number You can copy/move entries from SIM card memory to Use this function to access a particular list of Phone memory and vice versa. services provided by your network operator (if supported by the SIM card). 1.
-
Page 159: Settings
SETTINGS Date & Time Power saving [Menu 9-1] [Menu 9-2] You can set functions relating to the date and time. If you set On, you can save the power when you don’t use the phone. Set date [Menu 9-1-1] You can enter the current date. Display [Menu 9-3] Date format... -
Page 160: Language [Menu 9-4]
Selecting On displays the functionalities of 4 ! Note Navigation keys and Menu key as pictures on the • If you use LG PC Sync via bluetooth, you can middle of the idle window. (Profiles/Messaging/ exchange the data only within phonebook... - Page 161 • Paired devices check the User Manual of the device you are You can view all devices which your KE600 is already initiating the pair with to see if it already has a paired to. If you enter Paired devices, you access the predetermined passcode in place.
- Page 162 - My handset’s name: You can set the name of Bluetooth device. For example if you regularly bluetooth device. The default name is LG KE600. use a Bluetooth headset with your phone then • Supported services...
- Page 163 SETTINGS • Network selection • Preferred [Menu 9-5-2] You can set a list of preferred networks and the You can select a network which will be registered phone attempts to register with first, before either automatically or manually. attempting to register to any other networks. This Usually, the network selection is set to Automatic.
-
Page 164: Calling [Menu 9-6]
• When needed ! Caution If you select this menu, the GPRS connection is Before you remove the cable, it is necessary that you established when you connect a WAP or application click Exit. Or, the integrity of transferred data is not service and closed when you end the WAP or guaranteed. - Page 165 SETTINGS Call divert • All fax calls [Menu 9-6-1] Diverts to a number with a fax connection The Call divert service allows you to divert incoming unconditionally. voice calls, fax calls, and data calls to another number. For details, contact your service provider. •...
- Page 166 Send my number To favourite number [Menu 9-6-3] (network and subscription dependent) You can check recent 5 diverted numbers. • Set by network - Cancel If you select this, you can send your phone number Deactivate the corresponding service. depending on two line service such as line 1 or - View status line 2.
-
Page 167: Security [Menu 9-7]
SETTINGS • Cancel Send DTMF [Menu 9-6-7] If you select Cancel, you cannot recognize the You can send touch tones during an active call to waiting (receiving) call. control your voice mailbox or other automated phone services. • View status •... - Page 168 Call barring 4. If you enter wrong PIN code more than 3 times, the [Menu 9-7-4] phone will lock out. If the PIN is blocked, you will The Call barring service prevents your phone from need to key in PUK code. making or receiving certain category of calls.
- Page 169 SETTINGS • Cancel all • On You can cancel all barring services. You can restrict your outgoing calls to selected phone numbers. • Change password • Off You can change the password for Call Barring Service. You can cancel fixed dialling function. The submenus: •...
-
Page 170: Memory Status [Menu 9-8]
Memory status [Menu 9-8] You can check free space and memory usage of each repository, Internal memory and Multimedia memory. You can go to each repository menu. Reset default [Menu 9-9] You can initialize all factory defaults. You need Security code to activate this function. -
Page 171: Accessories
Data cable/CD ! Note You can connect your phone to • Always use genuine LG accessories. PC to exchange the data between • Failure to do this may invalidate your warranty. them. • Accessories may be different in different regions;... -
Page 172: Technical Data
TECHNICAL DATA General Product name : KE600 System : GSM 900 / DCS 1800 / PCS 1900 Ambient Temperatures Max : +55°C Min : -10°C... - Page 174 MEMO...
- Page 175 MEMO...
- Page 176 MEMO...
- Page 177 MEMO...
Need help?
Do you have a question about the KE600 and is the answer not in the manual?
Questions and answers