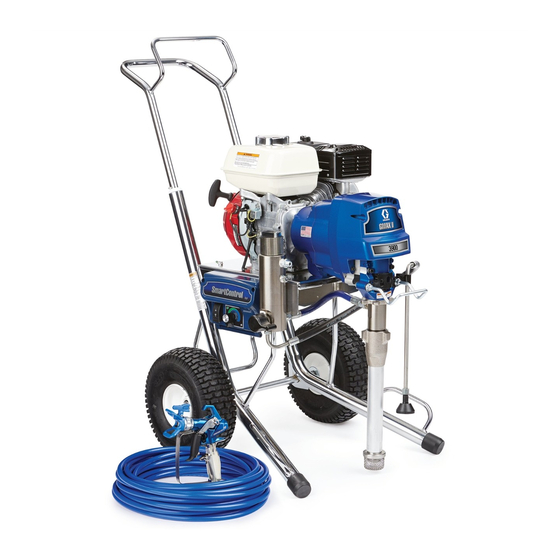
Graco GMAX 3400 Operation
Airless sprayers
Hide thumbs
Also See for GMAX 3400:
- Operation (46 pages) ,
- Instructions manual (9 pages) ,
- Brochure & specs (27 pages)
Advertisement
Quick Links
Operation
™
GMAX
3400
Airless Sprayers
- For Portable Airless Spraying of Architectural Coatings and Paints
3300 psi (22.8 MPa, 228 bar) Maximum Working Pressure
Read all warnings and instructions
✓
248663
✓
248664
248665
248666
310813
309250
Graco Inc. P.O. Box 1441 Minneapolis, MN 55440-1441
Copyright 2005, Graco Inc. is registered to I.S. EN ISO 9001
✓
✓
✓
✓
309639
309640
310802A
-
Advertisement

Related Manuals for Graco GMAX 3400


Summary of Contents for Graco GMAX 3400
- Page 1 3300 psi (22.8 MPa, 228 bar) Maximum Working Pressure Read all warnings and instructions ✓ 248663 ✓ ✓ 248664 ✓ 248665 ✓ ✓ 248666 310813 309639 309250 309640 Graco Inc. P.O. Box 1441 Minneapolis, MN 55440-1441 Copyright 2005, Graco Inc. is registered to I.S. EN ISO 9001...
- Page 2 Warning Warning The following warnings include general safety information for this equipment. Further product specific warnings may be included in the text where applicable. WARNING FIRE AND EXPLOSION HAZARD Flammable fumes, such as solvent and paint fumes, in work area can ignite or explode. To help prevent fire and explosion: •...
- Page 3 Do not alter or modify equipment. • For professional use only. • Use equipment only for its intended purpose. Call your Graco distributor for information. • Route hoses and cables away from traffic areas, sharp edges, moving parts, and hot surfaces. •...
- Page 4 English French German Spanish Italian Engine controls Engine ON/OFF switch Pump On/Off Switch Pressure control Prime valve & Filter Suction tube Pump Drain hose Trigger Lock 310802A...
- Page 5 Setup Setup Connect appropriate Graco Connect other end of hose to Tighten securely. Remove tip guard. high-pressure hose to gun. sprayer. Tighten securely. 310802A...
- Page 6 Setup Install clean inlet strainer. Check engine oil level. Add Fill fuel tank. Attach sprayer grounding Fill throat packing nut with SAE 10W-30 (summer) or clamp to earth ground. TSL to extend pump life. Do 5W-30 (winter), if neces- this each time you spray sary.See Honda Engines and store.
- Page 7 Startup Startup Place suction tube and drain Turn prime valve down. Set pump switch OFF. tube in grounded metal pail Turn pressure control coun- partially filled with flushing terclockwise to lowest pres- fluid. Attach ground wire to sure. pail and to earth ground. 310802A...
- Page 8 Startup Start engine Move fuel valve to open Move choke to closed Set throttle to fast Set engine switch to ON 310802A...
- Page 9 Startup Set pump switch ON. - Pump/clutch is now active - Pull starter rope After engine starts, move Set throttle to desired setting choke to open 310802A...
- Page 10 Startup Increase pressure enough to Take spray gun trigger safety Hold gun against grounded Inspect fittings for leaks. Do not start pump stroking and allow metal flushing pail. Trigger stop leaks with your hand or a rag! fluid to circulate for 15 sec- gun and increase fluid pres- If leaks occur, turn sprayer OFF onds;...
-
Page 11: Switchtip And Guard Assembly
Startup SwitchTip and Guard Assembly Place siphon tube in paint Trigger gun again into flush- Put trigger safety ON. Screw assembly onto gun. pail ing fluid pail until paint Insert SwitchTip. Insert Hand tighten. appears. Assemble tip and seat and OneSeal. guard, page 11. -
Page 12: Clearing Tip Clogs
ti4138a Startup ti5402a ti5402a ti5259a ti5260a ti5403a ti5403a Spray Test Pattern Clearing Tip Clogs Trigger gun and spray test Hold gun perpendicular, Release trigger, put trigger Put trigger safety ON, pattern. Slowly adjust pres- 10-12 in. (25-30 cm) from safety ON. Rotate return SwitchTip to original sure to eliminate heavy surface. -
Page 13: Pressure Relief
Pressure Relief Pressure Relief Set pump valve OFF. Turn pressure to lowest set- Turn prime valve down Remove guard and SwitchTip Turn engine OFF. ting. Trigger gun into pail to relieve pressure. 310802A... - Page 14 Cleanup Cleanup Do Pressure Relief, Clean filter, guard and Remove siphon tube set Turn engine ON and start page13. SwitchTip in flushing fluid. from paint and place in engine. Unscrew bowl, remove fil- flushing fluid. Set pump valve ON. ter. Assemble without filter. Use water for water base Turn prime valve horizontal.
- Page 15 Cleanup ti5275a PAINT FLUSH Hold gun against paint pail. Move gun to flushing pail, Turn prime valve down and Raise siphon tube above Take trigger safety OFF. hold gun against pail, trig- allow flushing fluid to circu- flushing fluid and run Turn pressure control up ger gun to thoroughly flush late for approximately 20...
- Page 16 Cleanup ti2895a Pump Armor Caution: If flushing with water, Close prime valve. Trigger Install filter into filter bowl. Clean tip, guard and gas- do not leave water in sprayer. gun into flushing pail to Make sure plastic center ket with a soft bristle brush Flush again with mineral spirits, purge fluid from hose.
- Page 17 With the exception of any special, extended, or limited warranty published by Graco, Graco will, for a period of twelve months from the date of sale, repair or replace any part of the equipment determined by Graco to be defective.
- Page 18 Warranty / Garantie / Garantía / Garanzia / Garantia TO PLACE AN ORDER, contact your Graco distributor, or call 1-800-690-2894 to identify the nearest distributor. All written and visual data contained in this document reflects the latest product information available at the time of publication.
Need help?
Do you have a question about the GMAX 3400 and is the answer not in the manual?
Questions and answers