Table of Contents
Advertisement
Available languages
Available languages
Quick Links
Converter Module Type
AJ65VBTCU-68DAVN
Thank you for buying the programmable controller MELSEC Series
Prior to use, please read both this manual and detailed manual
thoroughly and familiarize yourself with the product.
© 2003 MITSUBISHI ELECTRIC CORPORATION
Digital-Analog
User's Manual
MODEL AJ65V-68DAN-U-HW
MODEL
CODE
IB(NA)-0800252-H(2207)MEE
(Hardware)
13JP20
Advertisement
Table of Contents

Related Manuals for Mitsubishi Electric AJ65VBTCU-68DAVN


Summary of Contents for Mitsubishi Electric AJ65VBTCU-68DAVN
- Page 1 User's Manual (Hardware) Thank you for buying the programmable controller MELSEC Series Prior to use, please read both this manual and detailed manual thoroughly and familiarize yourself with the product. MODEL AJ65V-68DAN-U-HW MODEL 13JP20 CODE IB(NA)-0800252-H(2207)MEE © 2003 MITSUBISHI ELECTRIC CORPORATION...
- Page 2 SAFETY PRECAUTIONS (Read these precautions before using this product.) Before using this product, please read this manual and the relevant manuals carefully and pay full attention to safety to handle the product correctly. These precautions apply only to this equipment. Refer to the user's manual of the CPU module to use for a description of the programmable controller system safety precautions.
- Page 3 [Design Precautions] WARNING ● Install a safety circuit external to the programmable controller that keeps the entire system safe even when there are problems with the external power supply or the programmable controller. Otherwise, trouble could result from erroneous output or erroneous operation. (1) The status of analog output changes depending on the setting of various functions that control the analog output.
- Page 4 [Wiring Precautions] CAUTION ● Shut off the external power supply for the system in all phases before wiring. Failure to do so may result in damage to the product. ● Always ground the FG terminal to the protective ground conductor. Not doing so can cause a malfunction.
- Page 5 [Starting and Maintenance Precautions] CAUTION ● Do not touch any pin while power is on. Doing so will cause malfunction. ● Shut off the external power supply for the system in all phases before cleaning the module. Failure to do so may cause the module to fail or malfunction. ●...
- Page 6 PRÉCAUTIONS DE SÉCURITÉ (Lire ces précautions avant toute utilisation du produit.) Avant d'utiliser ce produit, lire attentivement ce manuel ainsi que les manuels auxquels il renvoie, et toujours considérer la sécurité comme de la plus haute importance en manipulant le produit correctement. Ces précautions ne concernent que cet équipement.
- Page 7 [Précautions lors de la conception] AVERTISSEMENT ● Prévoir un circuit de sécurité extérieur à l'automate programmable permettant de garantir la sécurité de l'ensemble du système même en cas de problème avec l'alimentation externe ou avec l'automate programmable. Faute de quoi, une sortie erronée ou une anomale de fonctionnement peuvent être source de problèmes.
- Page 8 [Précautions d'installation] ATTENTION ● Chaque produit doit être utilisé dans un environnement conforme aux "spécifications générales" exposées dans la documentation détaillée.L'utilisation de l'automate programmable hors des conditions prévues dans les spécifications générales peut être à l'origine d'un choc électrique, d'un départ de feu ou d'un dysfonctionnement, ou peut endommager ou détériorer le produit.
- Page 9 [Pécautions de câblage] ATTENTION ● Couper l'alimentation externe du système sur toutes les phases avant de commencer à câbler. Faute quoi, le produit risquerait d'être endommagé. ● Toujours mettre à la masse la borne FG sur le conducteur de protection de terre.
- Page 10 [Précautions de démarrage et de maintenance] ATTENTION ● Ne pas toucher à la broche quand l'appareil est sous tension. Cela pourrait être à l'origine de dysfonctionnements. ● Avant de nettoyer le module, couper l'alimentation externe du système sur toutes les phases. Le non-respect de cette précaution peut être à...
- Page 11 PRODUCTs are required. For details, please contact the Mitsubishi Electric representative in your region. (3) Mitsubishi Electric shall have no responsibility or liability for any problems involving programmable controller trouble and system trouble caused by DoS attacks, unauthorized access, computer viruses, and other cyberattacks.
- Page 12 Section 2.1 This manual confers no industrial property rights or any rights of any other kind, nor does it confer any patent licenses. Mitsubishi Electric Corporation cannot be held responsible for any problems involving industrial property rights which may occur as a result of using the contents noted in this manual.
-
Page 13: Table Of Contents
CONTENTS 1. OVERVIEW ....................1 2. SPECIFICATION .................... 1 Performance specifications ..............1 3. NAMES AND SETTING OF PARTS............... 4 4. LOADING AND INSTALLATION ..............8 Precautions when handling ..............8 Installation environment ................ 8 5. DATA LINK CABLE WIRING ................9 Instructions for handling the CC-Link dedicated cables ...... - Page 14 MANUAL The following manuals are also related to this product. Order them if necessary. Detailed Manual Manual number Manual name (Model code) Digital-Analog Converter Module type AJ65VBTCU-68DAVN User's SH-080402E Manual (13JR66) Related Manuals Manual number Manual name (Model code) CC-Link System Master/Local Module Type AJ61BT11/A1SJ61BT11...
-
Page 15: Overview
1. OVERVIEW This user's manual explains the specifications, names and setting of parts, wiring and others of Type AJ65VBTCU-68DAVN digital-analog converter module (hereafter abbreviated to the "AJ65VBTCU-68DAVN") which is used as a remote device station of a CC-Link system. Confirm if the following items are included in the package after unpacking. - Page 16 Item AJ65VBTCU-68DAVN Number of analog output 8 channels/module points Remote device station CC-Link station type (Ver.1 remote device station, Ver.2 remote device station) Ver.1 remote device station (Ver.1 compatible slave station) setting: 3 stations (32 points for RX and RY, 12 points for RWr and RWw) Number of occupied stations Ver.2 remote device station (Ver.2 compatible slave station) setting:...
- Page 17 Item AJ65VBTCU-68DAVN One-touch Communication line : Ver. 1.10 compatible CC-Link dedicated cable connector for communication 0.5mm (20AWG) [2.2 to 3.0], shielded wire 0.5mm (20AWG) Connecteur Ligne de communication : câble dédié CC-Link compatible Ver. 1,10 0,5mm instantané pour (20AWG) [φ2,2 à 3,0], fil de blindage 0,5mm...
-
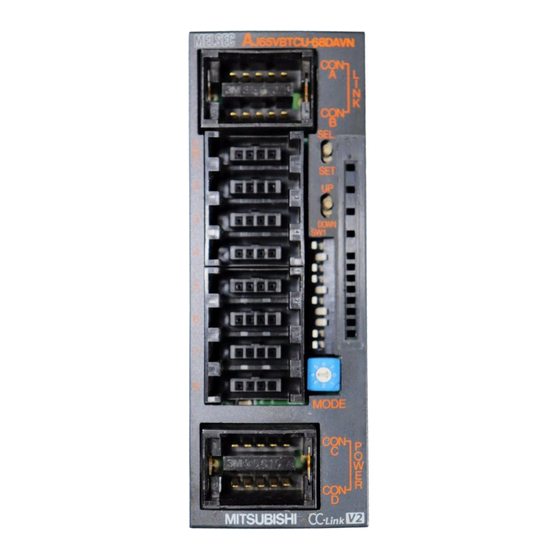
Page 18: Names And Setting Of Parts
3. NAMES AND SETTING OF PARTS The name of each part in the AJ65VBTCU-68DAVN is shown. [Pin layout and signals name] Pin arrangement Pin No. Signal name CONA,B CH V+ CONA CONB 1 to 8 CH COM CON1 CON2 +24V (UNIT) - Page 19 SELECT/SET switch. The switch to be used for selecting the mode among Ver. remote device station (Ver.- compatible slave station)/Normal mode/Test mode AJ65VBTCU-68DAVN 0: Normal mode Mode select Ver.1 remote device station 1: Test mode (User range setting 1) switch (Ver.1-compatible slave station)
- Page 20 Name and Description appearance Setting Switches Set Value Transmission Speed Transmission speed setting 156kbps switches 625kbps 2.5Mbps 5.0Mbps 10Mbps Always set the transmission speed within the above range. The switches are all factory-set to OFF. Making any other setting than the above will result in an error flickering the "L ERR." LED. Confirm the transmission speed setting switch numbers on the seal located on the side face of the connector for analog I/O.
- Page 21 Name and Description appearance One-touch One-touch connector for analog I/O connector for Connect a one-touch connector plug when wiring. analog I/O 11) DIN rail hook Used to mount the module to the DIN rail. Point After power-on, do not change the mode select switch setting. If you change it midway during operation, the setting at power-on is valid.
-
Page 22: Loading And Installation
4. LOADING AND INSTALLATION Precautions when handling The following is an explanation of handling precautions of the module. (1) Because the case of the module is made of resin, be careful not to drop it or expose it to strong impact. Installation environment Never install the module in the following environments: (1) Locations where the ambient temperature is outside the range of 0... -
Page 23: Data Link Cable Wiring
Connection of the CC-Link dedicated cables Raccordement des câbles dédiés CC-Link Connect the CC-Link dedicated cable between the AJ65VBTCU- 68DAVN and master module as shown below. Raccorder le câble dédié CC-Link entre AJ65VBTCU-68DAVN et le module maître comme illustré ci-dessous. - Page 24 One-touch connector plug for communication Online connector for (A6CON-L5P) communication (A6CON-LJ5P) One-touch connector plug with terminating resistor (A6CON-TR11(N)) Connect a wireless connector to an open connector for power 24VDC supply and FG. One-touch connector plug for power supply and FG (A6CON-PW5P/A6CON- PW5P-SOD) Online connector for power supply and FG (A6CON-PWJ5P)
- Page 25 English French One-touch connector plug for Fiche de connecteur rapide pour communication(A6CON-L5P) communication(A6CON-L5P) Online connector for communication(A6CON- Connecteur en ligne pour LJ5P) communication(A6CON-LJ5P) One-touch connector plug with terminating Fiche de connecteur rapide avec résistance resistor(A6CON-TR11(N)) d'extrémité (A6CON-TR11(N)) Fiche de connecteur instantané pour One-touch connector plug for power supply alimentation et FG(A6CON- and FG(A6CON-PW5P/A6CONPW5P-SOD)
- Page 26 Point • On this unit, use the Ver. 1.10-compatible CC-Link dedicated cable (FANC-110SBH, CS-110, FA-CBL200PSBH). You cannot use the Ver. 1.10-compatible CC-Link dedicated cables of other than the above types, CC-Link dedicated cables and CC-Link dedicated, high-performance cables. • The shield cable of the CC-Link dedicated cable should be connected to "SLD"...
-
Page 27: Wiring
AC side surge or conductivity. Utiliser des câbles séparés pour le courant alternatif et les signaux externes en entrée du AJ65VBTCU-68DAVN de façon à éviter les effets des phénomènes de surtension et de conductivité du côté courant alternatif. -
Page 28: Module Connection Example
Module connection example Motor drive unit or like CH.1 CON1 CH.1 V+ conversion CH.1 COM Motor drive unit or like CH.8 CON8 CH.8 V+ CH.8 COM English French D/A conversion Conversion N/A Motor drive unit or like Unité d'entraînement du moteur ou similaire *1 Use a two-core twist shielded line for the wiring. -
Page 29: How To Wire The One-Touch Connector Plug
7. HOW TO WIRE THE ONE-TOUCH CONNECTOR PLUG This section describes the way to wire the one-touch connector plug. Refer to the AJ65VBTCU-68DAVN Digital-Analog User's Manual for more information on the types and specifications of the one-touch connector plugs which conform to the AJ65VBTCU-68DAVN. - Page 30 (2) Checking the plug cover Check whether the plug cover is installed in the plug. Caution: Plug cover Plug body Before inserting the cable, do not push the plug cover into the plug. Once insulation- displaced, the plug cannot be reused. Metal contact (3) Inserting the cable Lift the back of the plug cover and insert the...
-
Page 31: External Dimension Diagram
8. EXTERNAL DIMENSION DIAGRAM 41 (1.61) 31 (1.22)* 67 (2.64) (0.14) 16.5 (0.65) *: This section should be 14.5mm (0.57inch) when an online connector is not installed. Unit: mm (inch) - Page 32 20 Waterford Office Park, 189 Witkoppen Road, Avenida Adelino Cardana, 293, 21 andar, Fourways, South Africa Bethaville, Barueri SP, Brazil Tel : +27-11-658-8100 Tel : +55-11-4689-3000 Germany MITSUBISHI ELECTRIC EUROPE B.V. German China MITSUBISHI ELECTRIC AUTOMATION (CHINA) Branch LTD. Mitsubishi-Electric-Platz 1, 40882 Ratingen, No.1386 Hongqiao Road, Mitsubishi Electric...
Need help?
Do you have a question about the AJ65VBTCU-68DAVN and is the answer not in the manual?
Questions and answers